This guide is designed to provide you with the necessary information to operate the different functions of our new payment terminal and transaction system. Here, you will find step-by-step instructions on setting up your terminal, navigate through its various functions and troubleshooting common issues.
Hardware Features
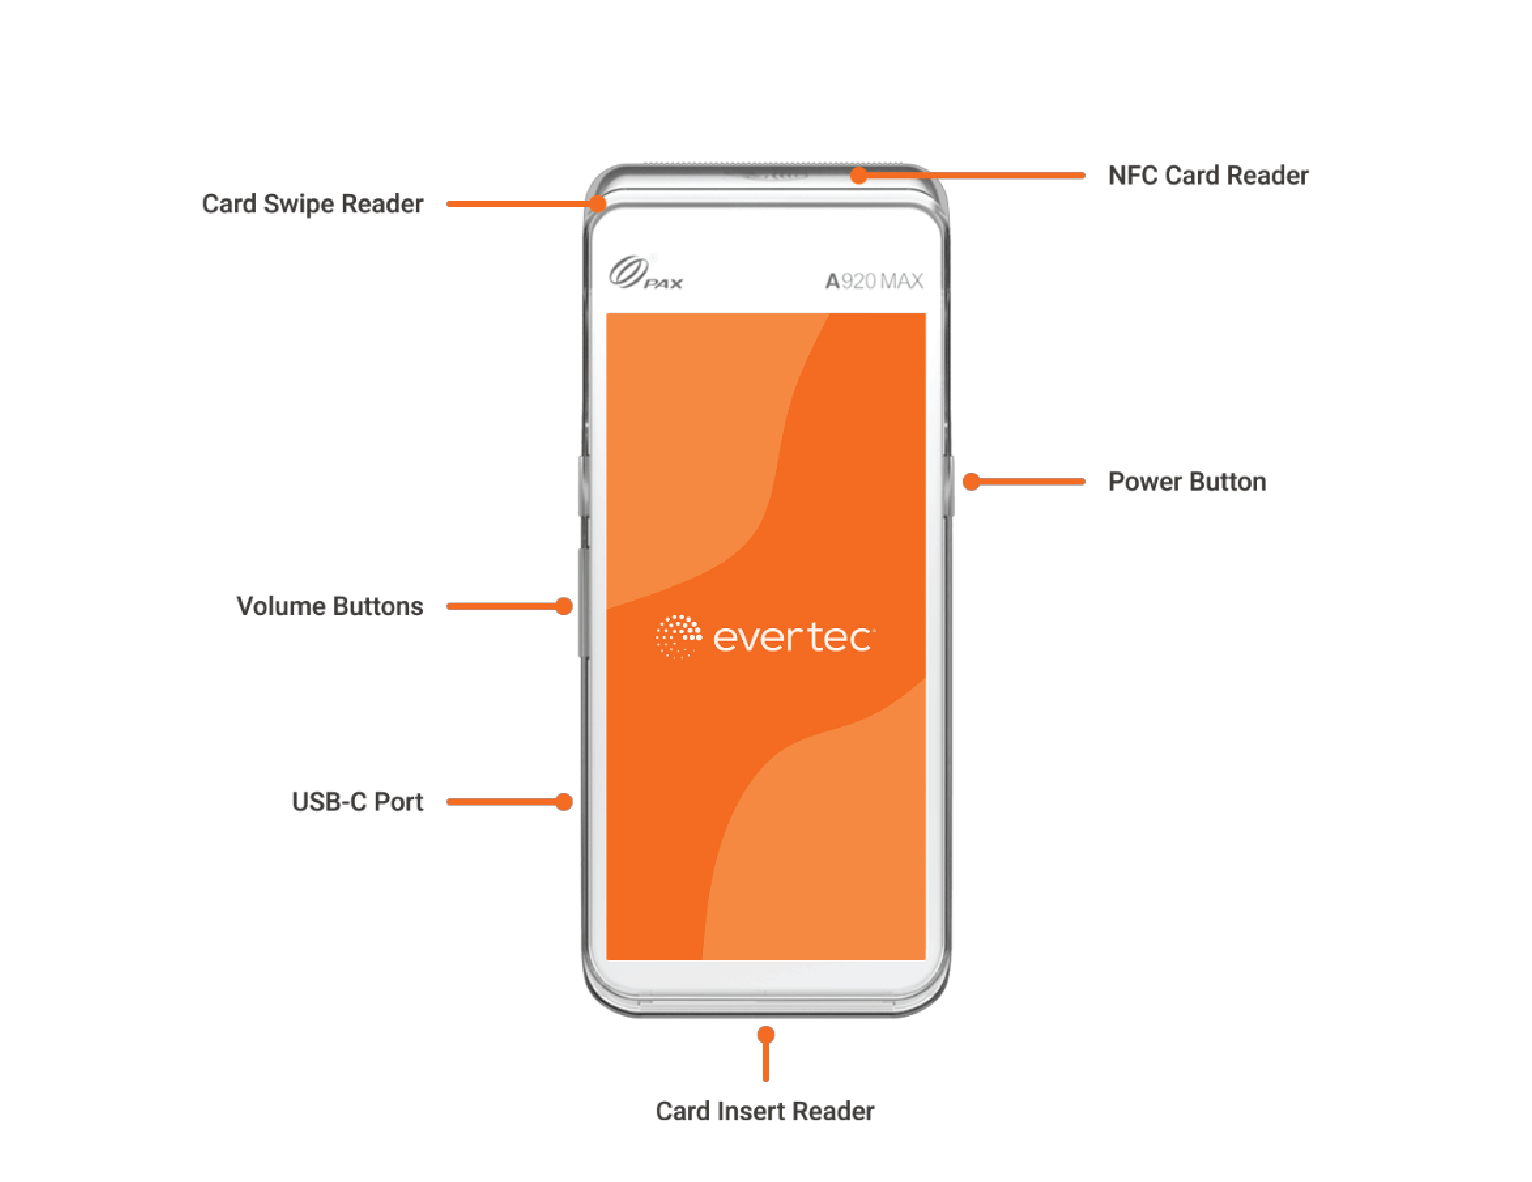
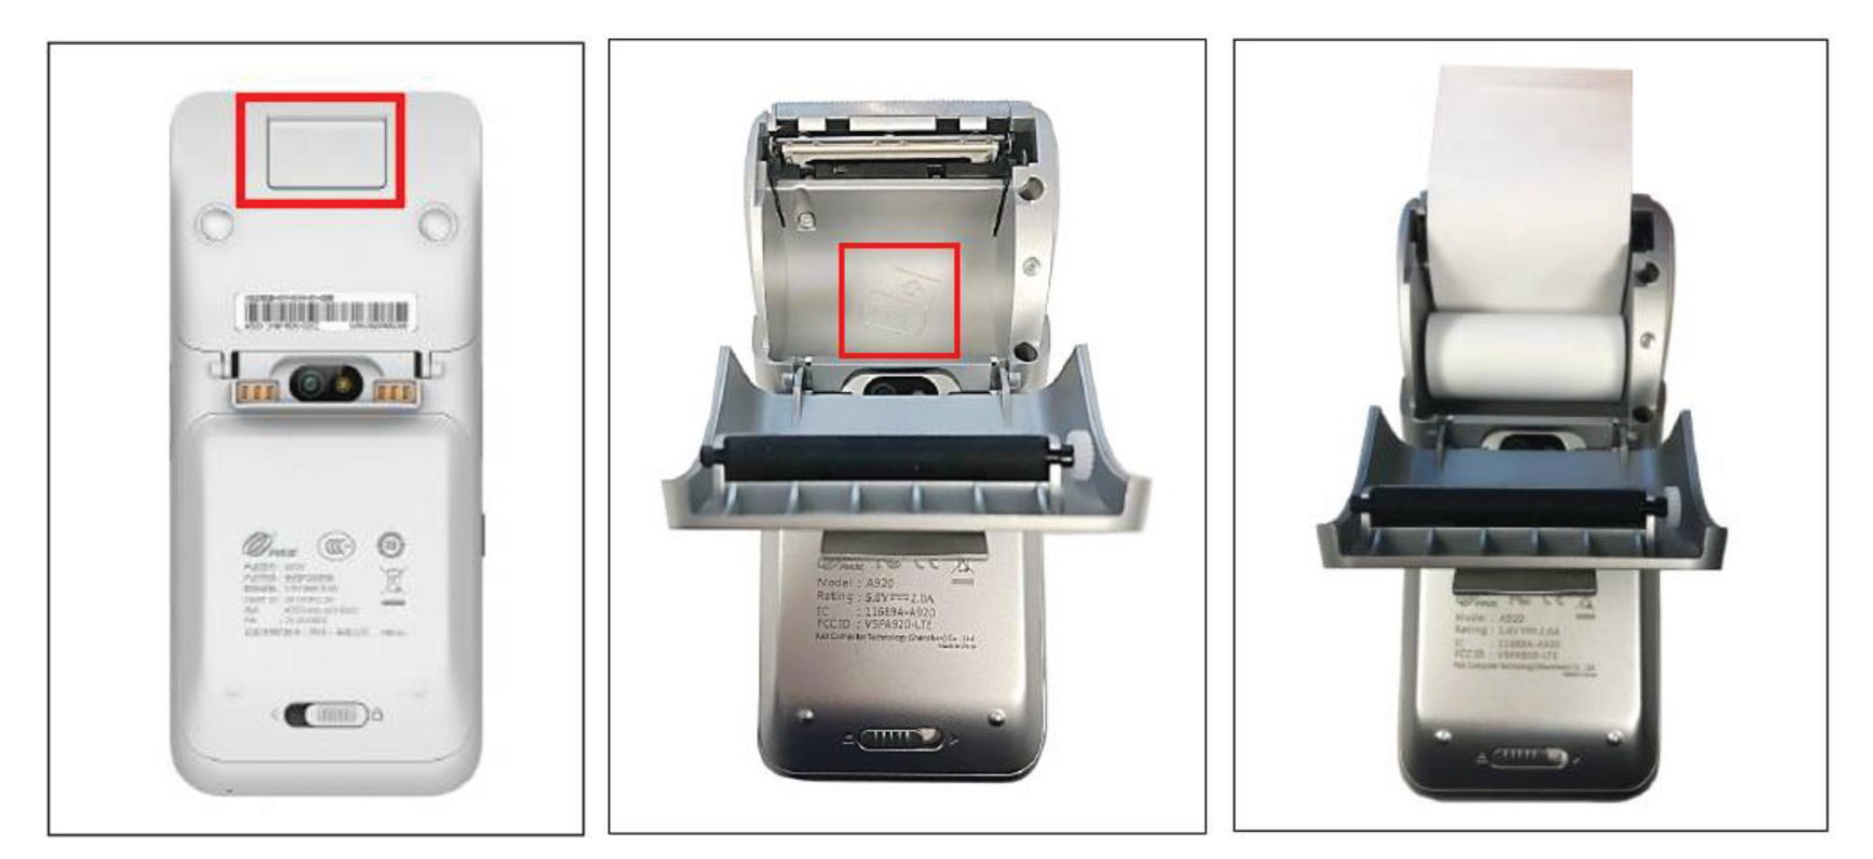
Pax A920 MAX Hardware Features
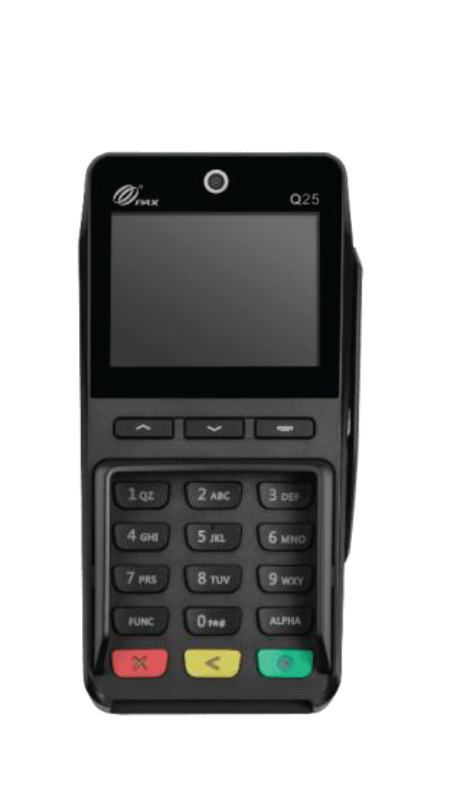
Pax A80 Hardware Features
External Pin Pad Q25 (optional) for A80 terminal
Paper Roll
The functionality of your POS Terminal is partially dependent on having paper available for receipt printing. If the terminal runs out of paper, it will not proceed with EBT and Cash transactions until the paper roll is replenished. We recommend keeping a regular check on the paper supply and maintaining an adequate stock of receipt paper rolls to avoid any disruption in your business operations. To order new paper rolls you can contact us at 787-751-1401.
A920 MAX Replacement Paper
Locate the printer door hatch on the bottom of the terminal and open the paper hatch.
Install paper roll according to the diagram inside with the paper coming out from the top of the roll.
Pull 6” paper from the roll. Carefully close the paper hatch until snaps into place.
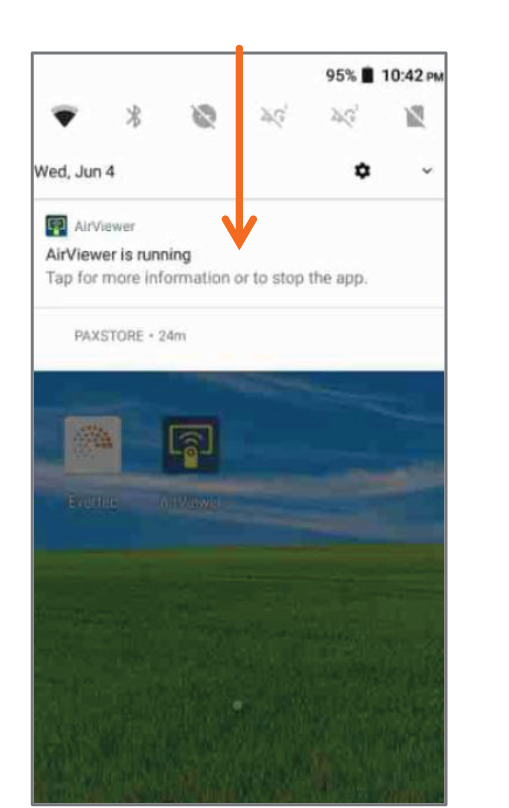
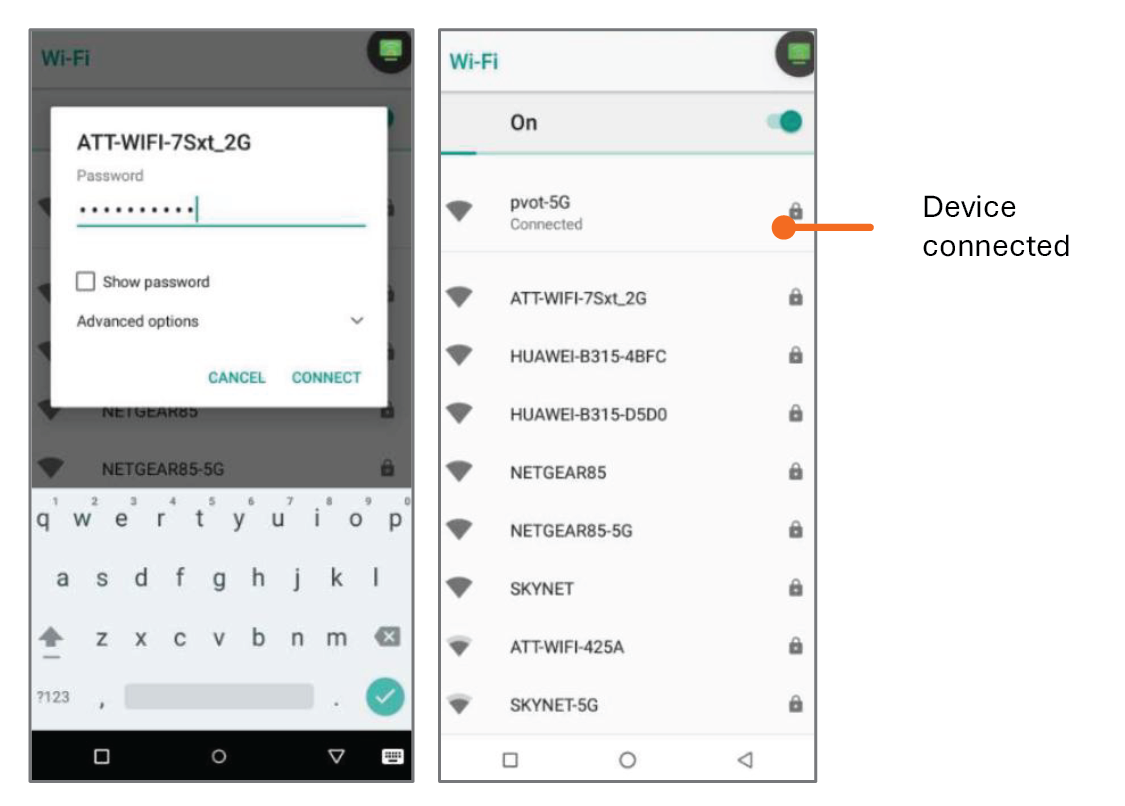
Internet Connection
This POS terminal relies on Internet connectivity, either through a mobile carrier or a Wi-Fi network, to process transactions and sync data in real time. If there is no active Internet connection, the functionality of the terminal will be significantly limited. To connect your terminal to a Wi-Fi network:
1
Swipe down from the notification bar and press the Wi-Fi connection button.
2
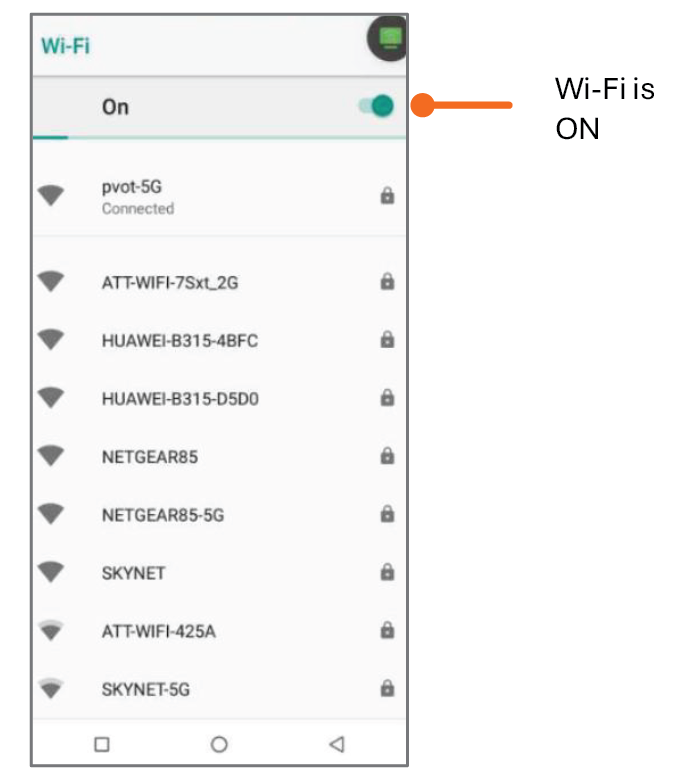
Ensure that Wi-Fi is turned on, and then select Wi-Fi. Choose your desired network from the list of available networks.
3
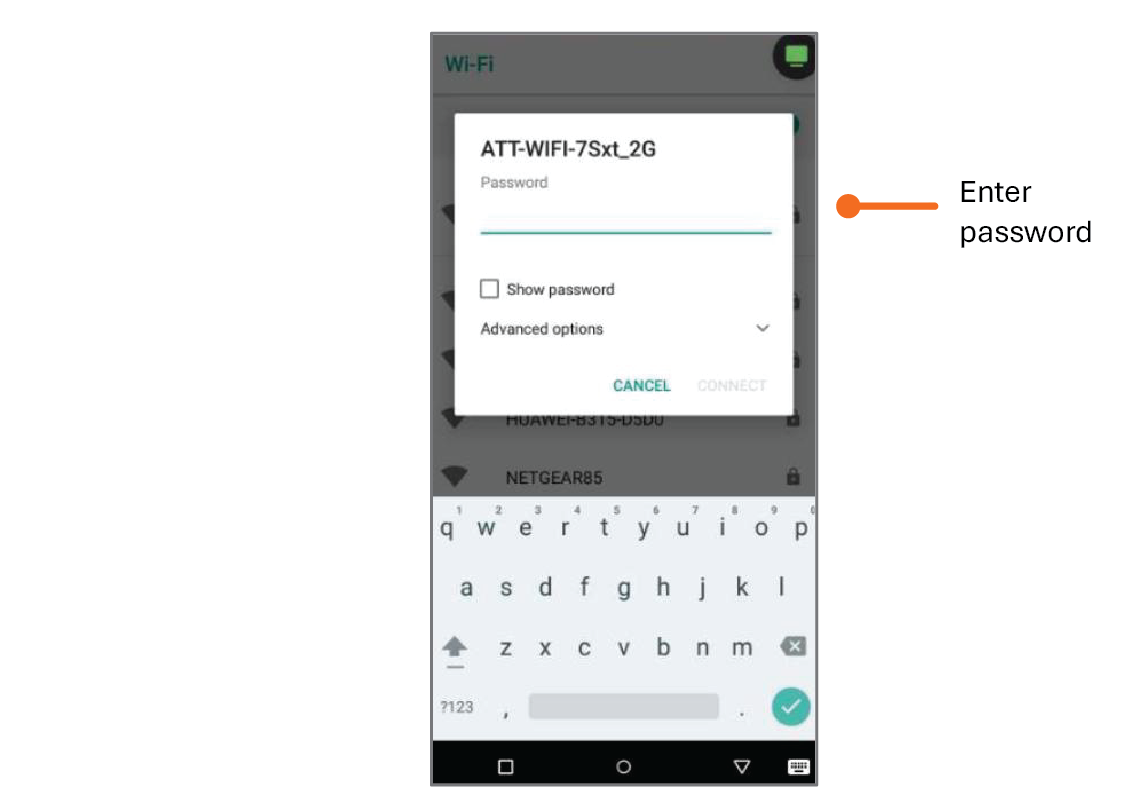
Enter the network password when prompted and select Connect.
4
A confirmation message will appear once you are successfully connected.
Regularly ensuring that your terminal maintains this connection is crucial for uninterrupted business operations. If your device is connected to a mobile carrier you don’t need to perform any steps or connect it to a Wi-Fi network, but it is still recommended.
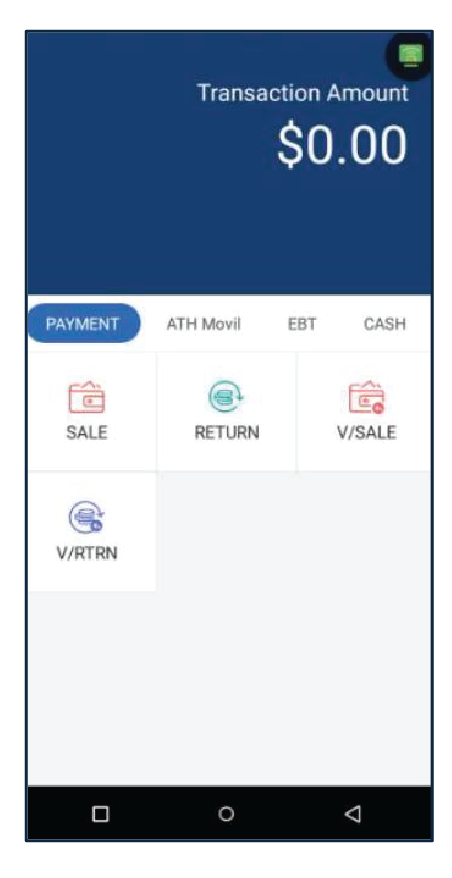
Payments
In this section, you will find information on how to process a sale using a credit card or debit card, apply automatic and manual taxes, add a tip, perform a manual entry transaction, process returns, void transactions, and handle voided returns.
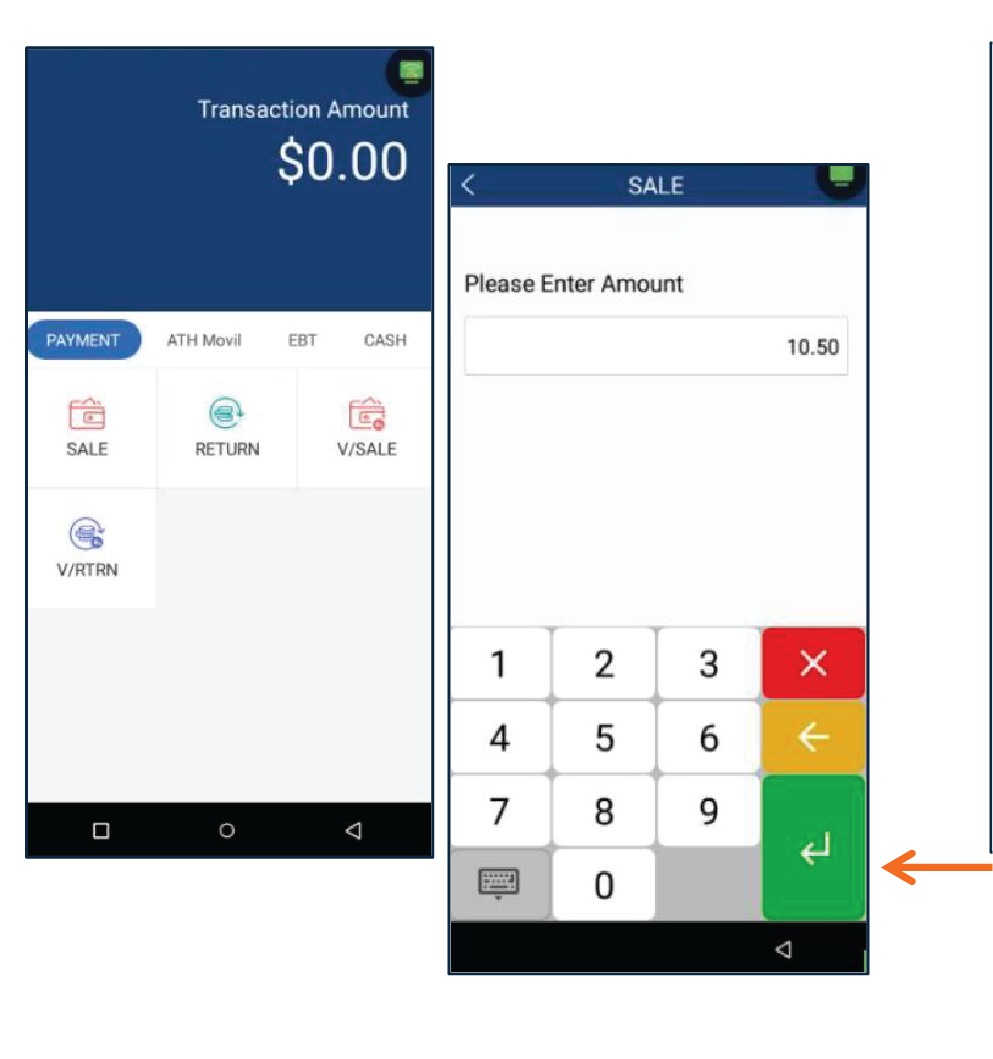
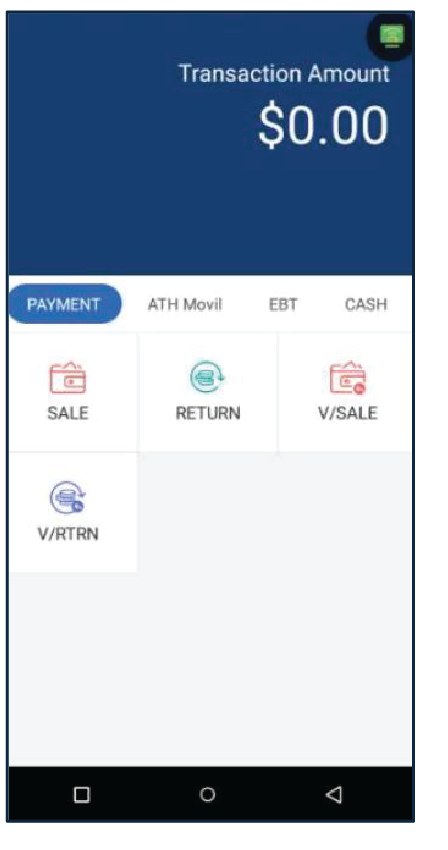
Sale
Sale with Automatic Taxes
Below are the steps to perform a sales transaction with taxes calculated automatically.
1
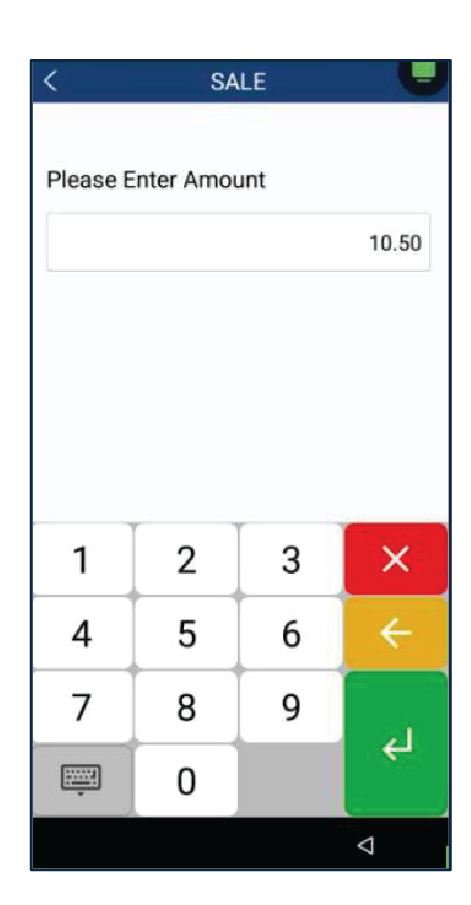
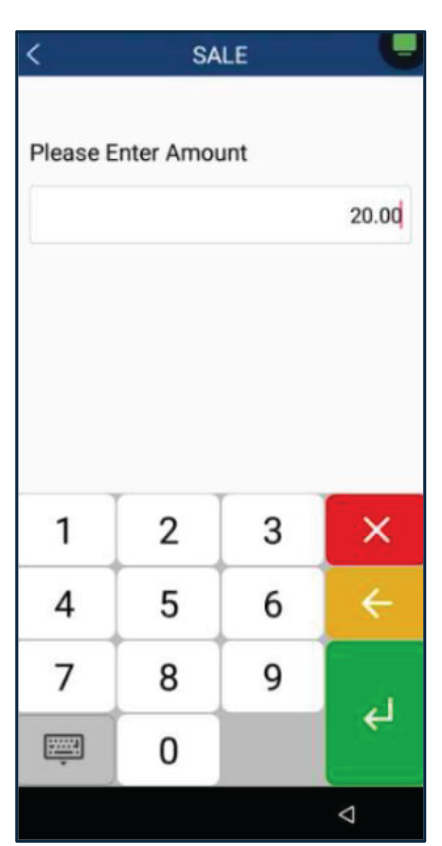
Press Evertec located in the main menu. Then, on the Payment section, press Sale.
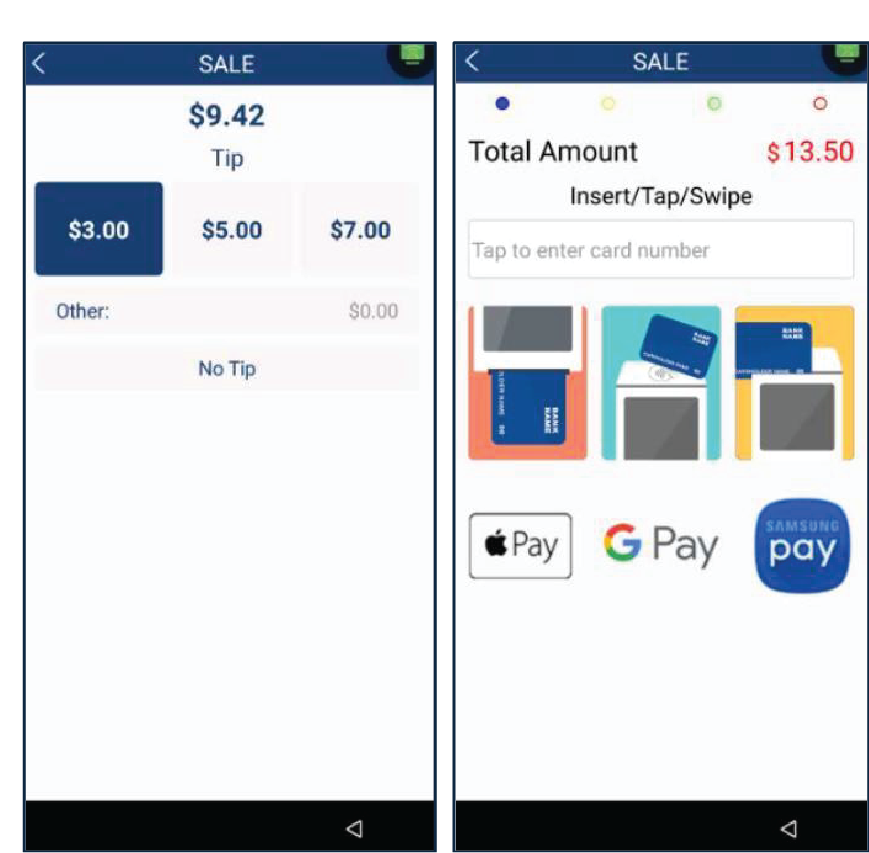
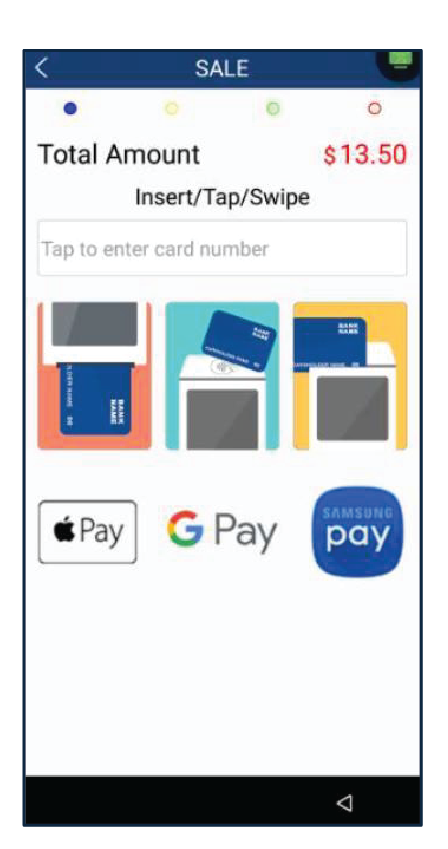
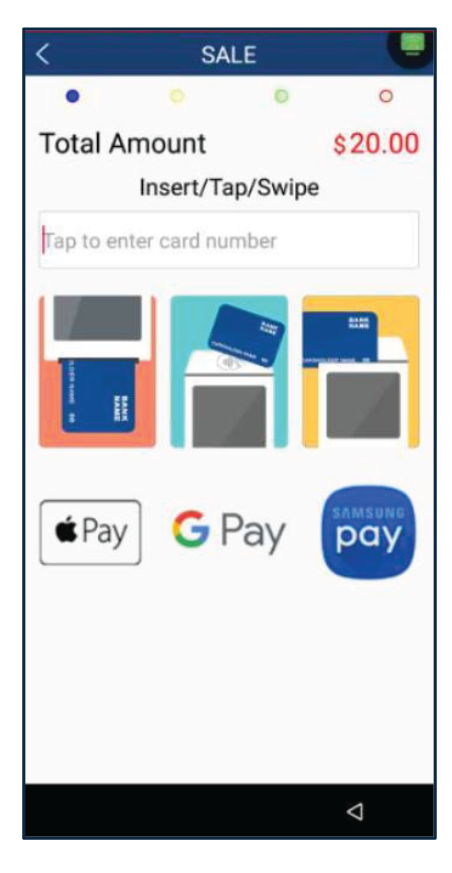
2
Enter the amount and add a Tip (If apply). On the insert/tap/swipe screen, the customer can pay with a credit card or a debit card.
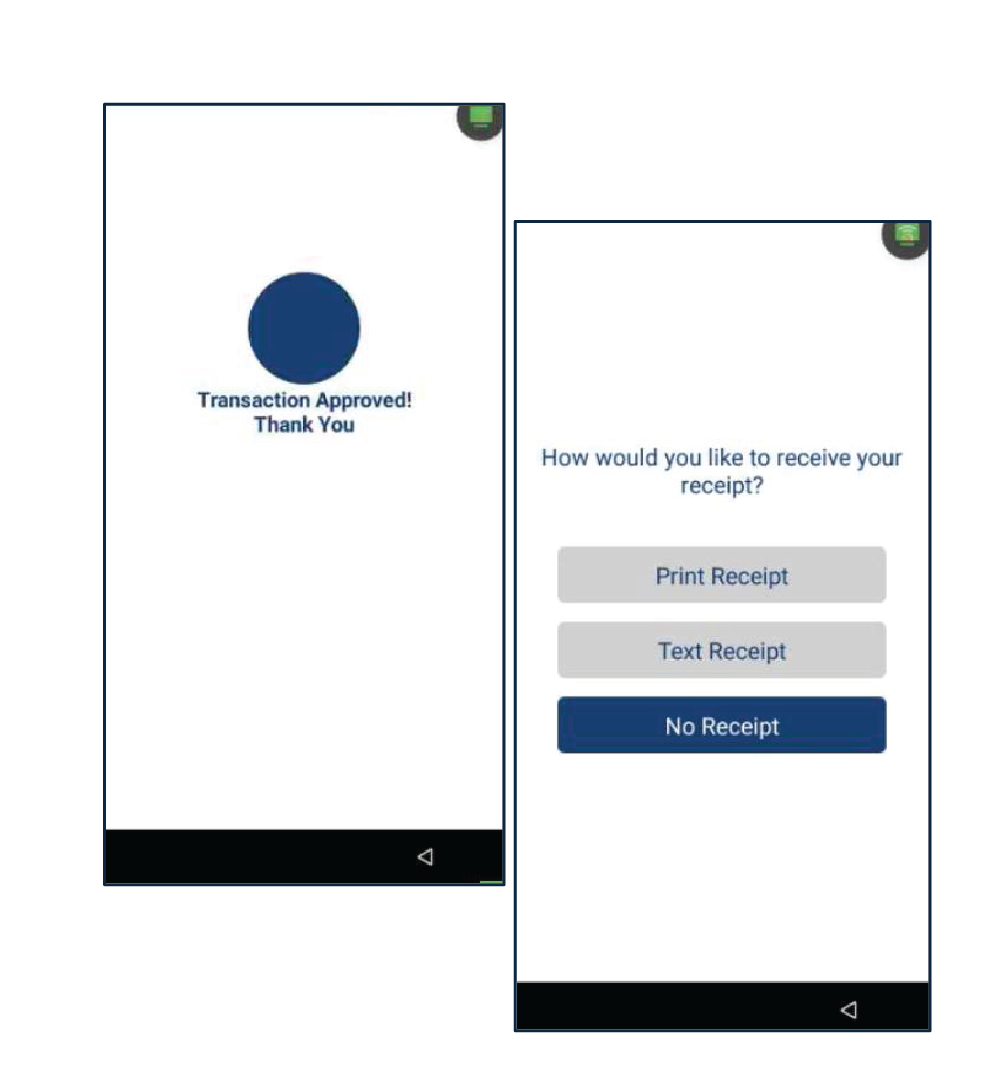
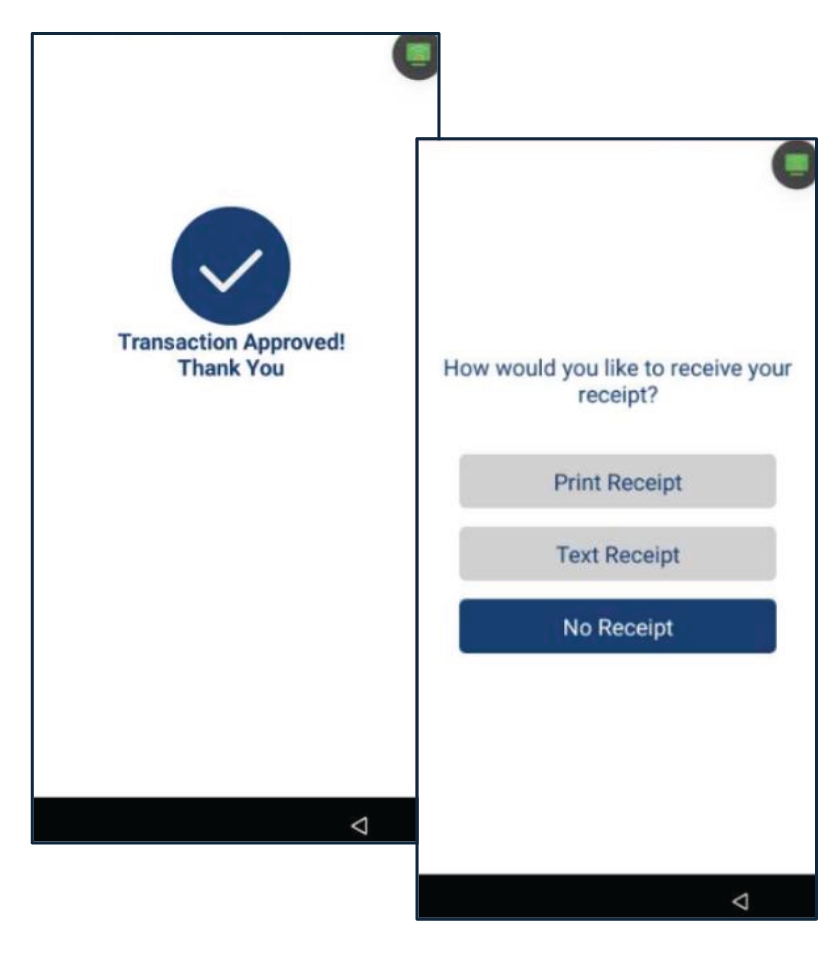
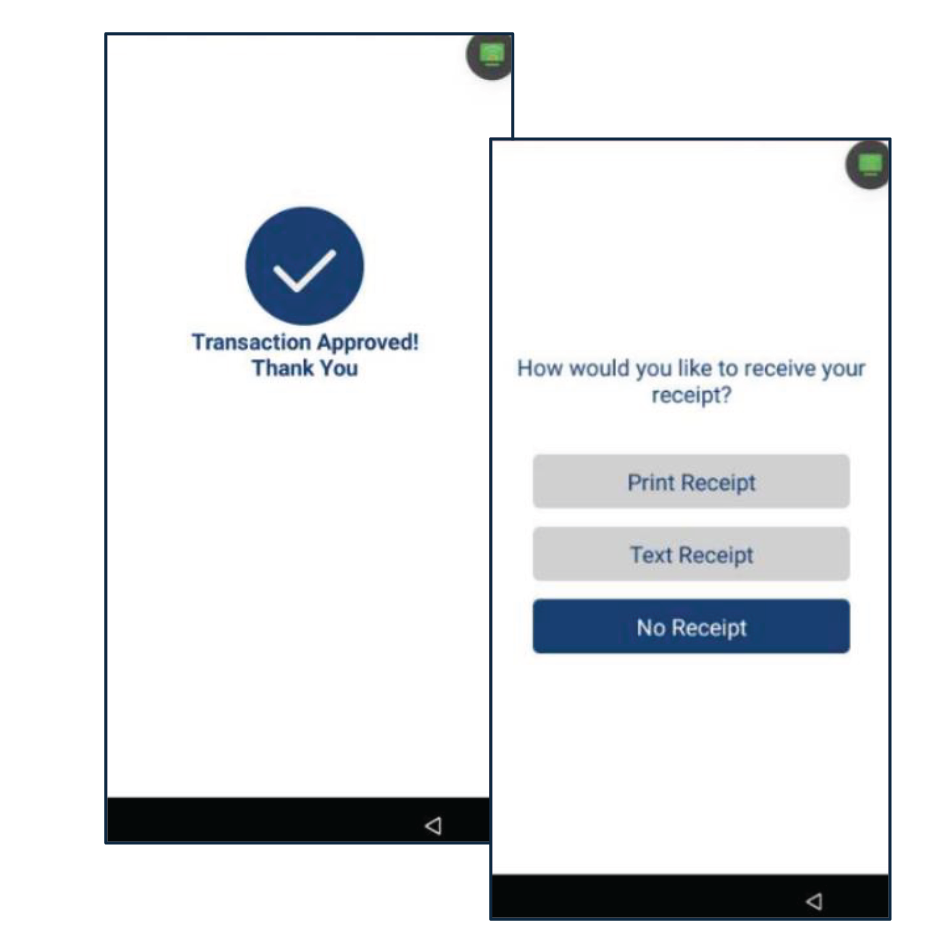
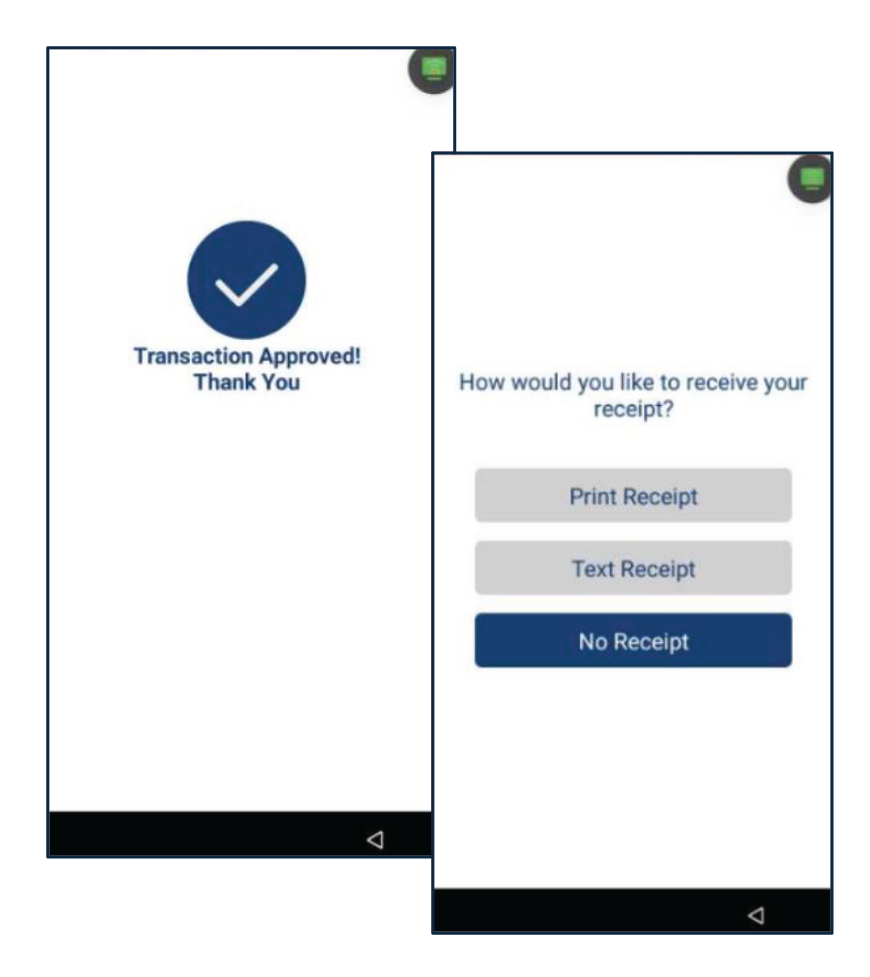
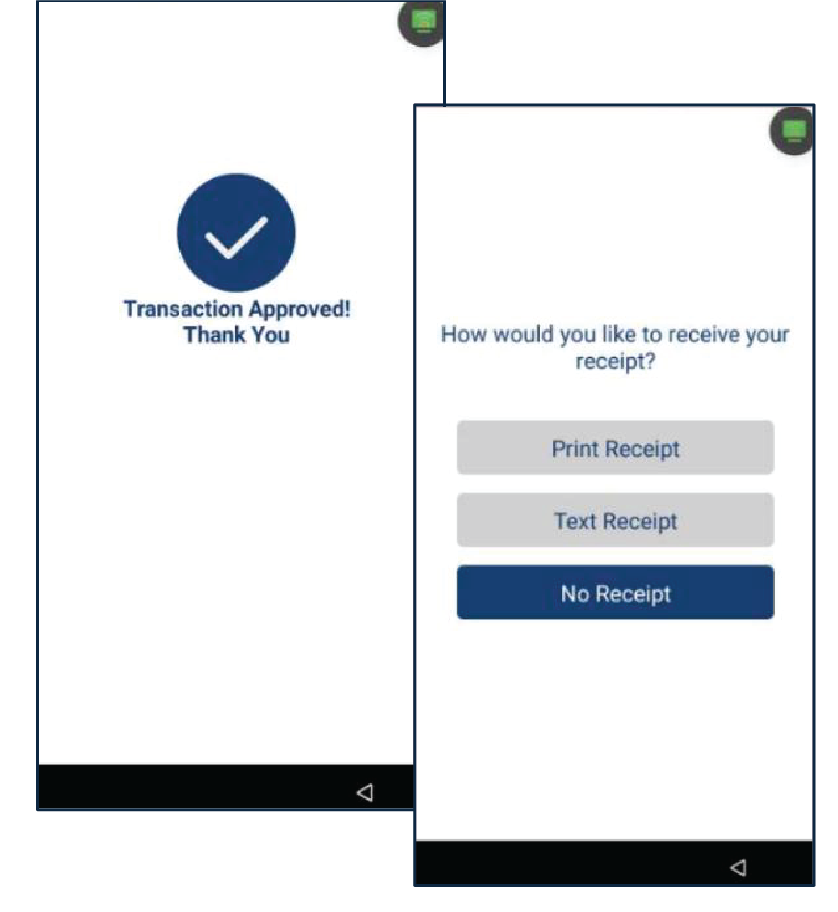
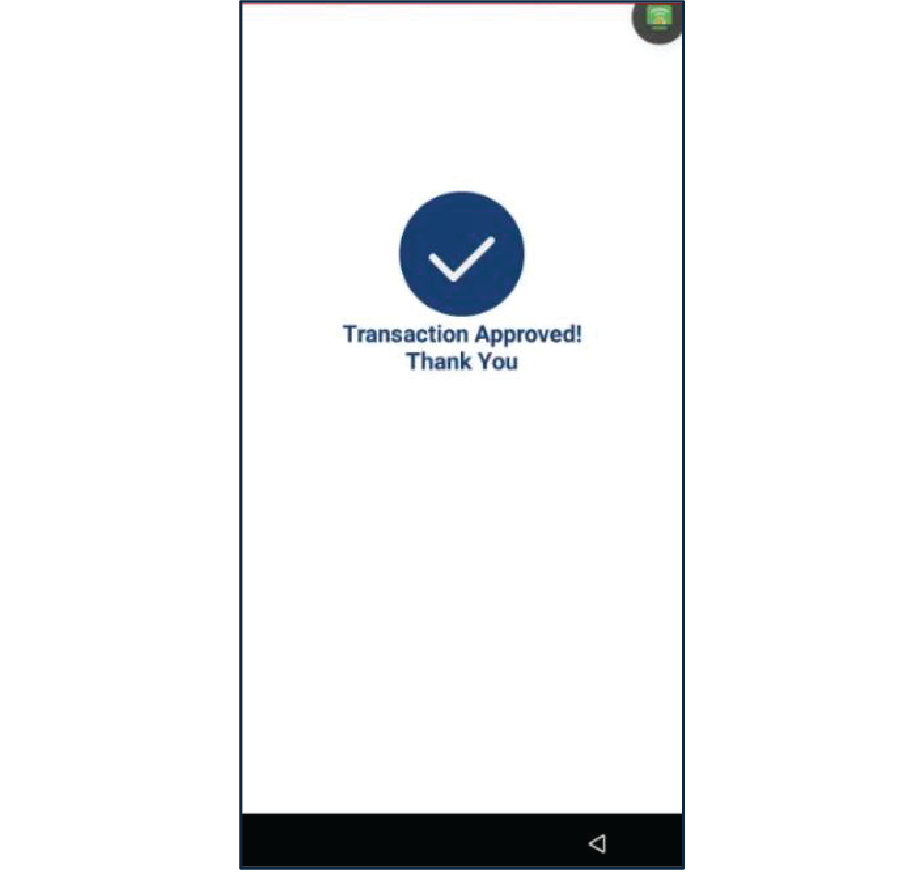
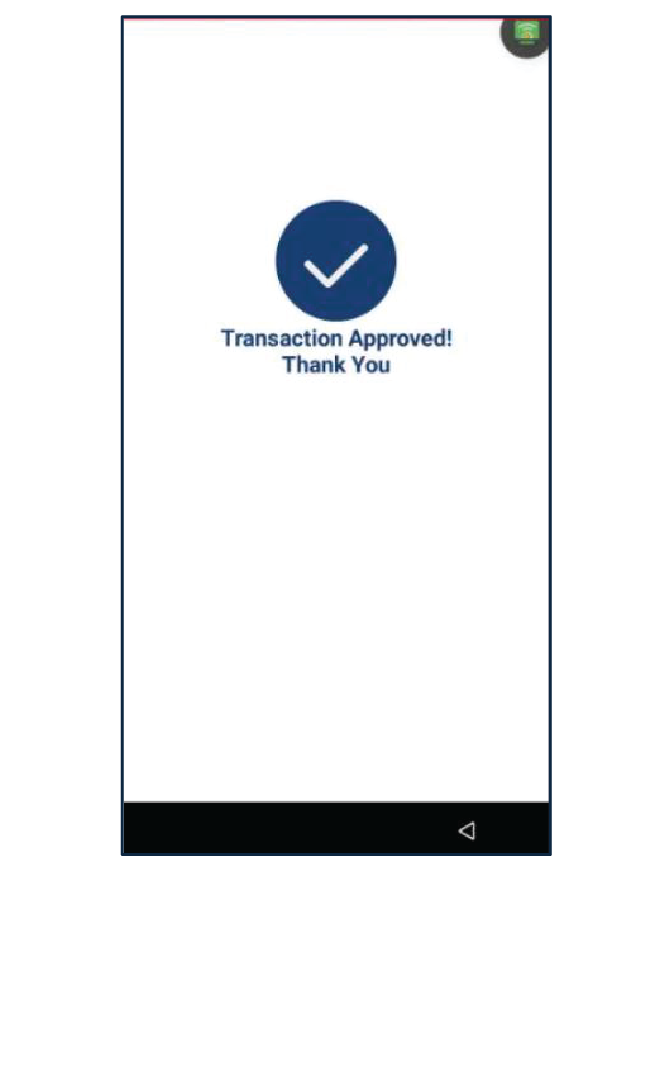
3
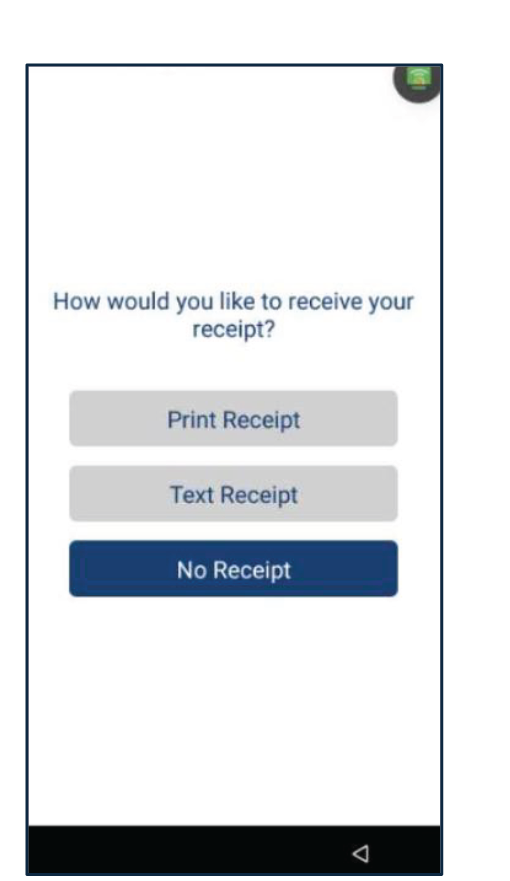
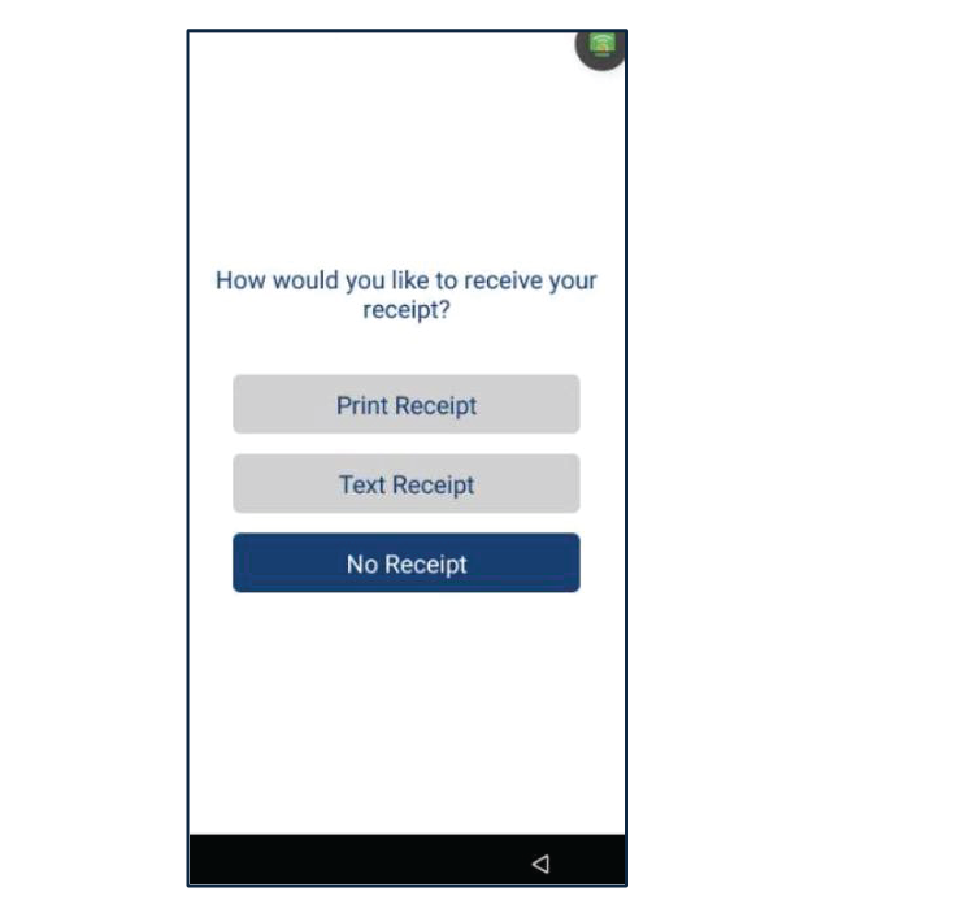
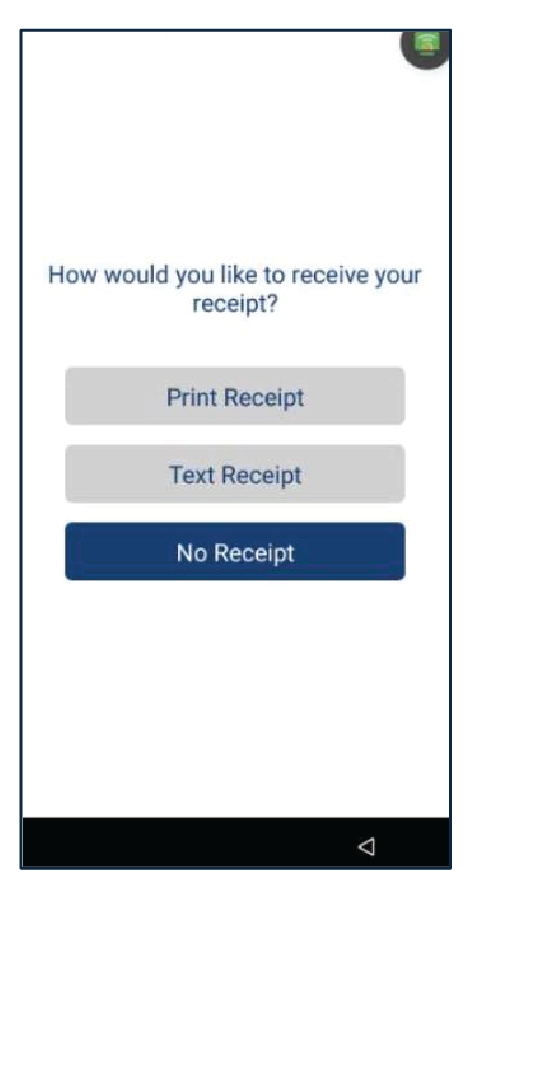
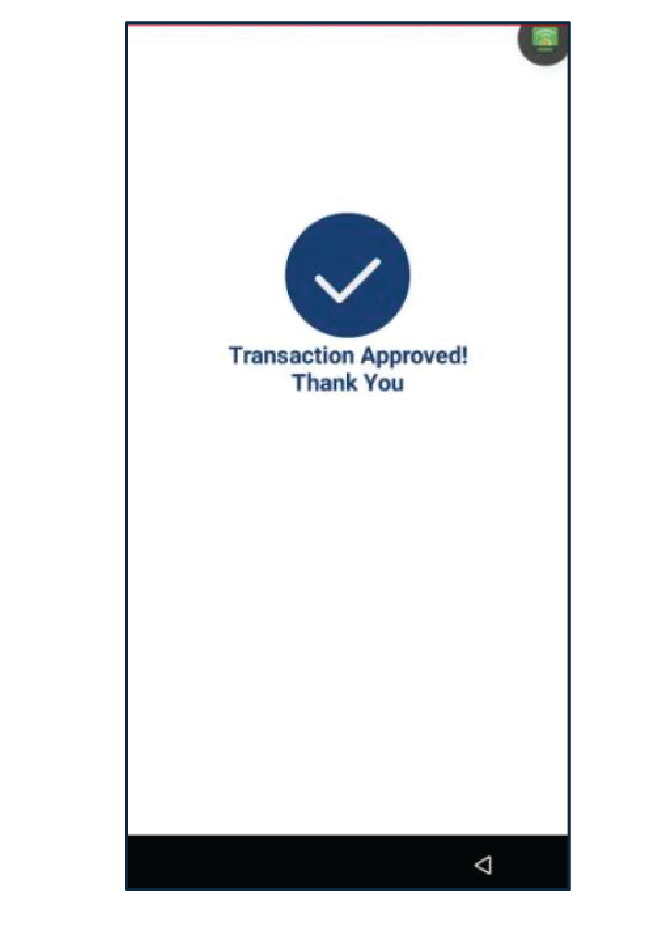
Once the transaction is completed, the terminal will display the payment result (Approved, Declined, etc.). Select the method for customer's copy receipt: Print Receipt, Text Receipt or No Receipt.
Sale with Manual Taxes
Below are the steps to perform a sales transaction with taxes entered manually.
1
Press Evertec located on the main menu. Then, on the Payment section, press Sale.
2
Enter the amount and taxes then, press Enter. Select tip if applies.
3
On the insert/swipe/tap screen, the customer can pay with a credit or debit card.
4
Once the transaction is completed, the terminal will display the payment result (Approved, Declined, etc.) Select the method for customer’s copy receipt: Print Receipt, Text Receipt or No Receipt.
Sales with Cashback
1
Press Evertec located on the main menu. Then, on the Payment section, press Sale.
2
Enter the amount and taxes (If applies) then, press Enter.
3
On the insert/swipe/tap screen, the customer can pay with a debit card.
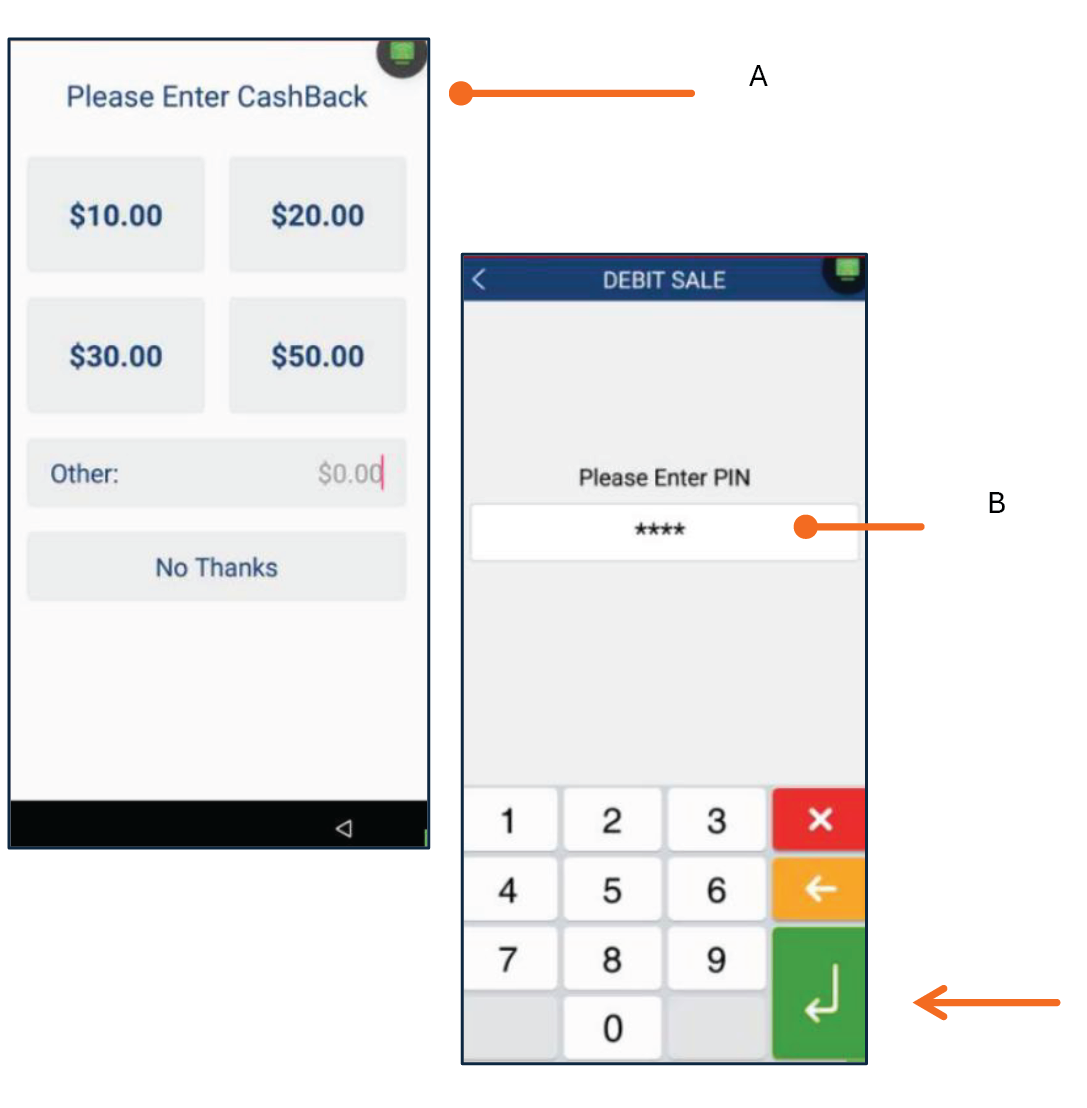
4
Enter CashBack, select between suggested amount, other amount or no thanks. Enter the pin number to continue.
5
Once the transaction is completed, the terminal will display the payment result (Approved, Declined, etc.). Select the method for customer’s copy receipt: Print Receipt, Text Receipt or No Receipt.
Sales with Manual Entry Transaction
Below the steps to complete a manual entry transaction with a credit card.
1
On the Payment section, press Sale. Enter the amount, taxes and tip.
2
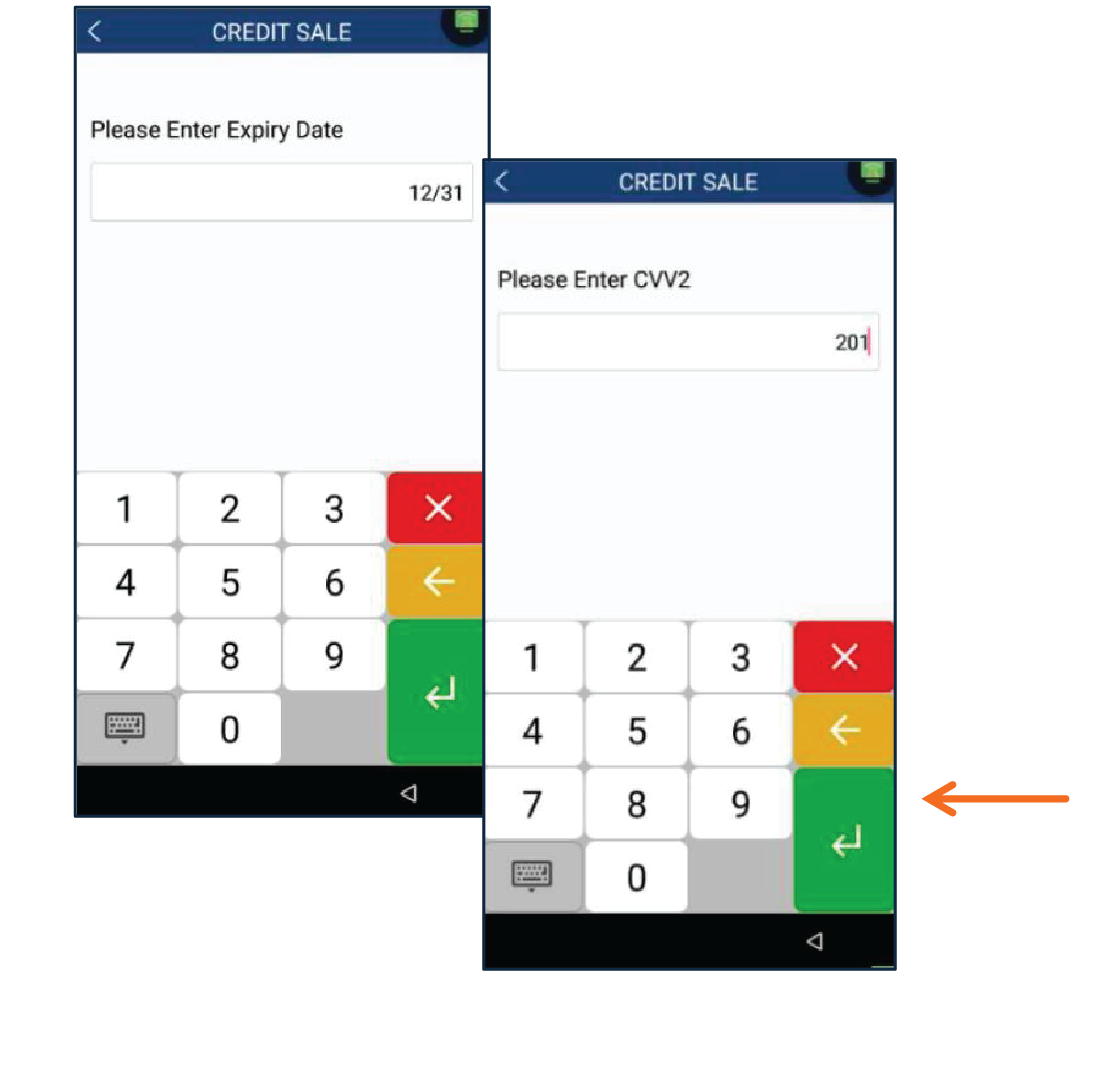
On the insert/tap/swipe screen, tap to enter the card number.
3
Enter expiry date and the CVC2.
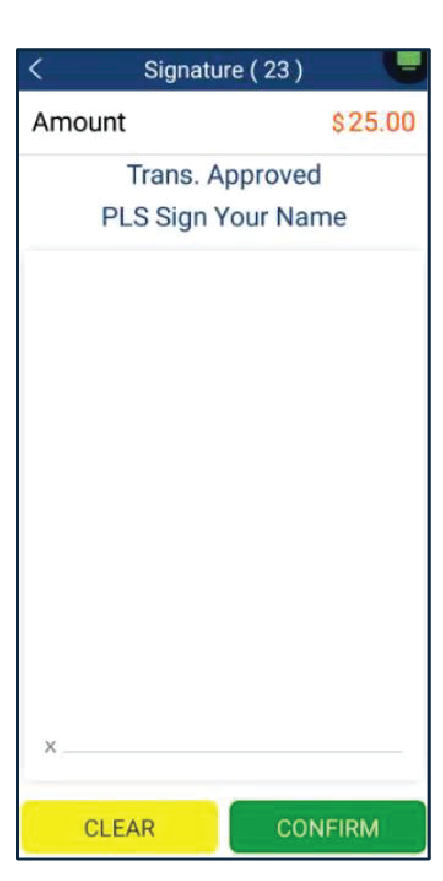
4
The terminal will present a signature request on the screen, or it will automatically proceed after 30 seconds.
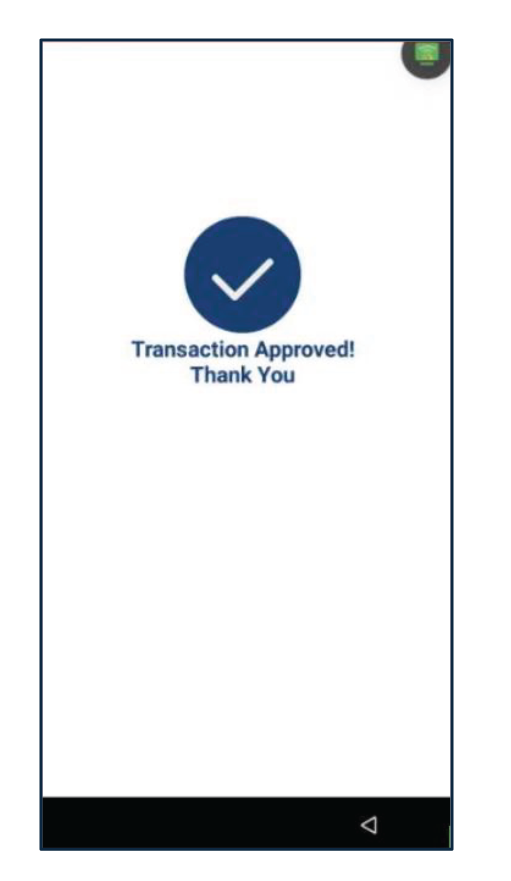
5
Once the transaction is completed, the terminal will display the payment result (Approved, Declined, etc.).
6
Select the method for customers copy receipt: Print Receipt, Text Receipt or No Receipt.
Return
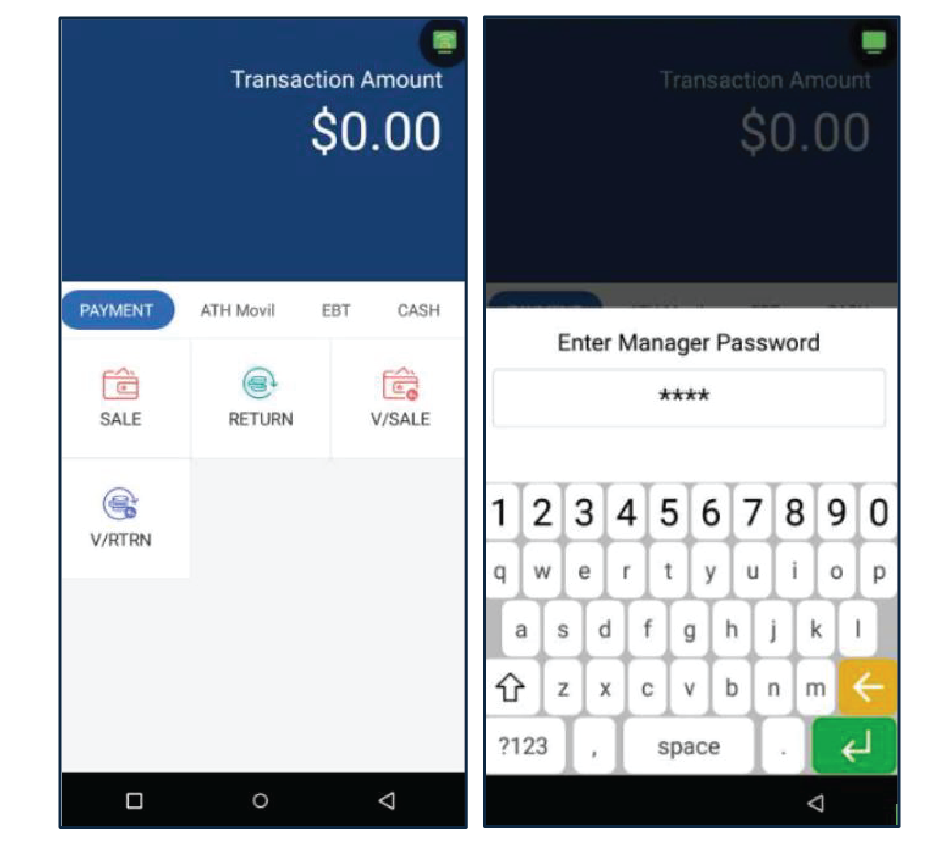
Below are the steps to perform a Refund. For this function the terminal will request a Manager Password.
1
Press Return, then enter the Manager Password and press Enter.
2
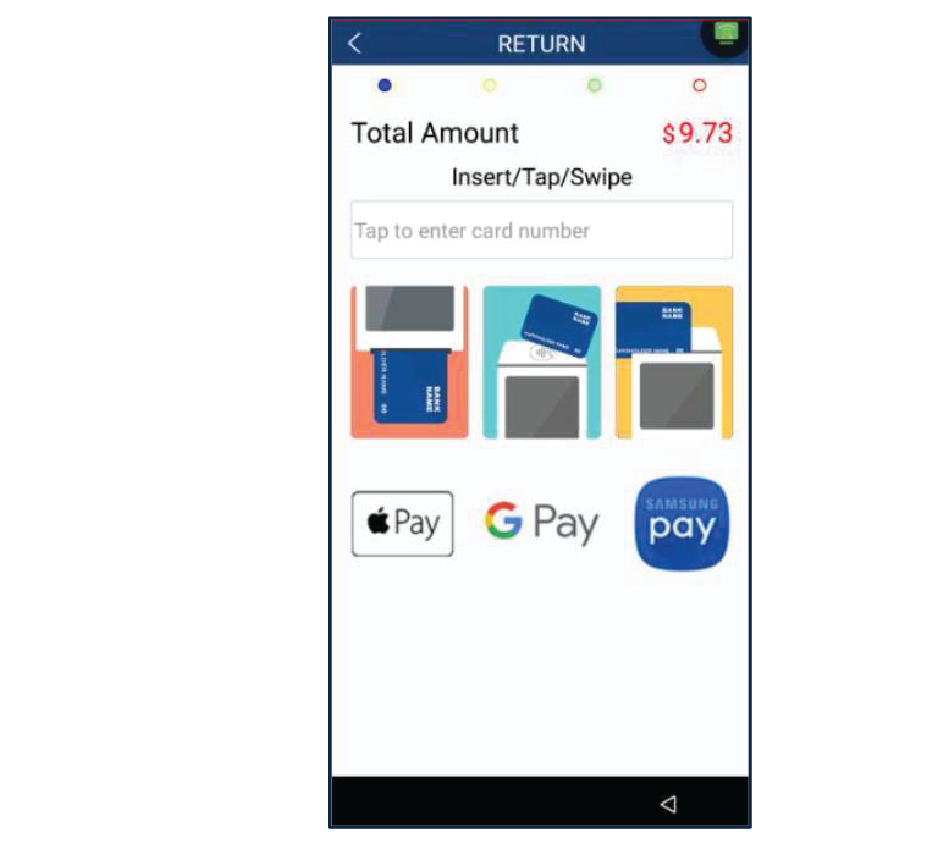
Enter the amount, taxes and tip (if applies).
3
On the insert/tap/swipe screen, process the refund with the applicable credit or debit card.
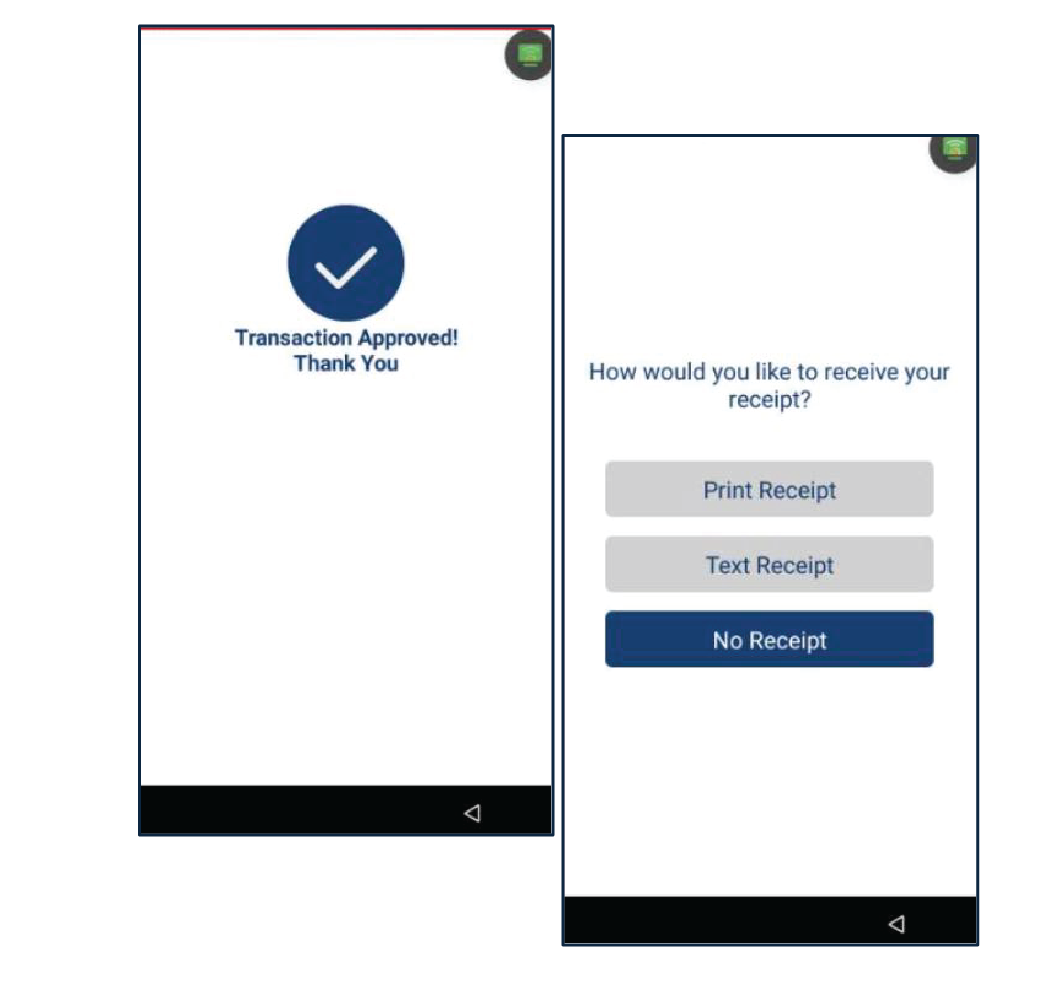
4
Once the transaction is completed, the terminal will display the payment result (Approved, Declined, etc.). Select the method for customer’s copy receipt: Print Receipt, Text Receipt or No Receipt.
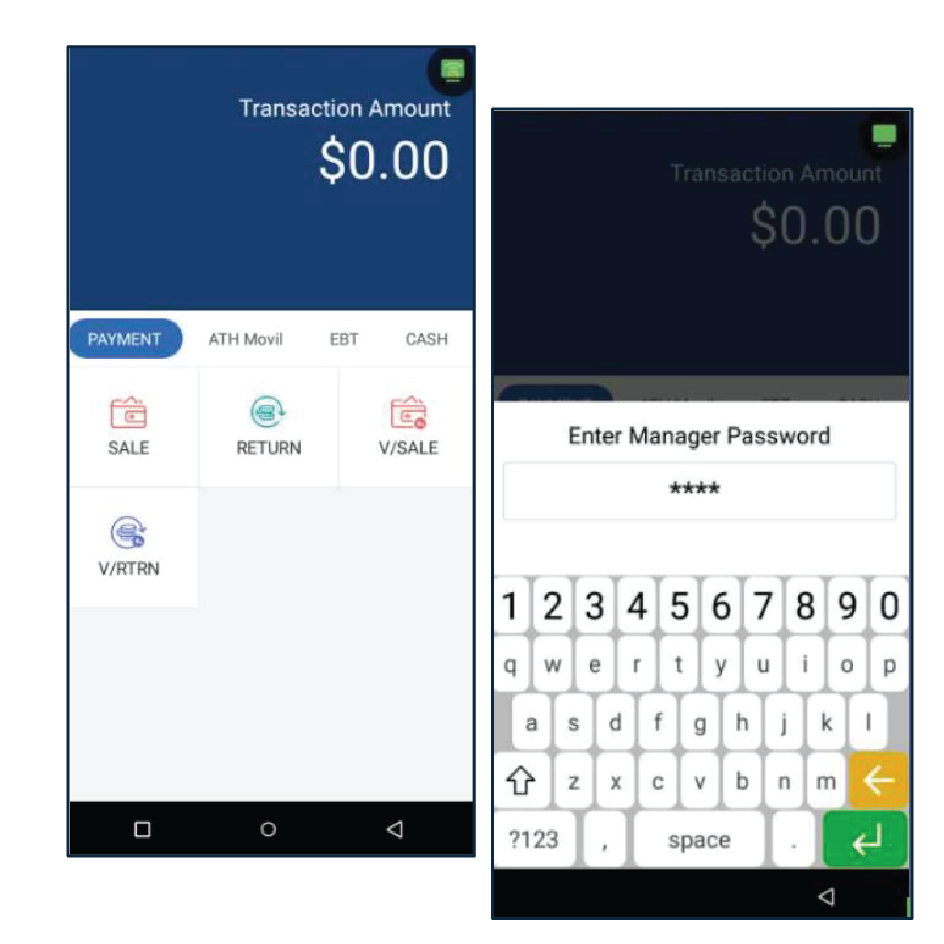
Void
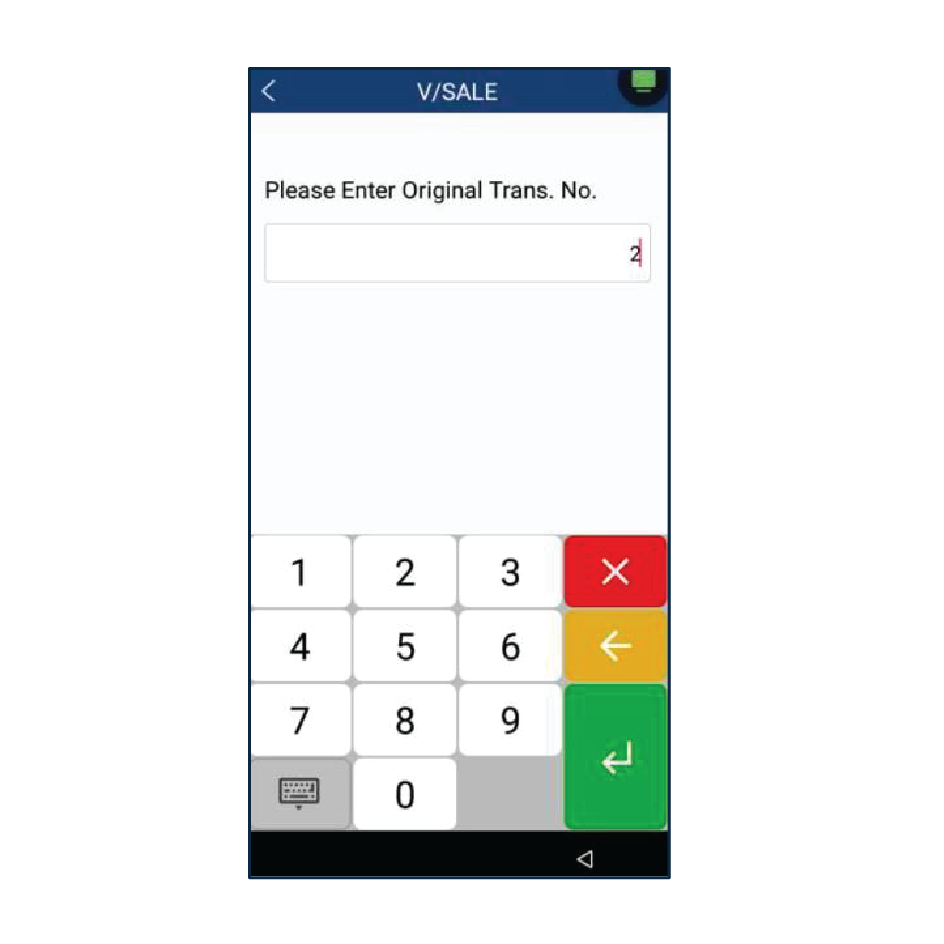
Below the steps to perform a Void transaction to a credit card.
1
Press V Sale, then enter the Manager Password.
2
Enter the Original Transaction Number, then press Enter.
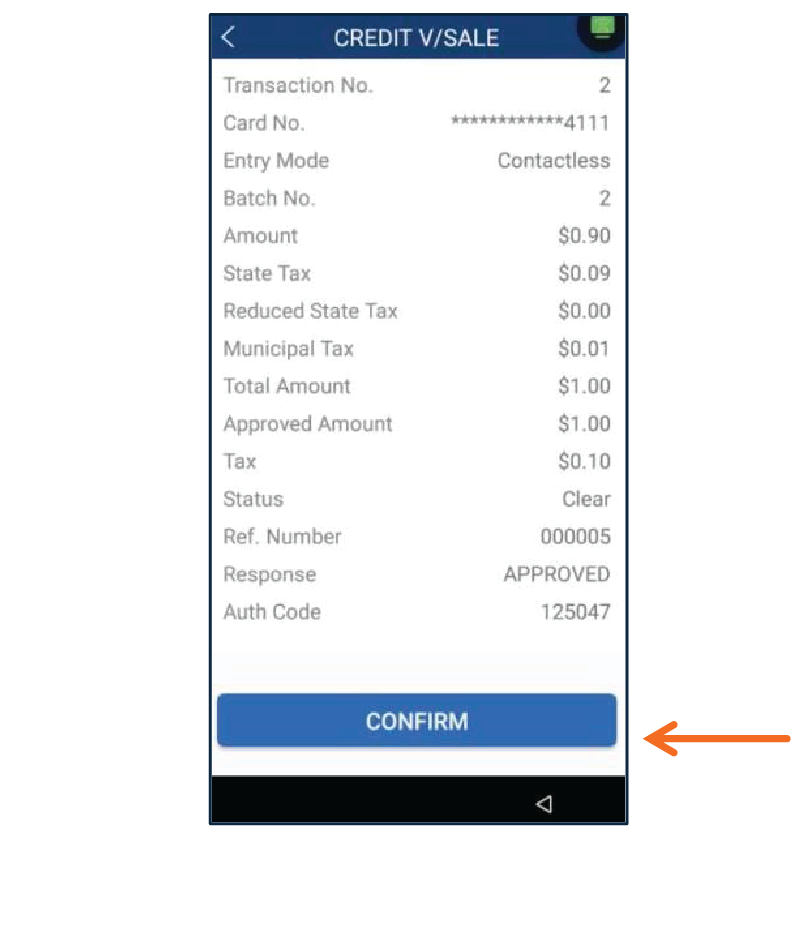
3
The terminal will display a summary of the transaction. Press Confirm to complete the Void transaction.
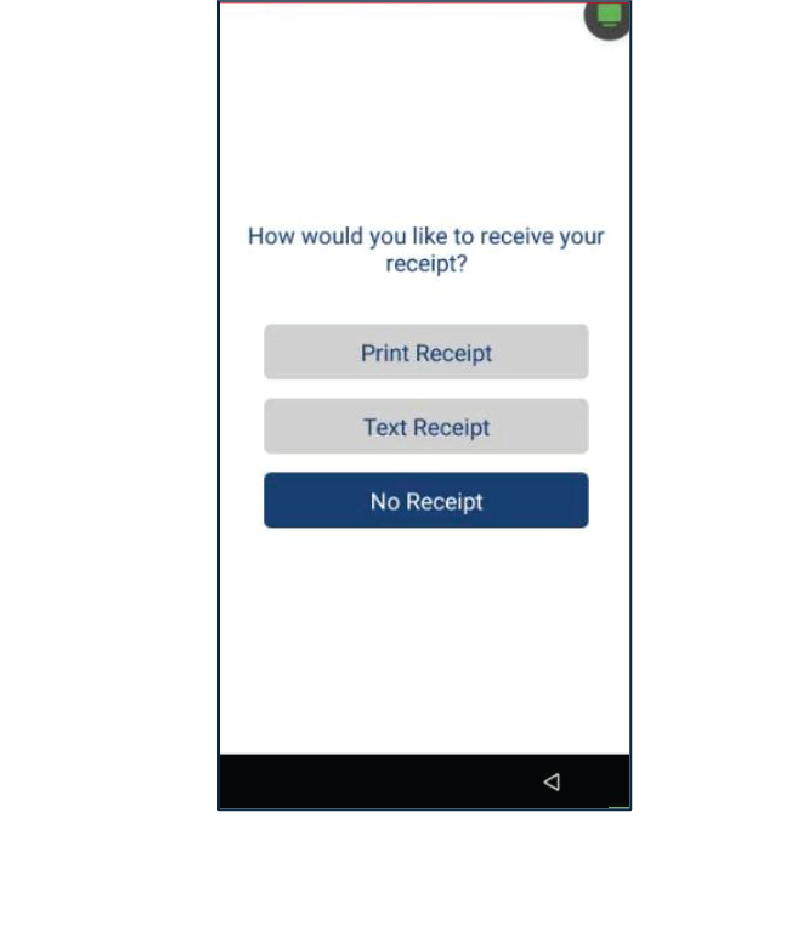
4
Select the method for Customers Copy Receipt: Print Receipt, Text Receipt or No Receipt.
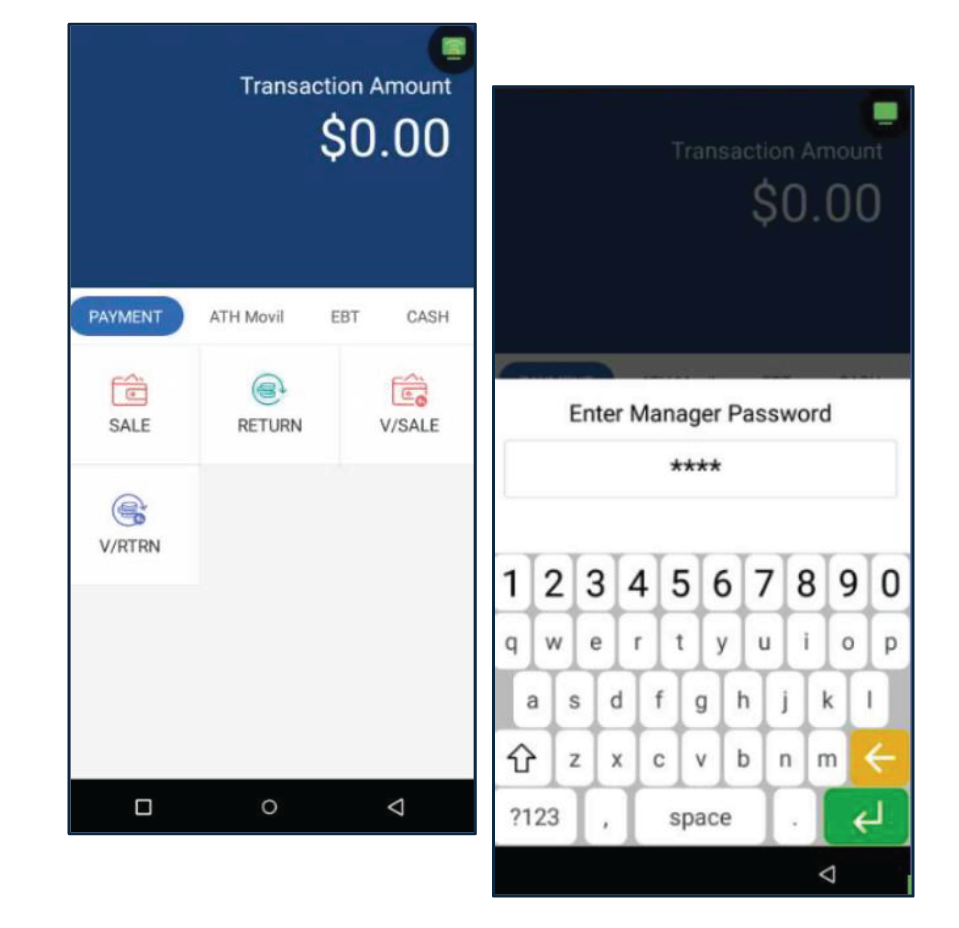
Void/Return
Below the steps to perform a Void for a Refund transaction to a credit card.
1
Press V RTRN, then enter the Manager Password.
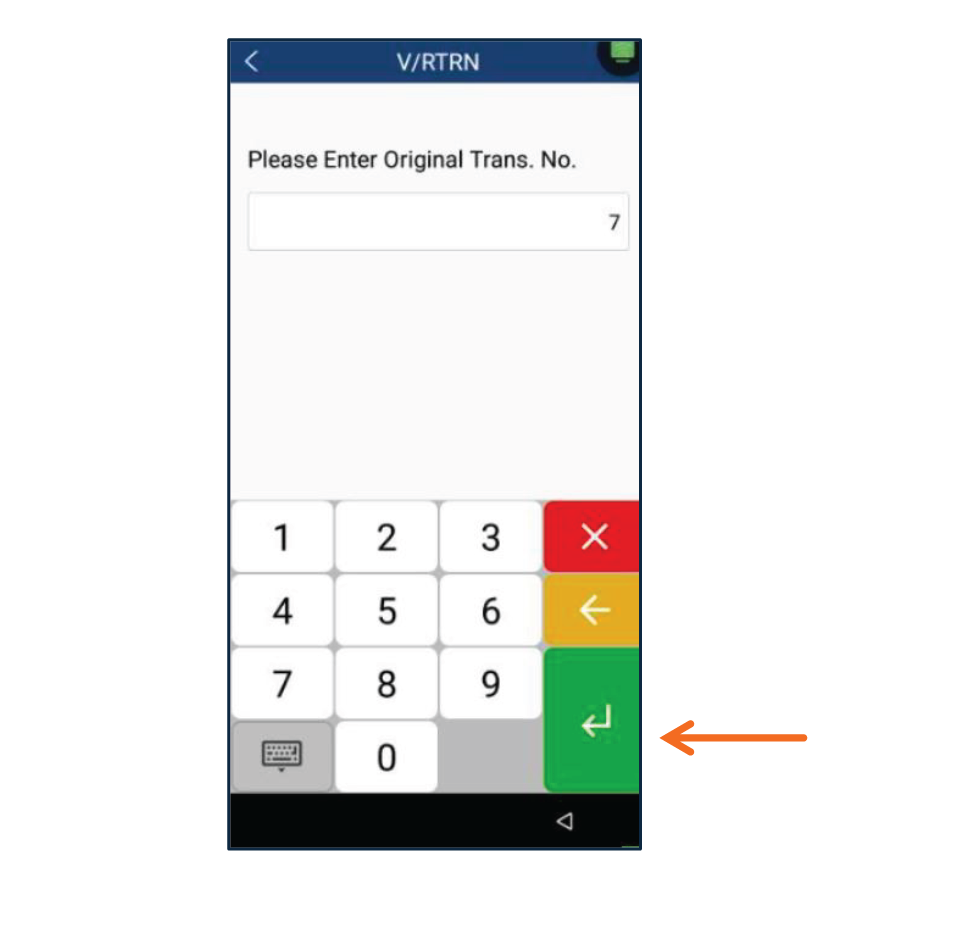
2
Enter the Original Transaction Number, then press Enter.
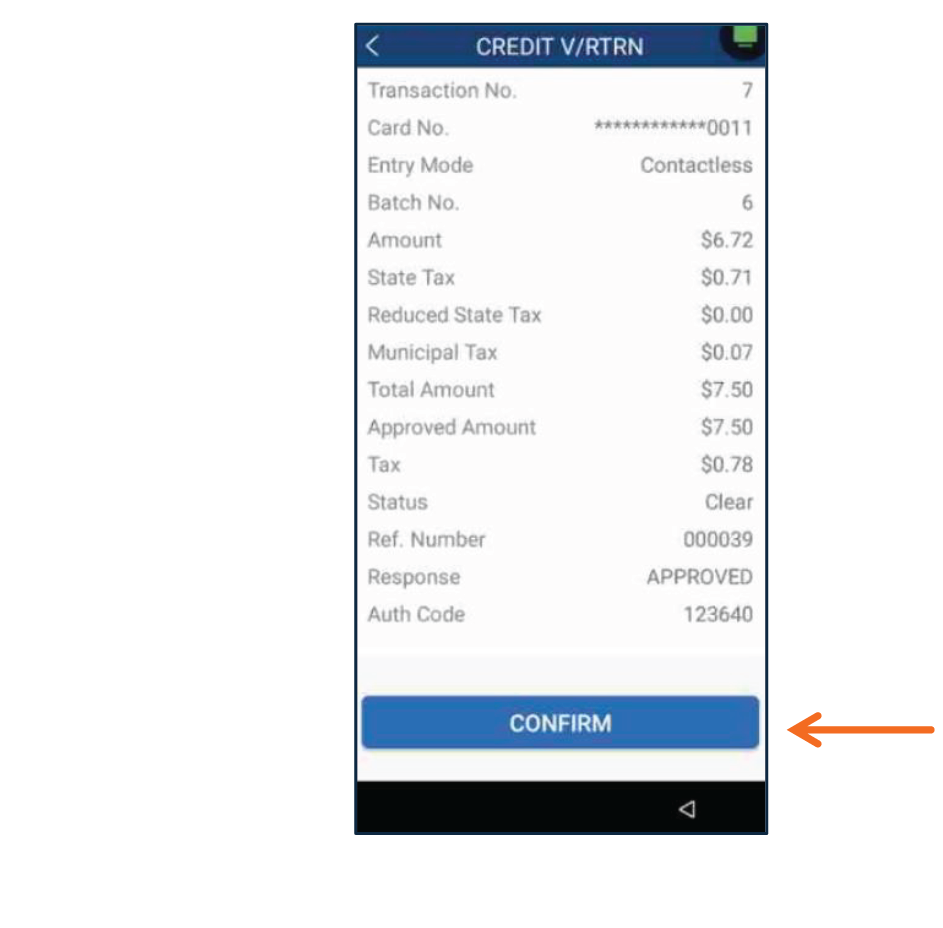
3
The terminal will display a summary of the transaction. Press Confirm to complete the Void/Return transaction.
4
Select the method for Customers Copy Receipt: Print Receipt, Text Receipt or No Receipt.
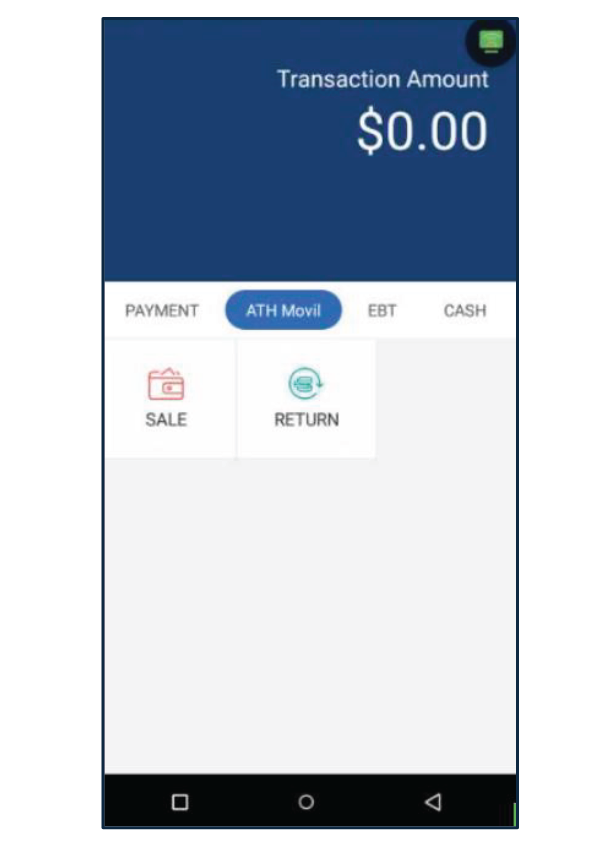
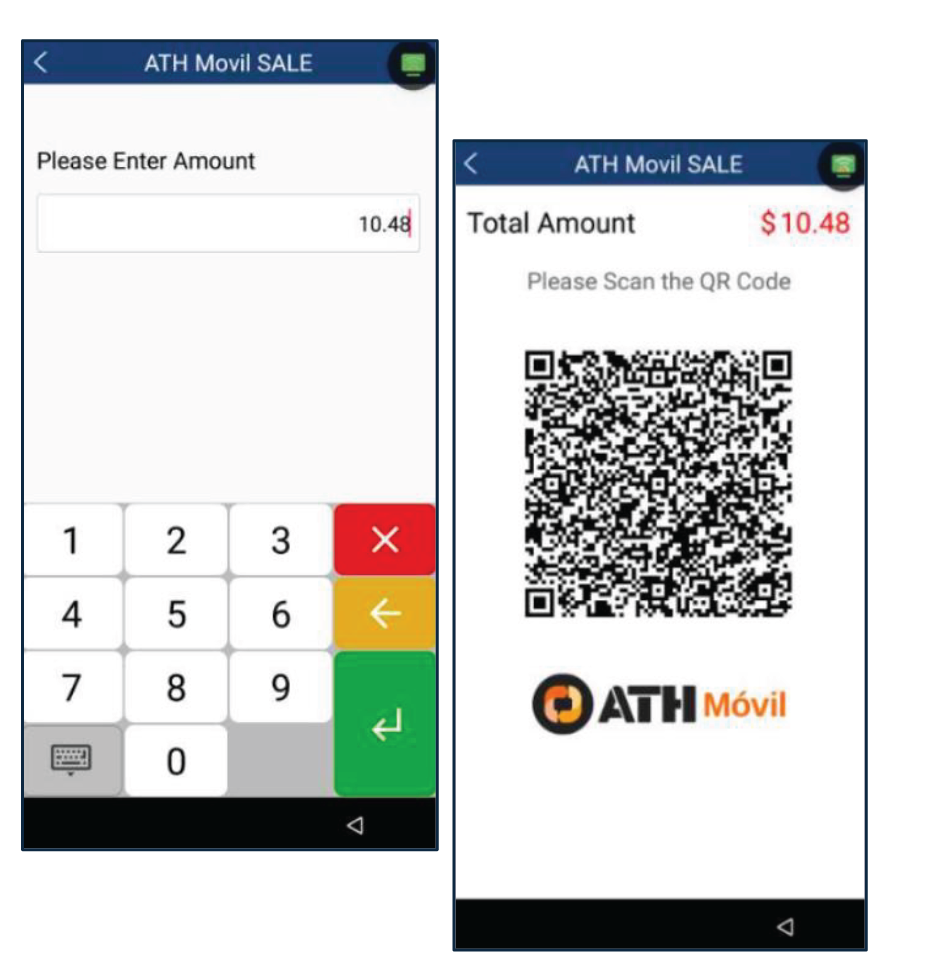
ATH Móvil
In this section you will find the steps to perform a Sale and a Return with ATH Móvil.
Sale
1
Press ATH Movil then, press Sale.
2
Enter the total amount, taxes and tip (if applies) then, press Enter. The terminal will then display the QR code to be scanned.
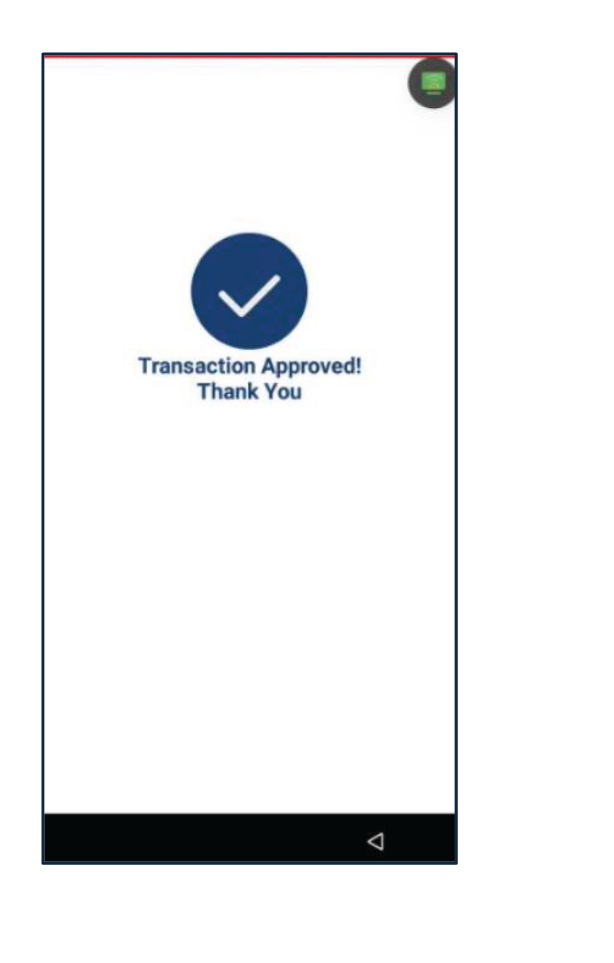
3
Once the transaction is completed, the terminal will show the payment result (Approved, Declined, etc.).
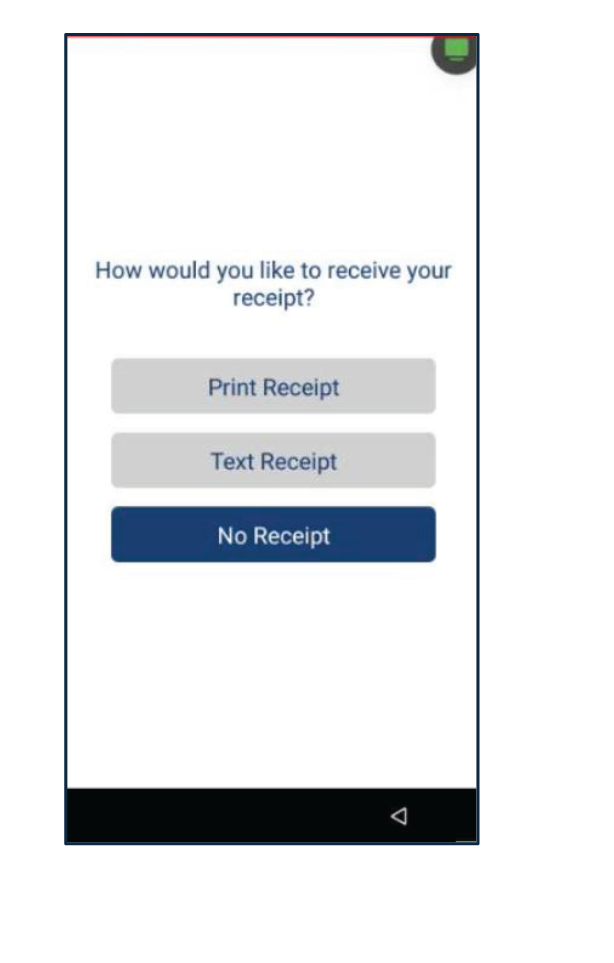
4
Select the method for Customers Copy Receipt: Print Receipt, Text Receipt or No Receipt.
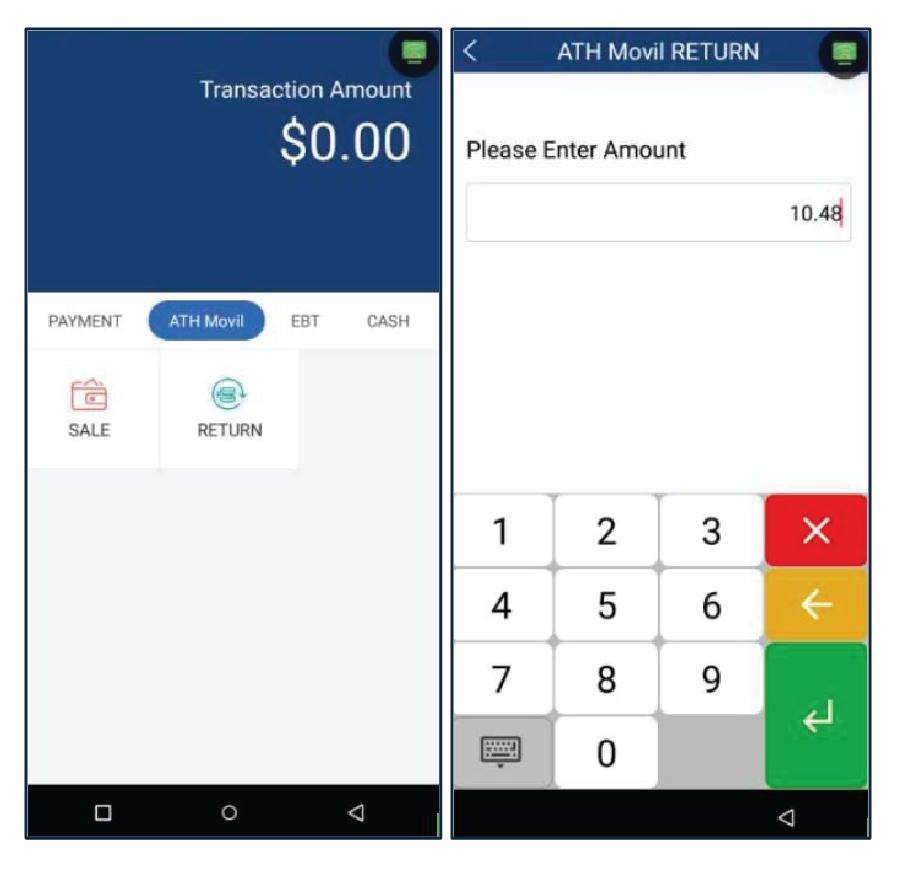
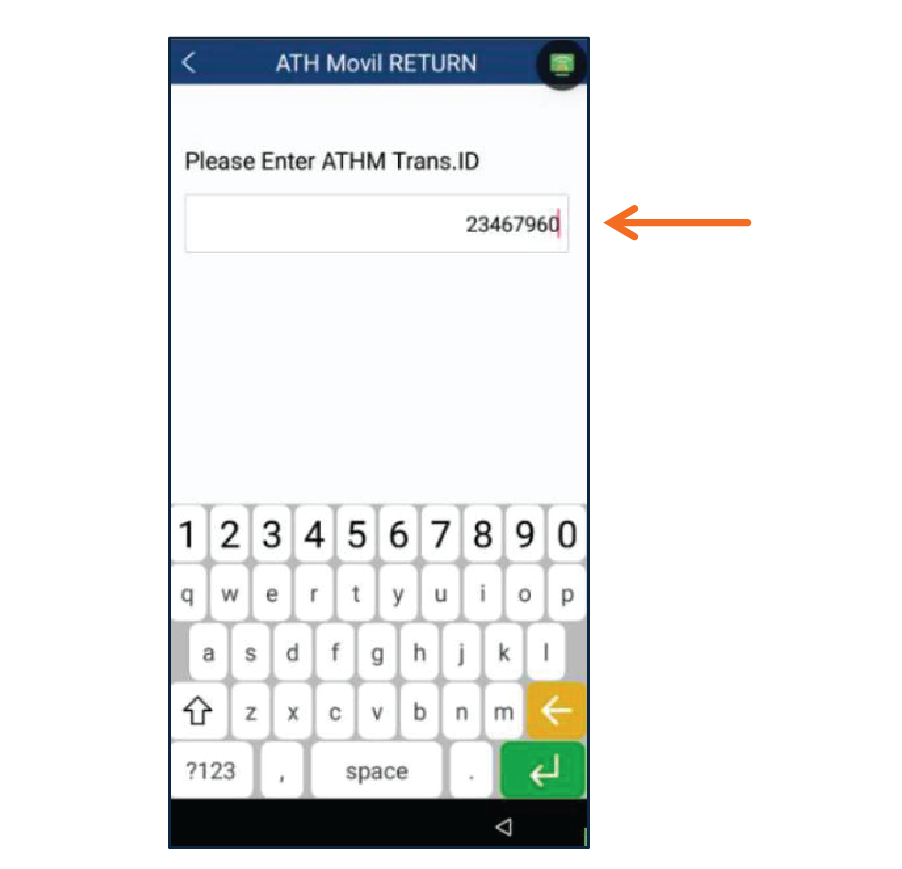
Return
Below are the steps to perform a Refund. For this function the terminal will request a Manager Password.
1
Press Return, then enter the Manager Password. Enter the amount and taxes applicable and press Enter.
2
Enter the ATHM Trans ID and press Enter.
3
Once the transaction is completed, the terminal will display the payment result (Approved, Declined, etc.). Select the method for customer’s copy receipt: Print Receipt, Text Receipt or No Receipt.
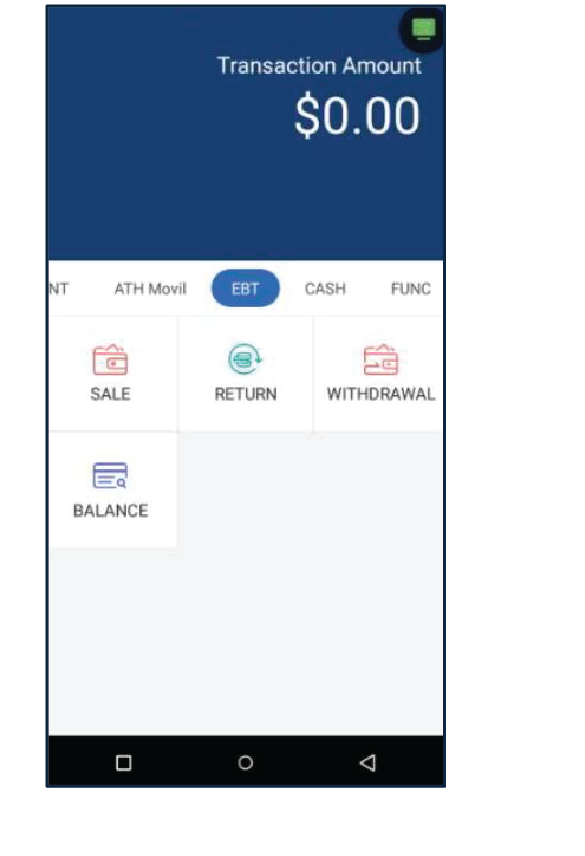
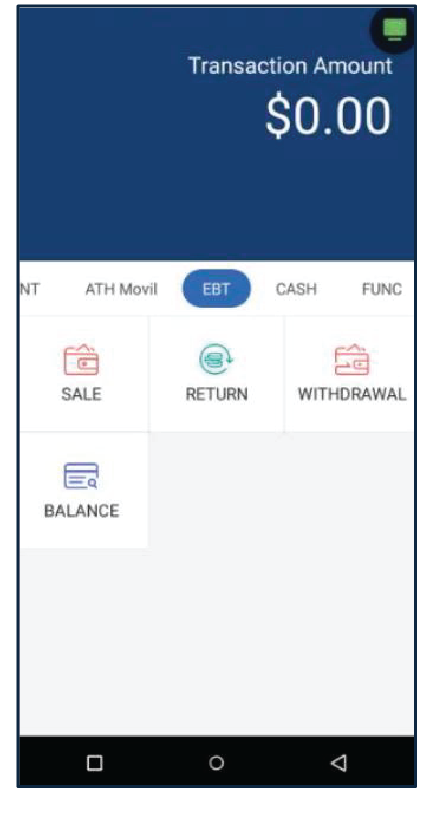
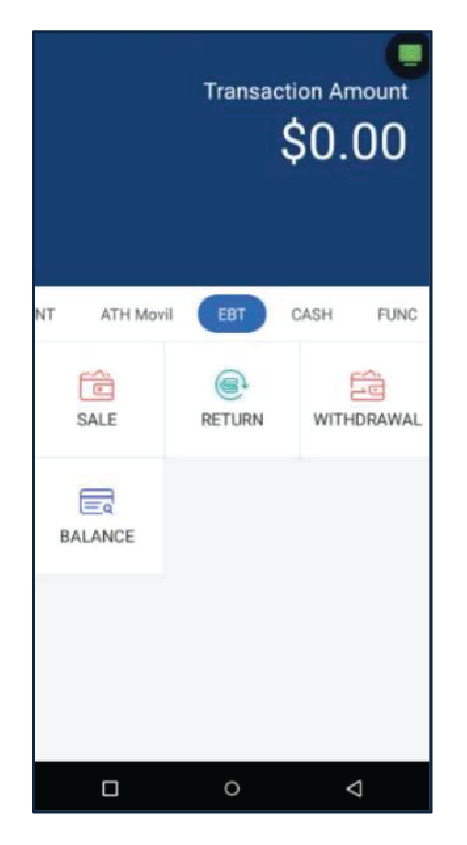
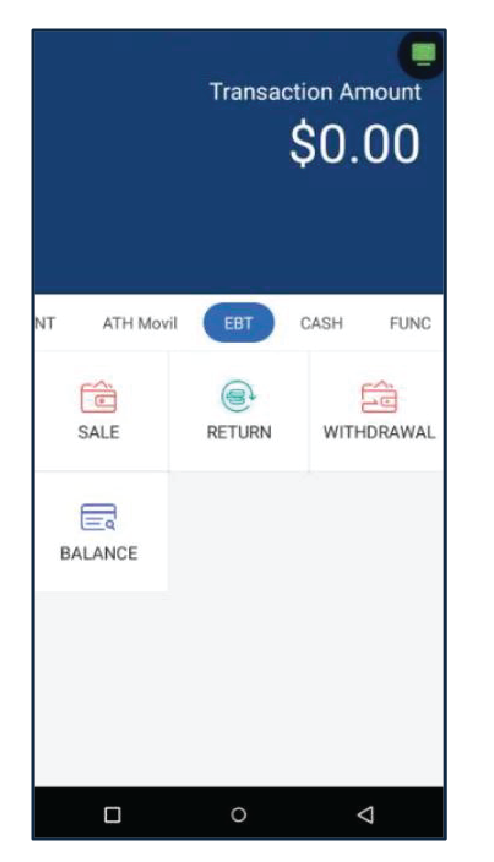
EBT
In this section, you will find the steps to perform a EBT Sale for Food Stamp, Cash, Cash Voucher, Food Stamp Voucher, a Return, Withdrawal and Balance.
Note: Taxes are not applied for EBT transactions, except for EBT Fondo Unica.
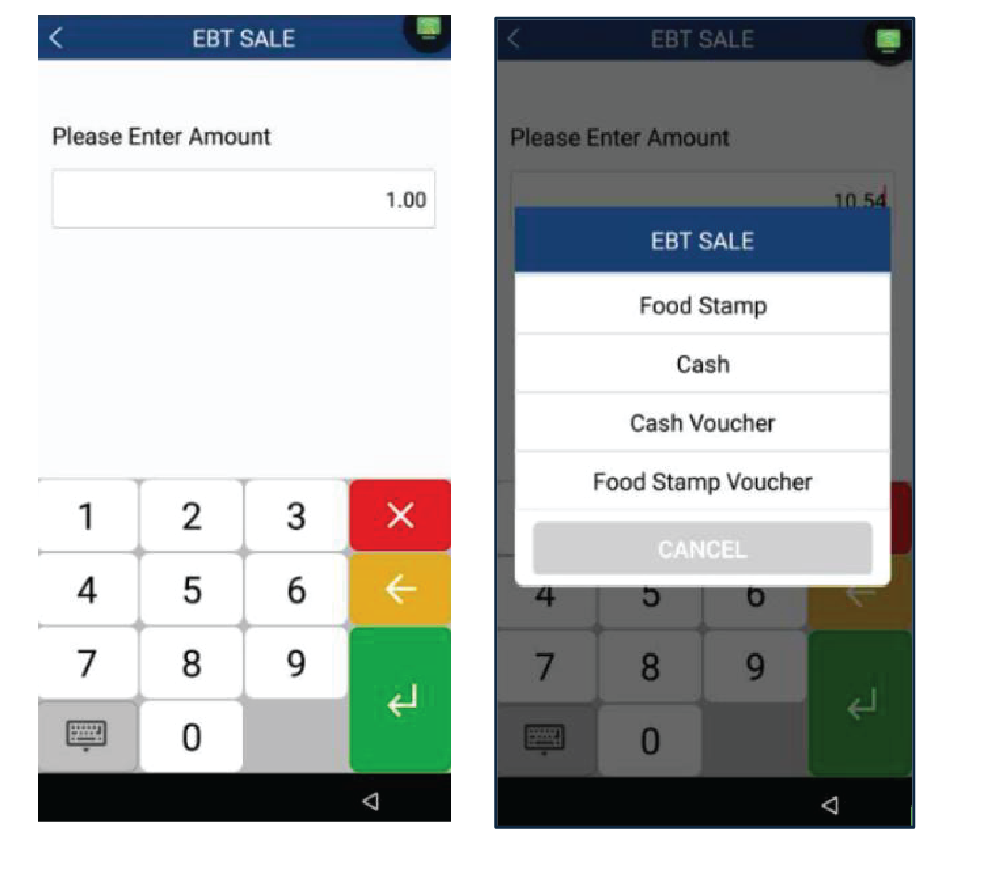
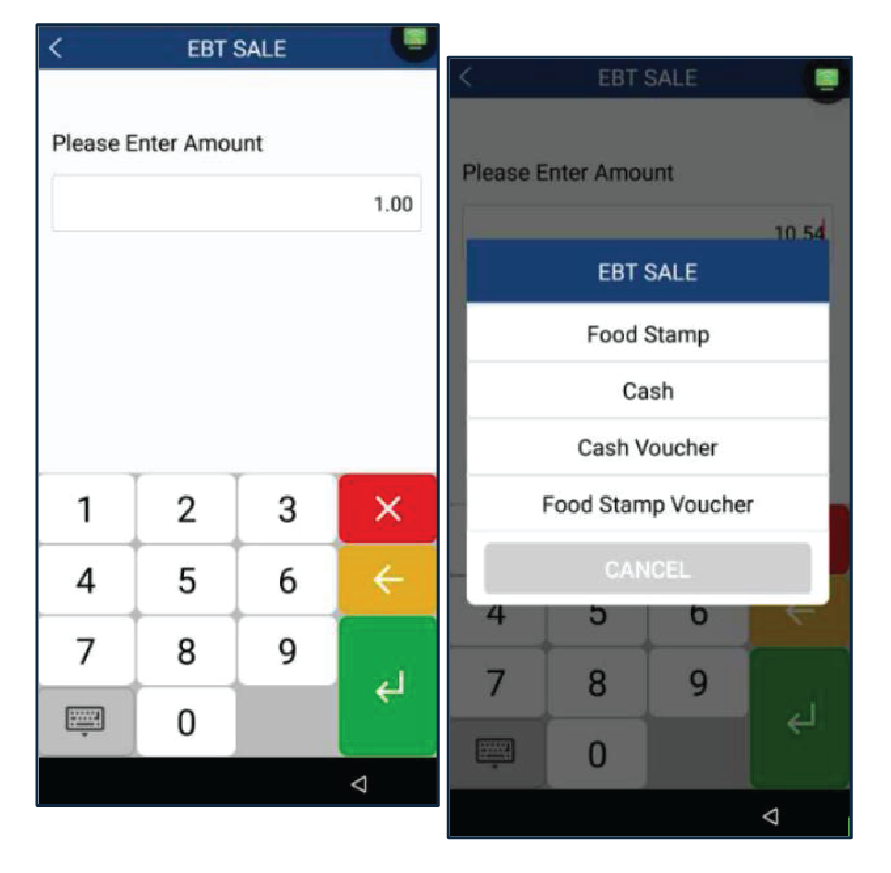
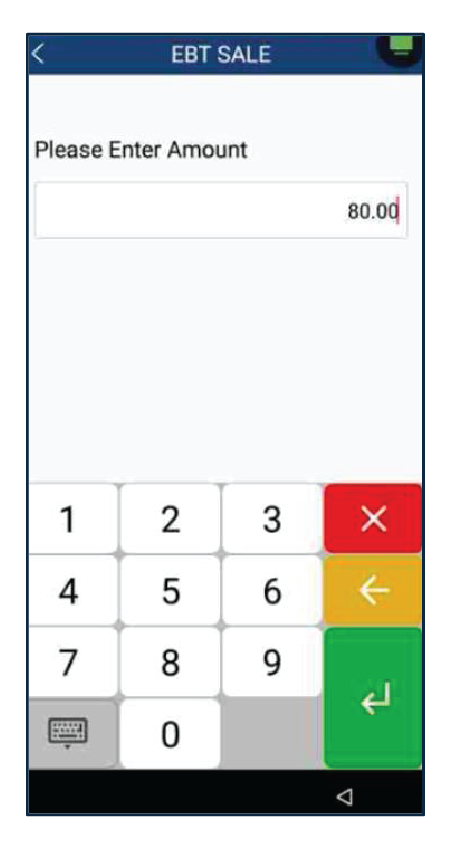
EBT Sale
1
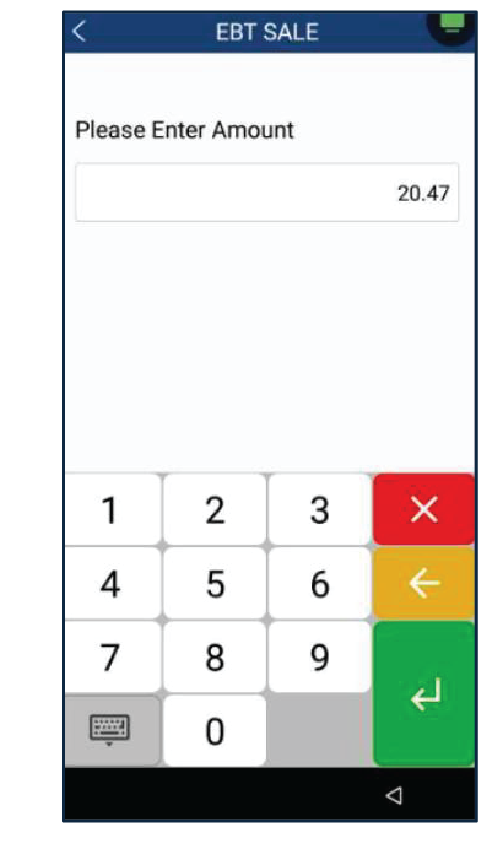
Press Evertec located in the main menu. Then, go to the EBT section and press Sale.
2
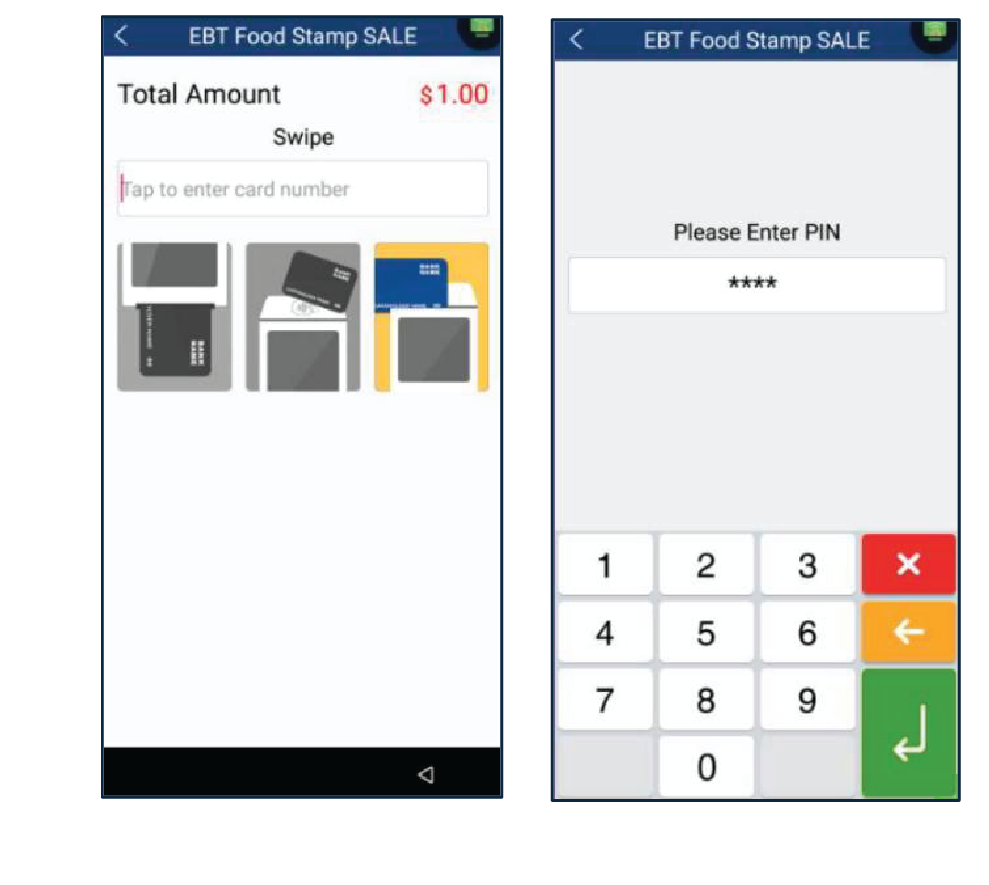
Enter the amount then press Enter. Select Food Stamp.
3
Swipe the card. Enter the pin number, then press Enter.
4
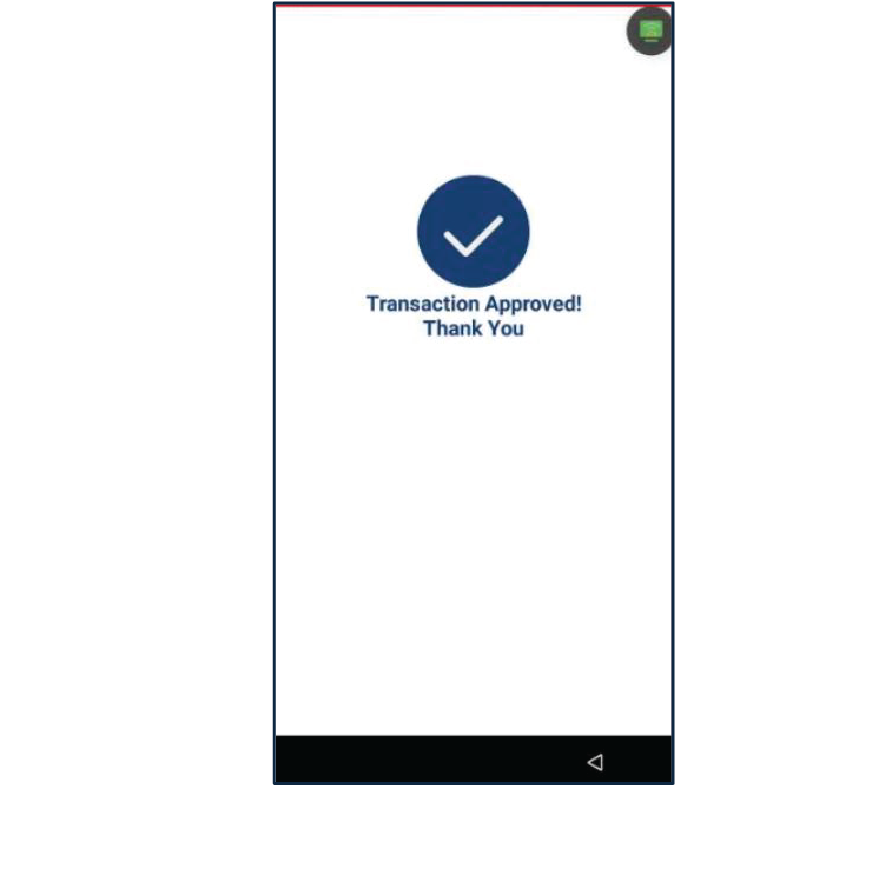
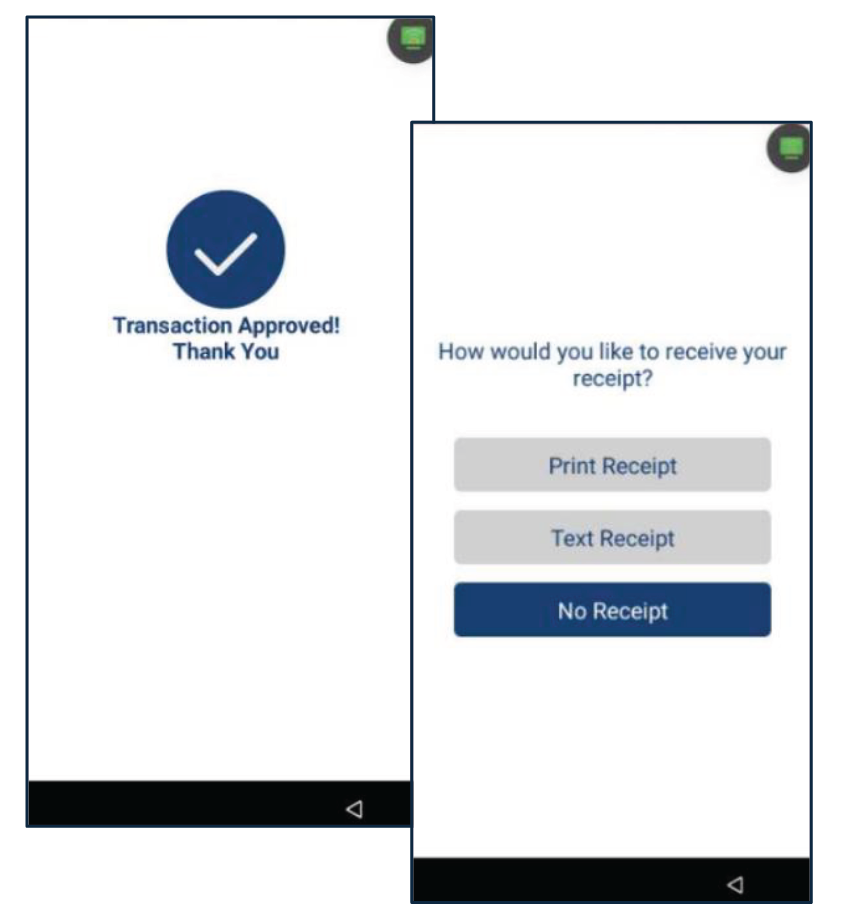
Once the transaction is completed, the terminal will display the payment result (Approved, Declined, etc.). Select a method for the Customers Copy Receipt: Print Receipt, Text Receipt or No Receipt.
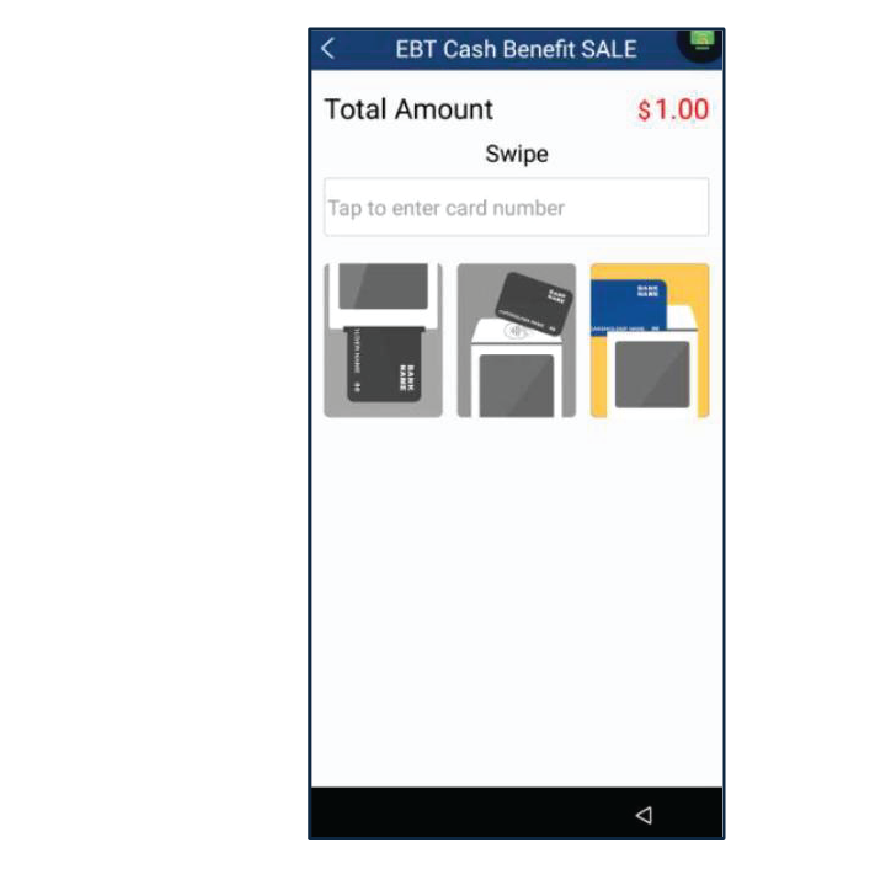
EBT Cash Sale
1
Press Evertec located in the main menu. Then, go to the EBT section and press Sale.
2
Enter the amount then press Enter. Select Cash.
3
Swipe the card to complete the transaction.
4
Once the transaction is completed, the terminal will display the payment result. Select a method for the Customers Copy Receipt.
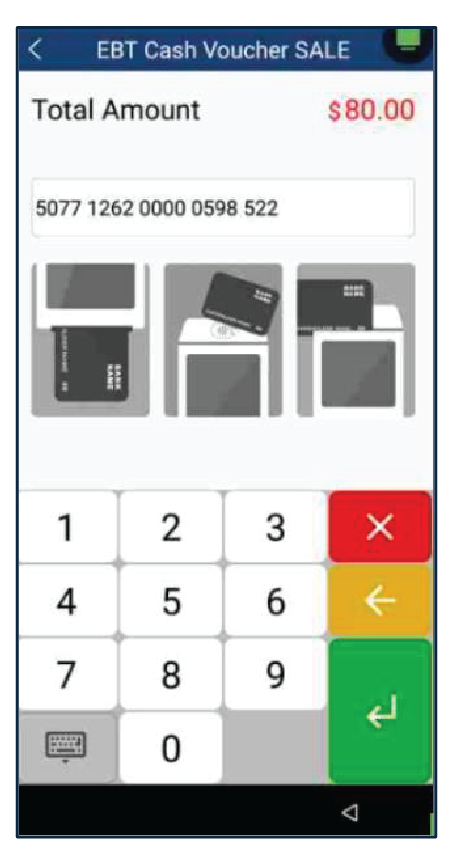
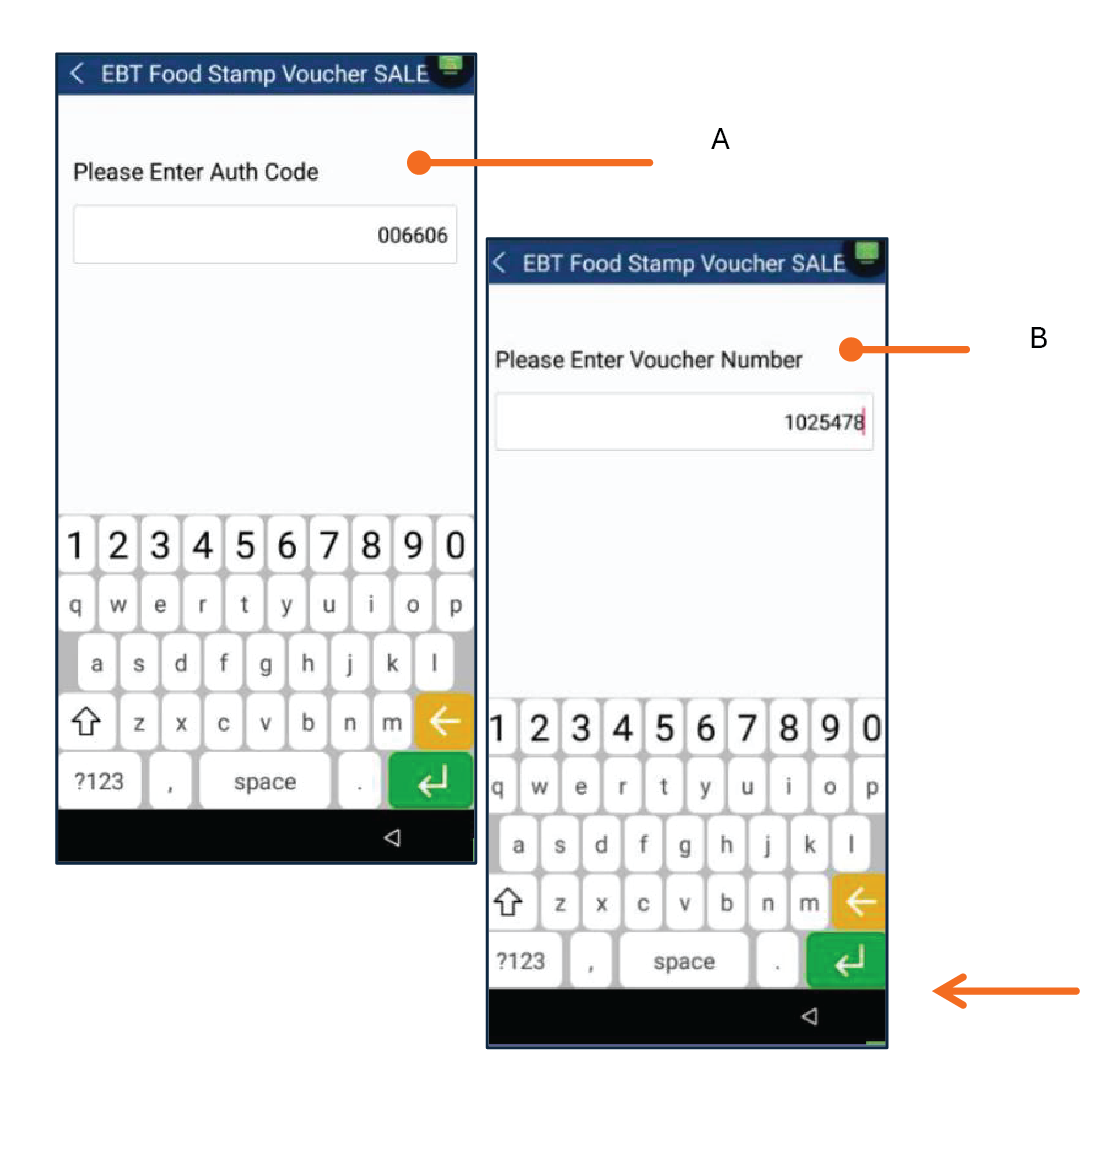
Cash Voucher Sale
1
Press EBT section and press Sale.
2
Enter the amount then press Enter. Select Cash Voucher.
3
Enter the card number then press Enter.
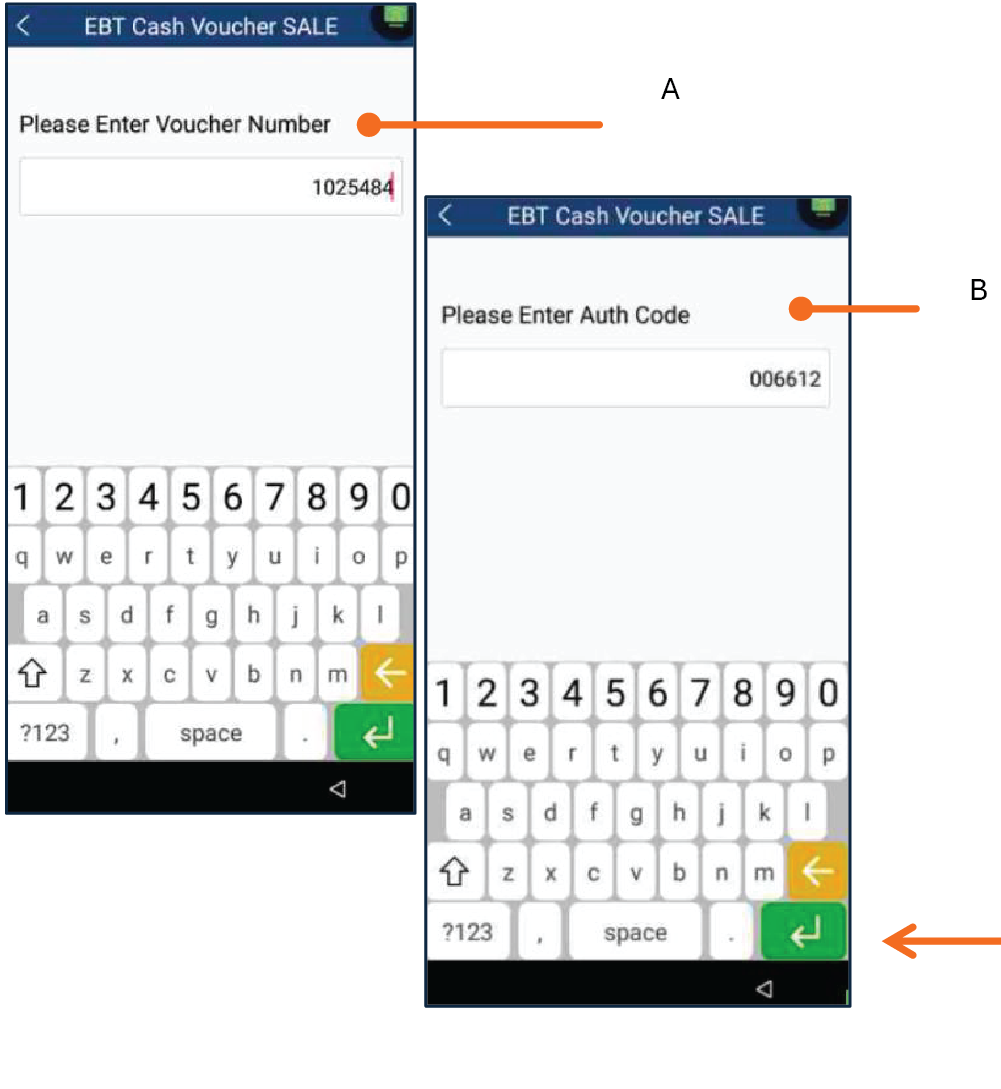
4
Enter the Voucher number, press Enter. Enter the Authorization Code and press Enter.
5
Once the transaction is completed, the terminal will display the payment result (Approved, Declined, etc.). Select the method for customer's copy receipt: Print Receipt, Text Receipt or No Receipt.
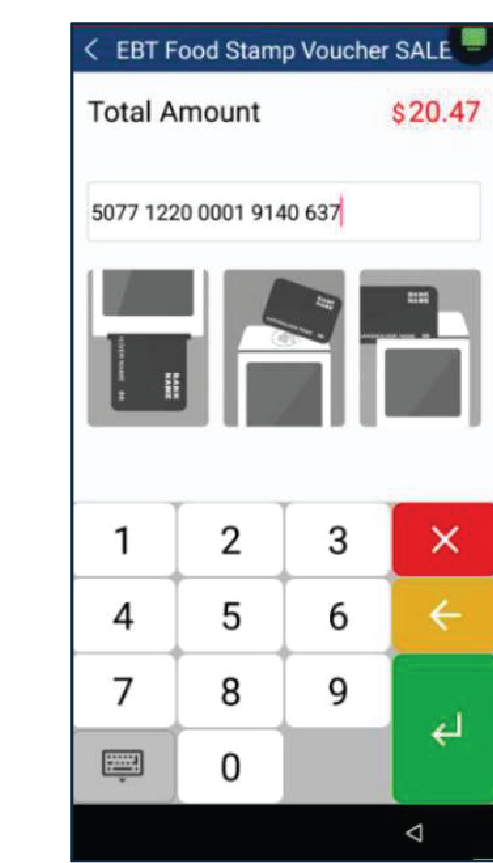
Food Stamp Voucher
1
Go to the EBT section and press Sale.
2
Enter the amount then press Enter. Select Food Stamp Voucher.
3
Enter the card number then press Enter.
4
Enter the Voucher number then press Enter. Enter the Authorization Code then press Enter.
5
Once the transaction is completed, the terminal will display the payment result (Approved, Declined, etc.). Select the method for customer's copy receipt: Print Receipt, Text Receipt or No Receipt.
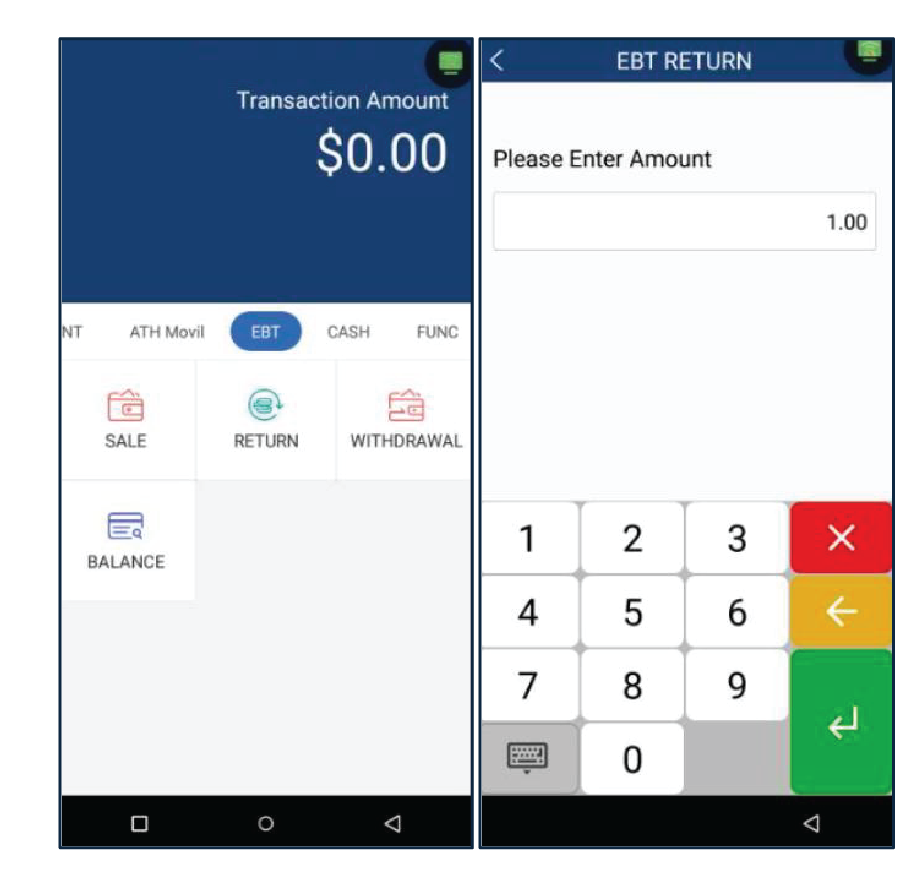
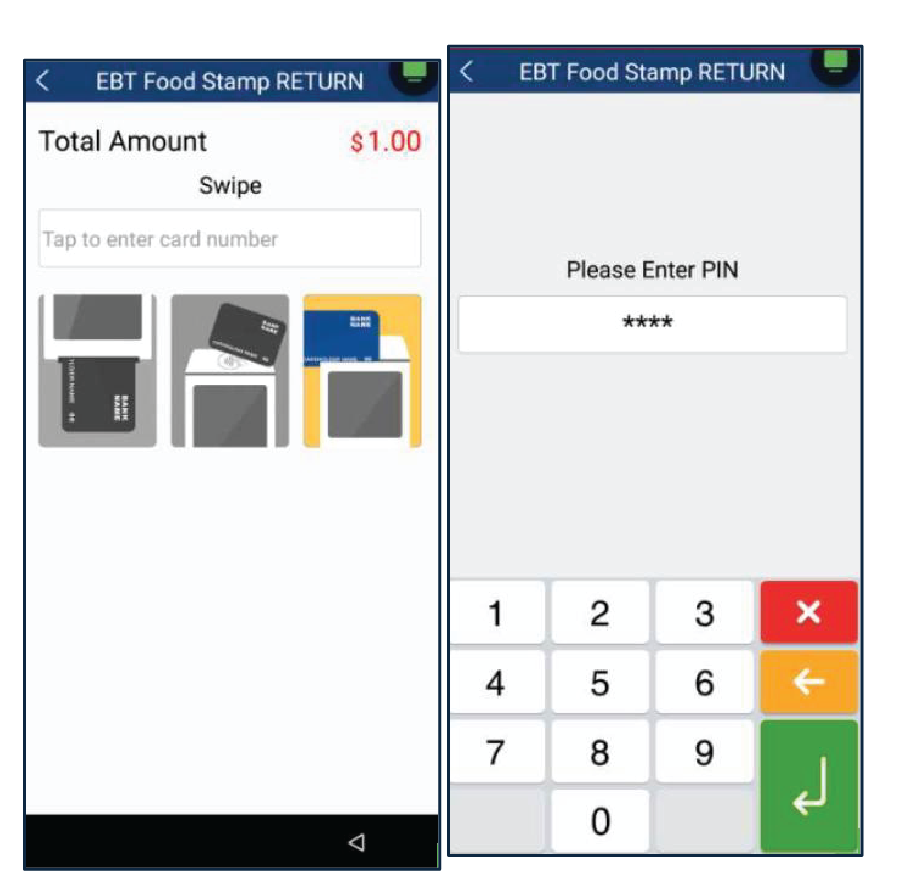
Return
1
Press Return, then enter the Manager Password. Enter the amount and press Enter.
2
Swipe the card and enter the pin number.
3
Once the transaction is completed, the terminal will display the payment result (Approved, Declined, etc.).
4
Select the method for customers copy receipt: Print Receipt, Text Receipt or No Receipt.
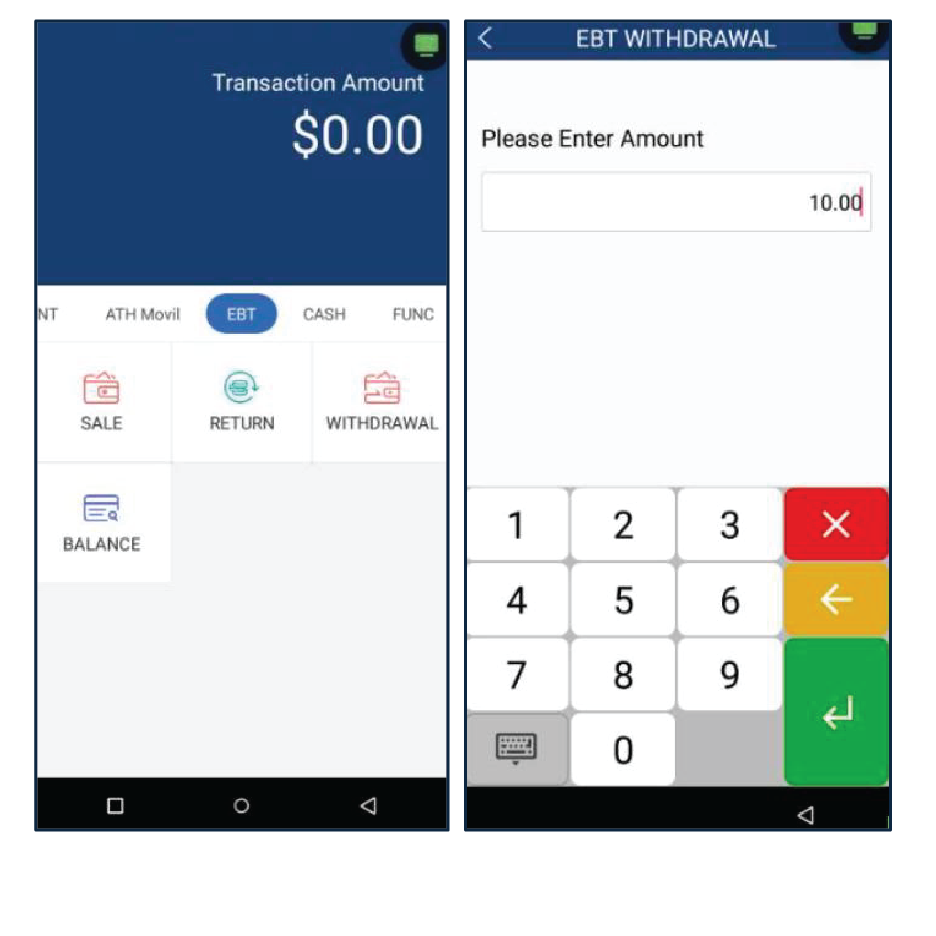
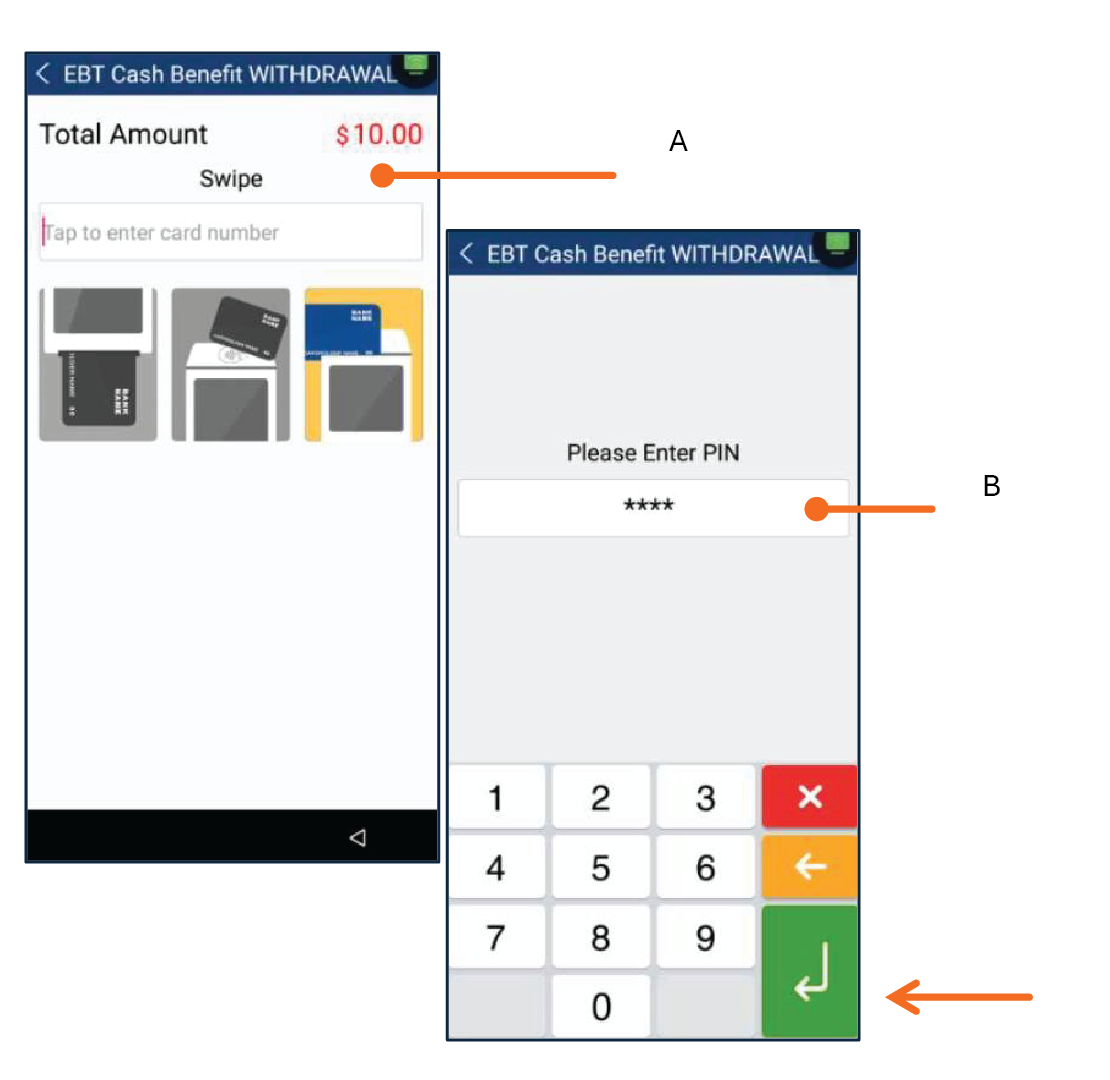
Withdrawal
1
Press Withdrawal, then enter the amount and press Enter.
2
Swipe the card. Enter the pin number then, press Enter.
3
Once the transaction is completed, the terminal will display the payment result (Approved, Declined, etc.).
4
Select the method for customers copy receipt: Print Receipt, Text Receipt or No Receipt.
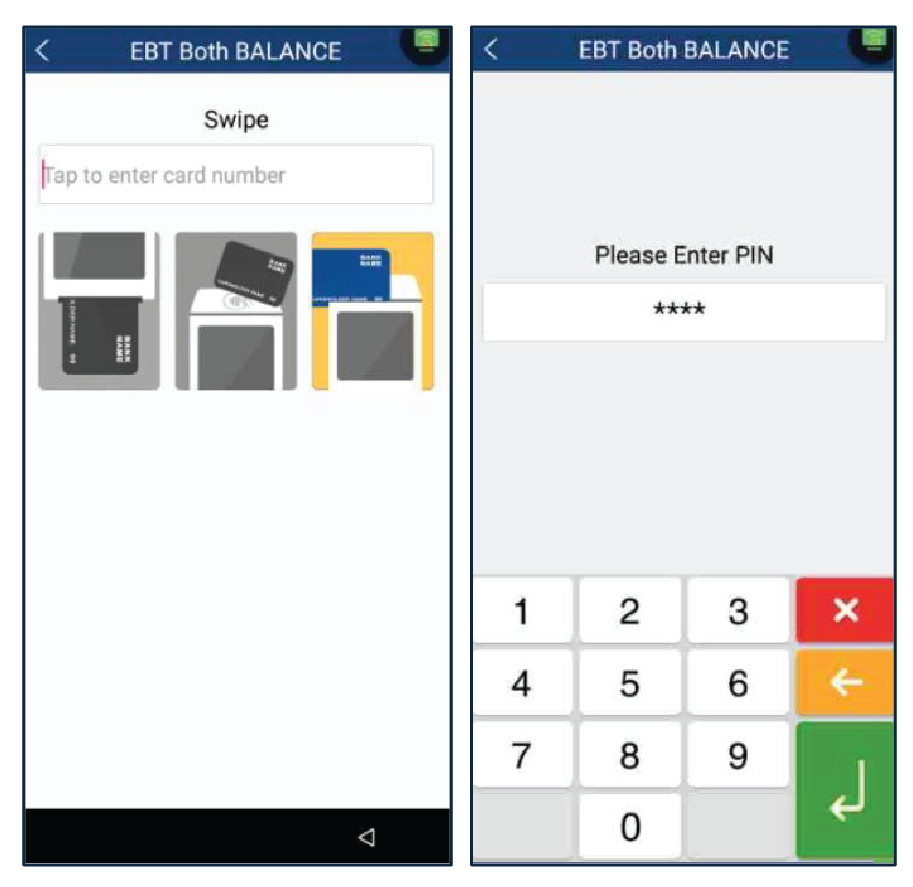
Balance
1
Press Balance, then, swipe the card. Enter the pin number and press Enter.
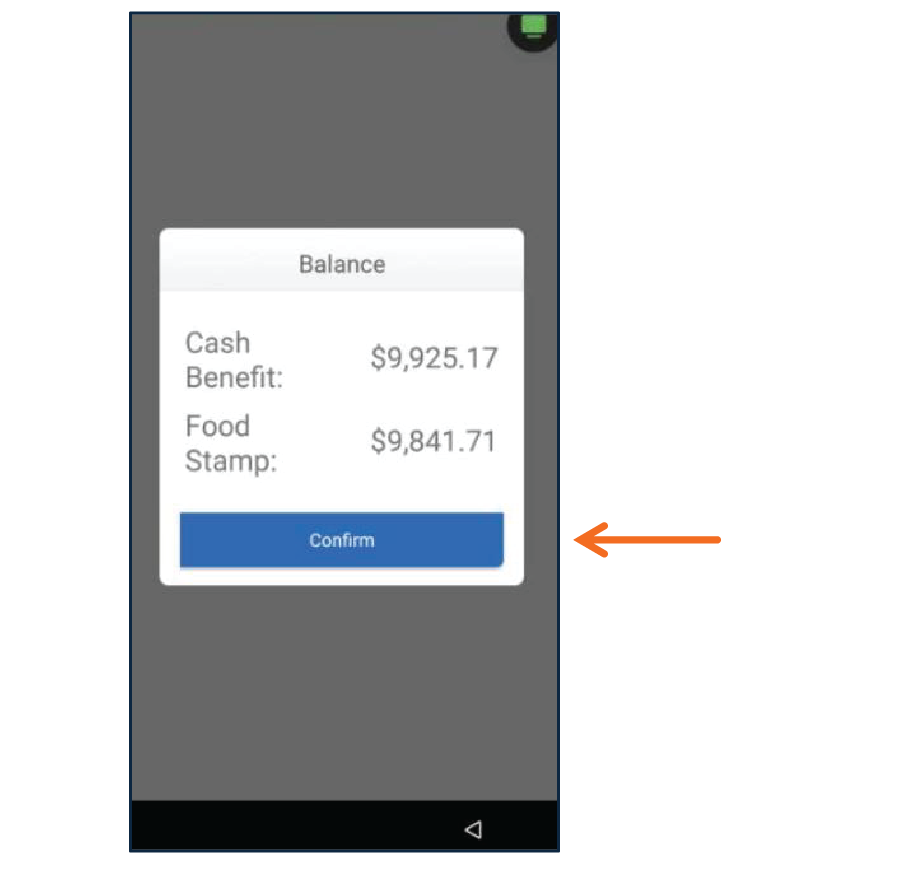
2
The balance will be displayed on the screen, then press Confirm.
3
Once the transaction is completed, the terminal will display the result. The EBT card balance will be printed on the Customer Receipt.
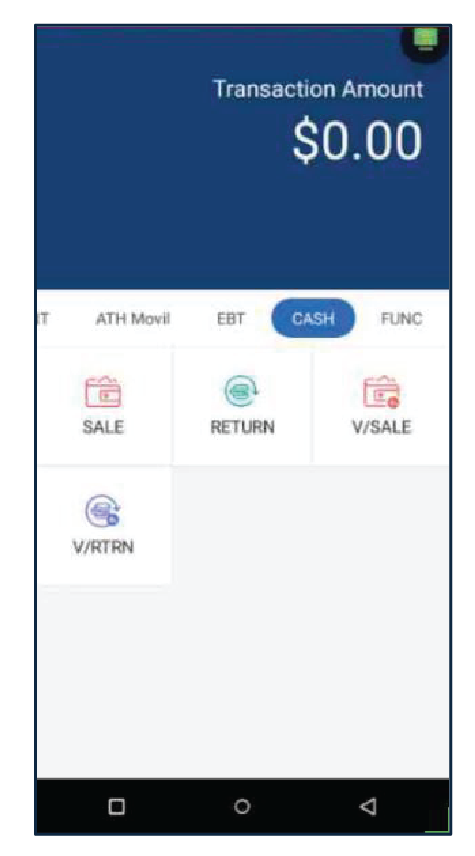
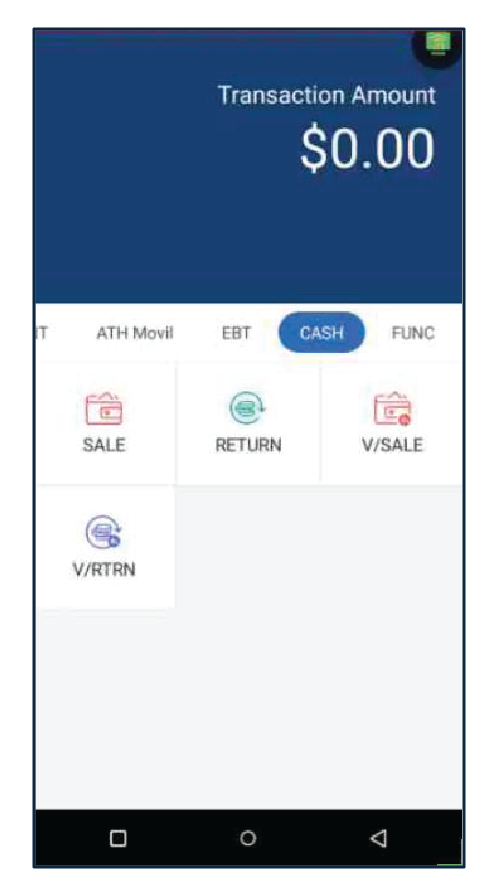
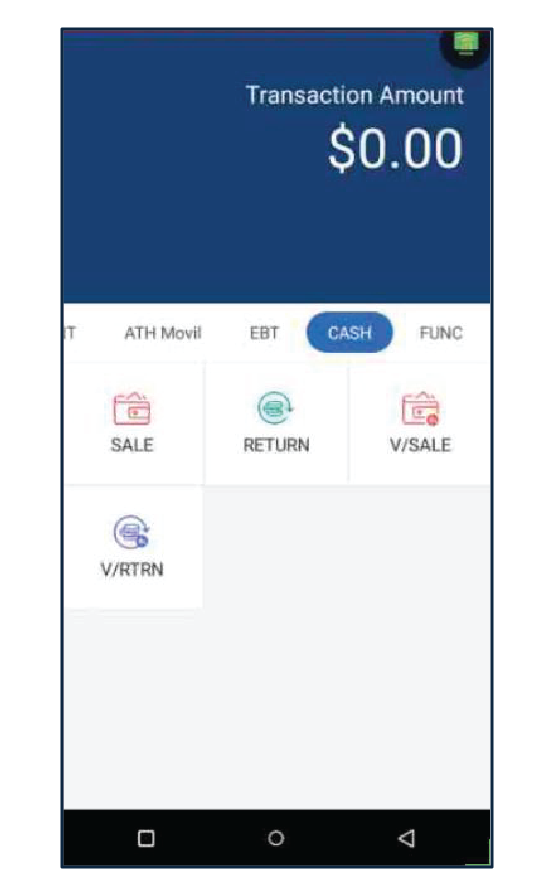
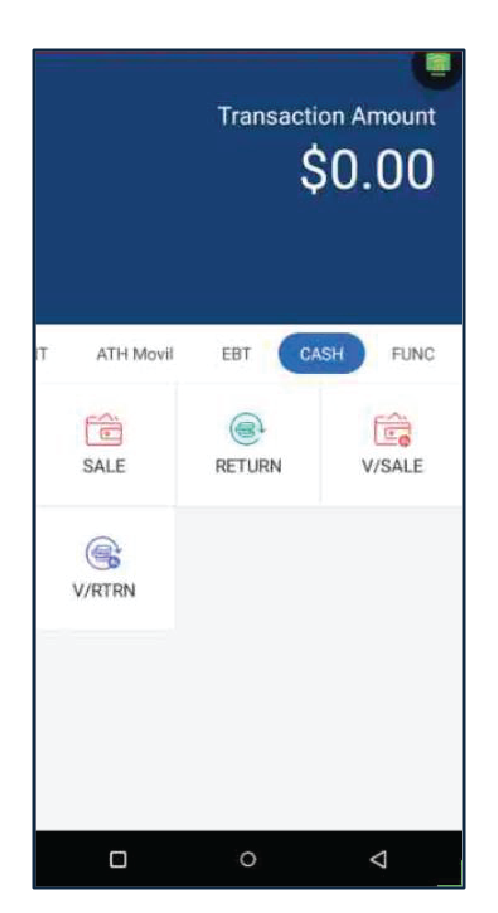
Cash
In this section, you will find the steps to process a Cash Sale, a Return, Void a Sale, and Void a Return.
Sale
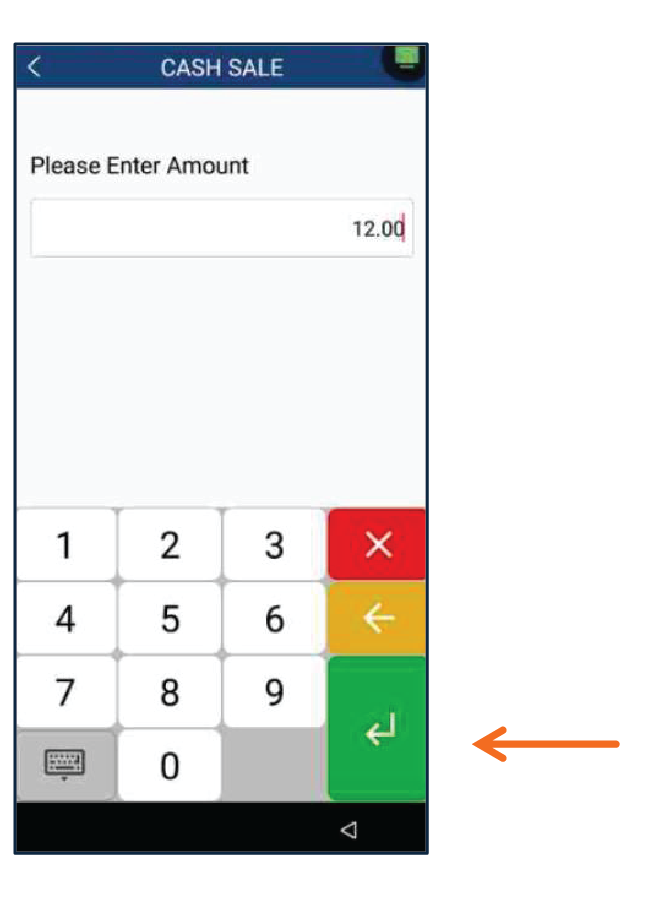
1
Press Cash then, press Sale.
2
Enter the amount and taxes (if applies) then, press Enter.
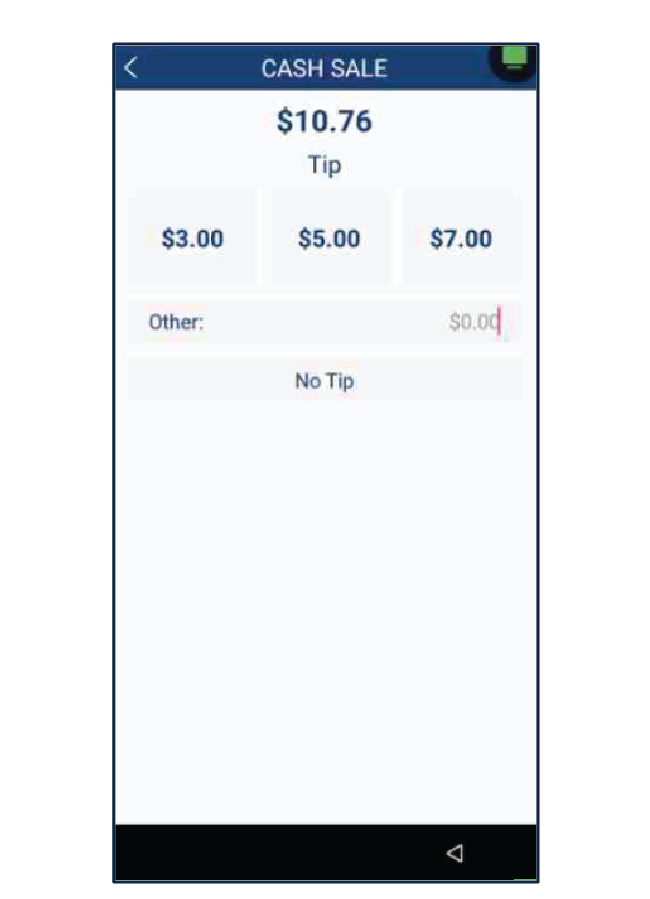
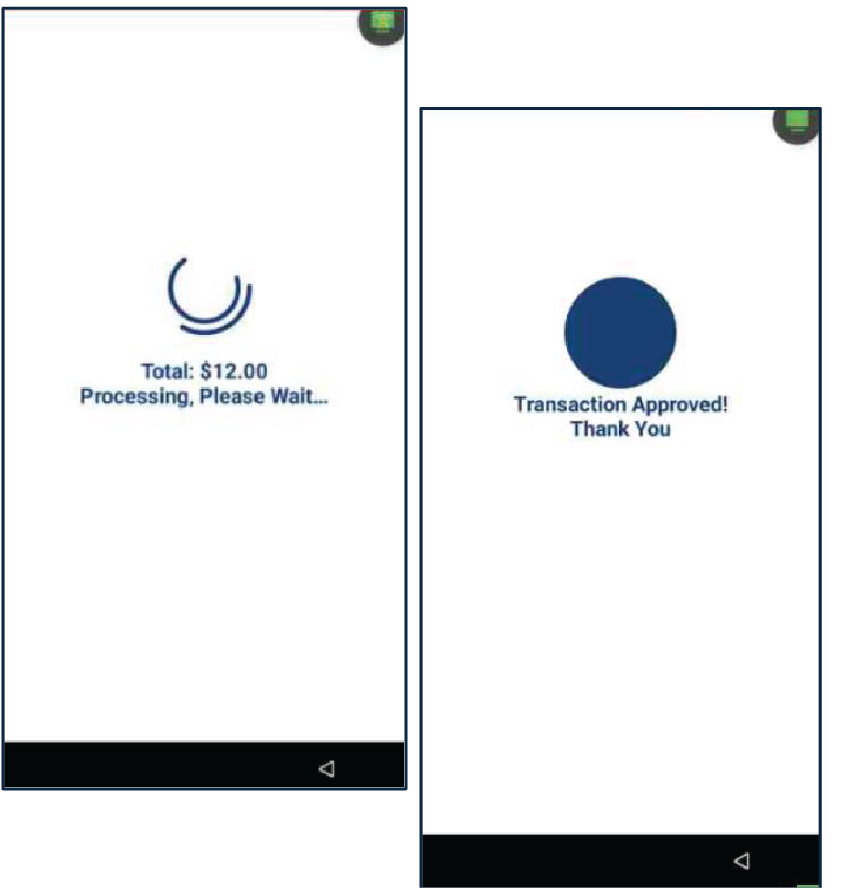
3
Select a tip, you can select Suggested Percentage, enter Other or No Tip.
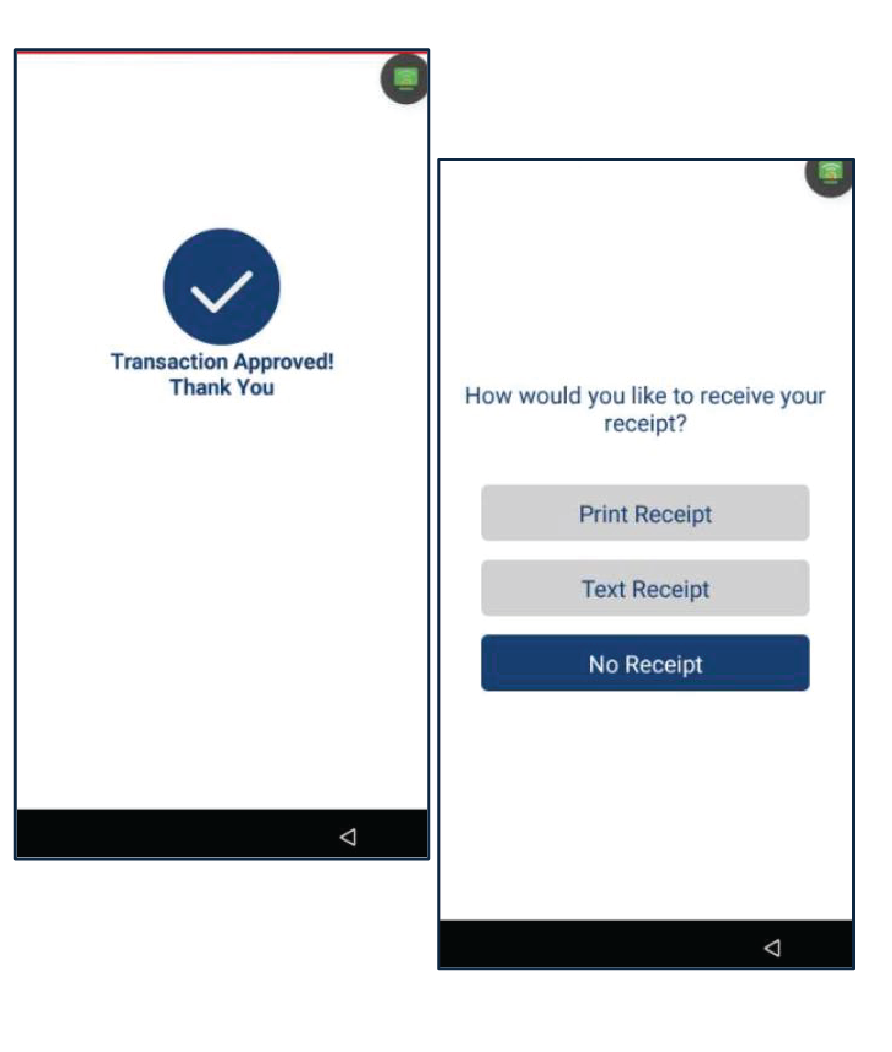
4
The transaction will be completed. The terminal will print a merchant copy receipt automatically. Select the method for Customers Copy Receipt.
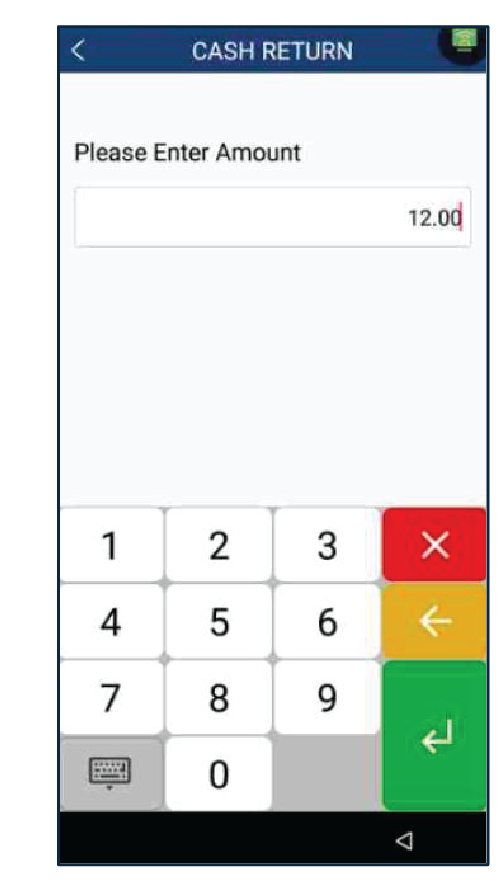
Return
1
Press Cash then, enter the Manager Password. Press Return.
2
Enter the amount and taxes (if applies).
3
The transaction will be completed. The terminal will print a merchant copy receipt automatically. Select the method for Customers Copy Receipt.
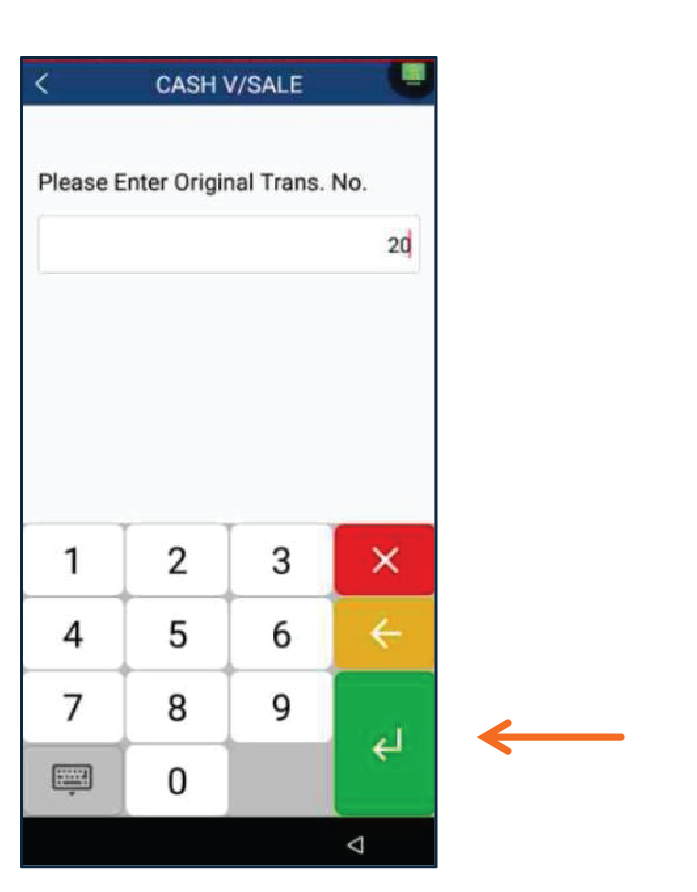
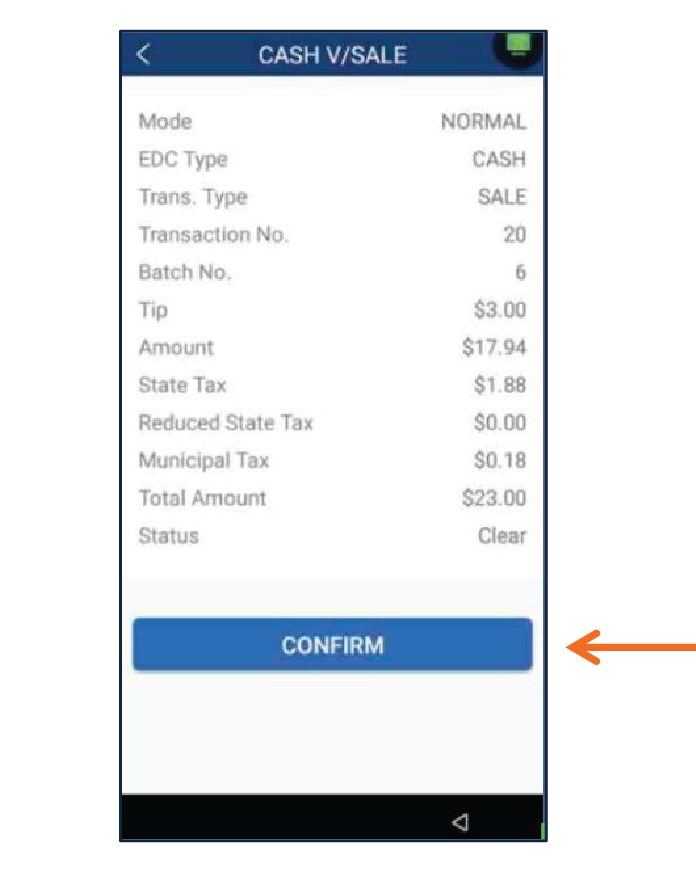
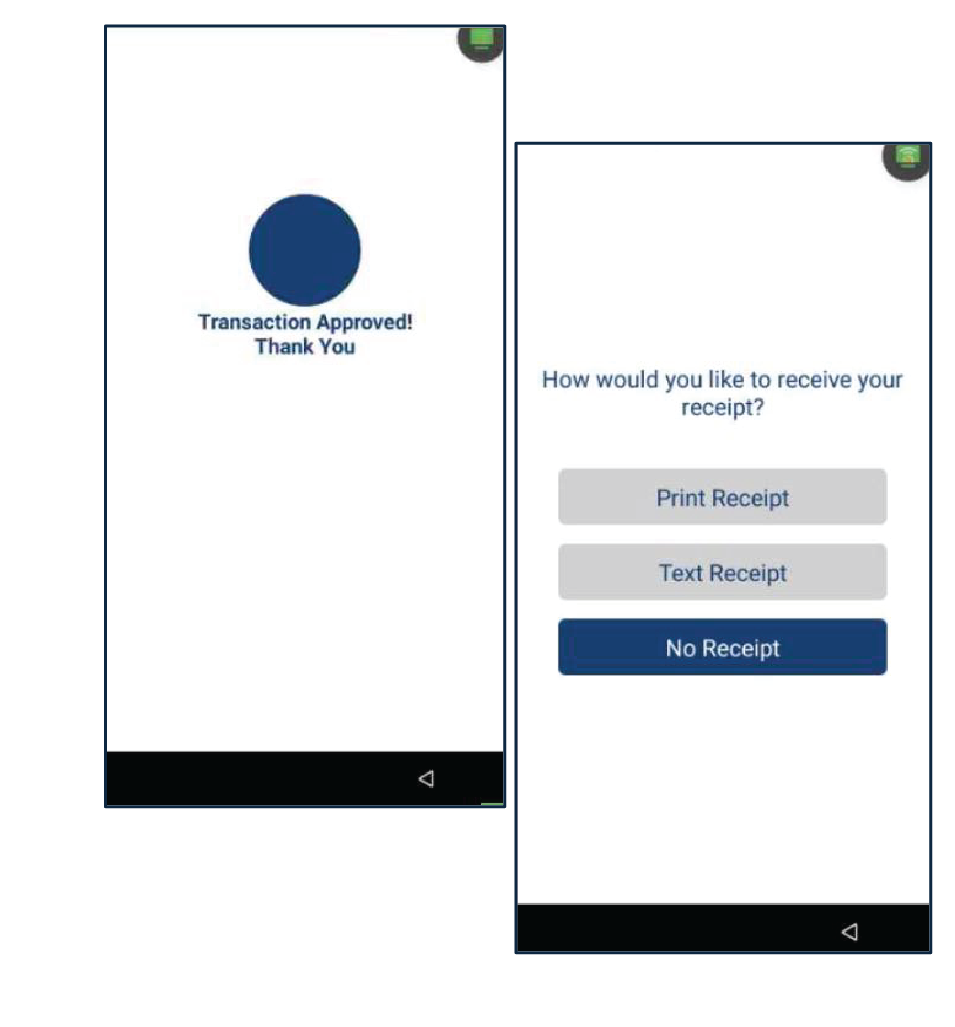
V/Sale
1
Press Cash. Then, enter the Manager Password. Press V Sale.
2
Enter the Original Transaction Number, then press Enter.
3
The terminal will display a summary of the transaction. Press Confirm to complete the Void transaction.
4
Select the method for Customers Copy Receipt: Print Receipt, Text Receipt or No Receipt.
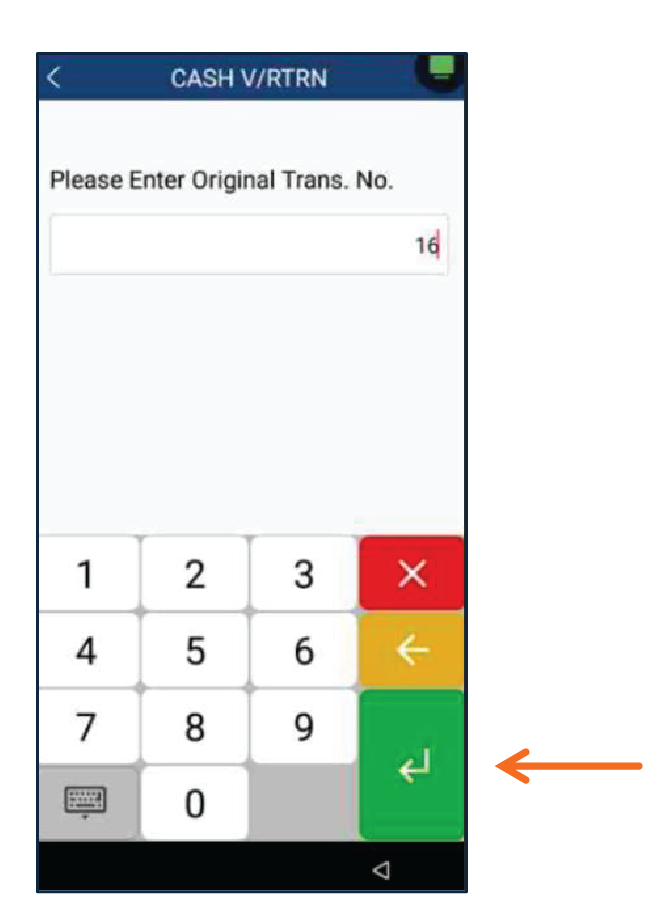
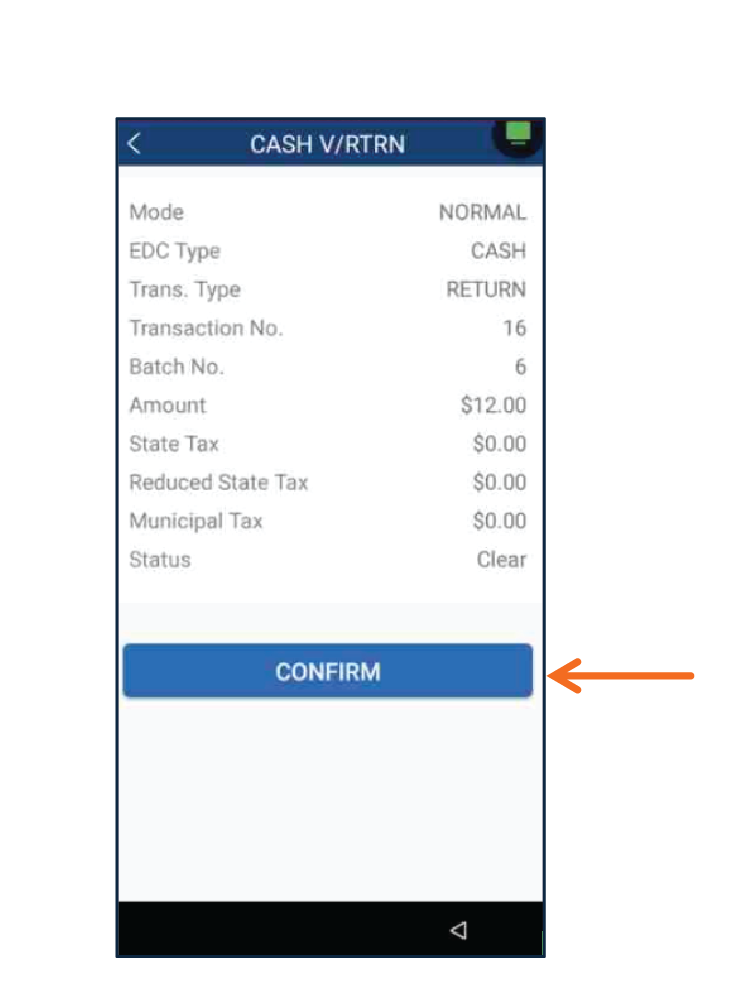
VRTRN
1
Press Cash. Then, enter the Manager Password. Press V/RTRN
2
Enter the Original Transaction Number, then press Enter.
3
The terminal will display a summary of the transaction. Press Confirm to complete the Void transaction.
4
Select the method for Customers Copy Receipt: Print Receipt, Text Receipt or No Receipt.
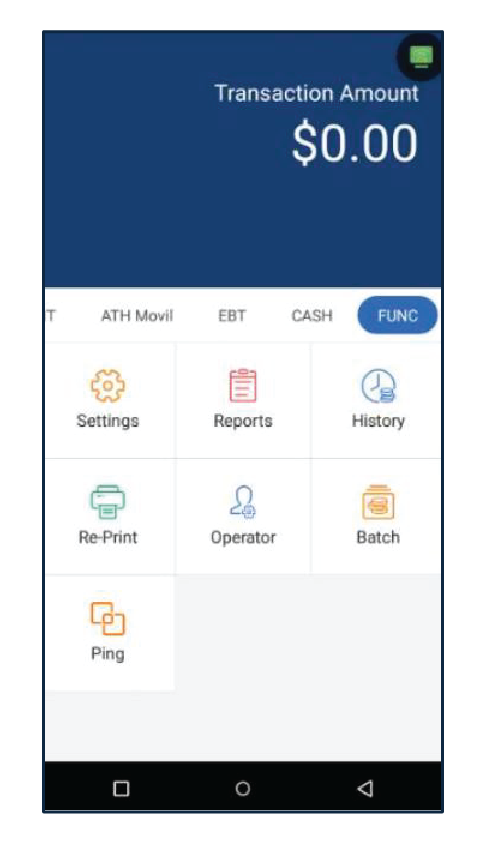
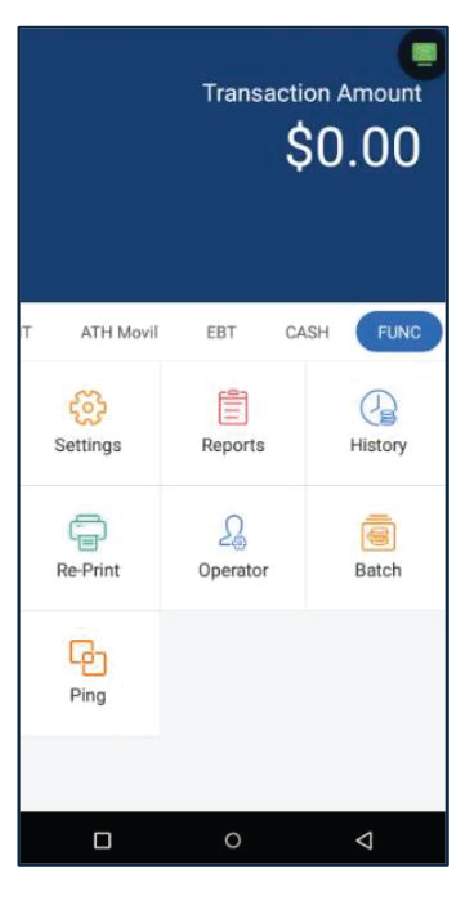
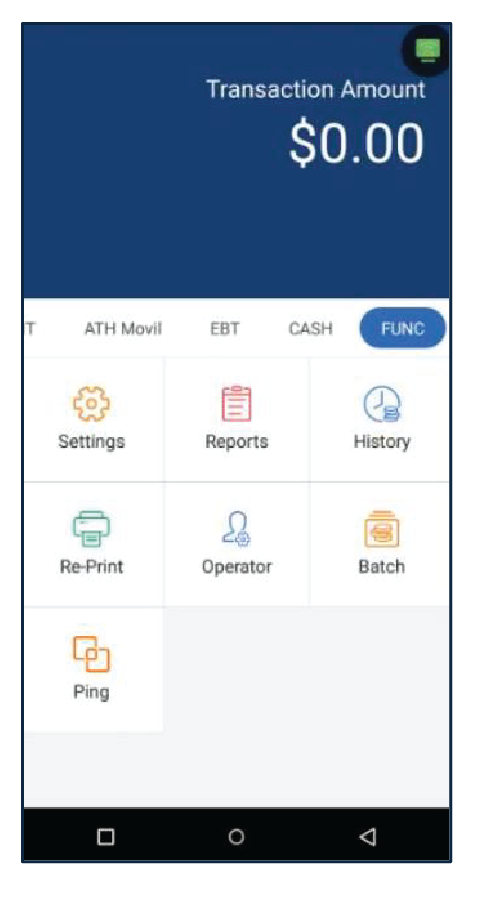
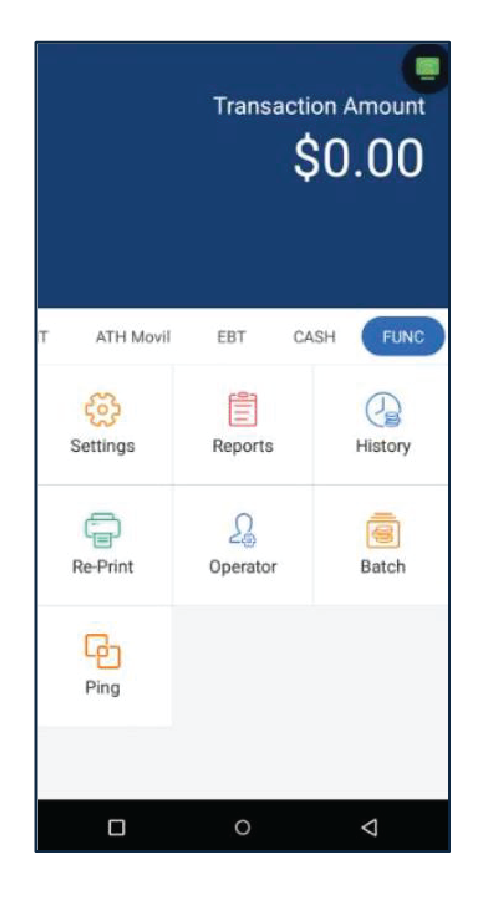
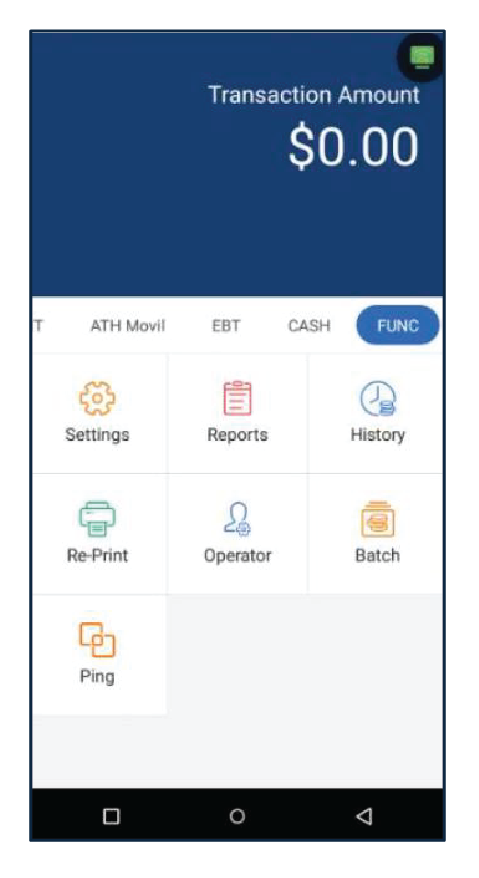
Functions
This section contains the main functions of the terminal, allowing the user to access and manage various essential settings and operations. The available functions include Settings, Reports, History, Re Print, Operator, Batch, Tip Menu and Ping.
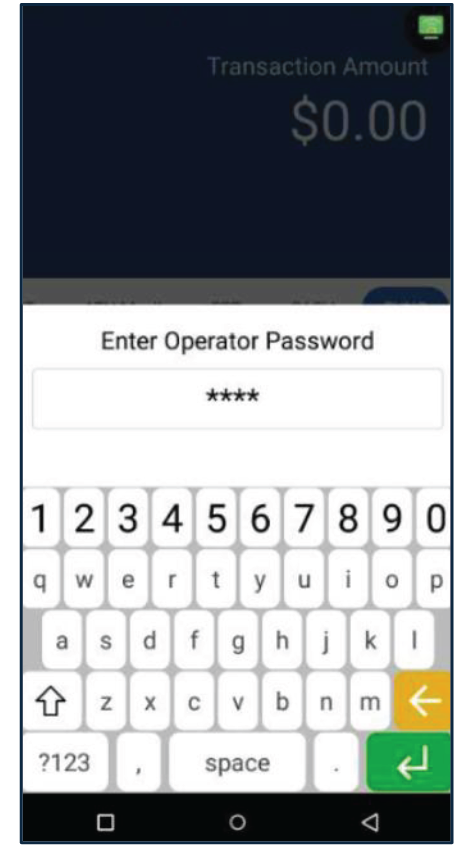
Note: For these functions, the terminal will request an Operator Password.
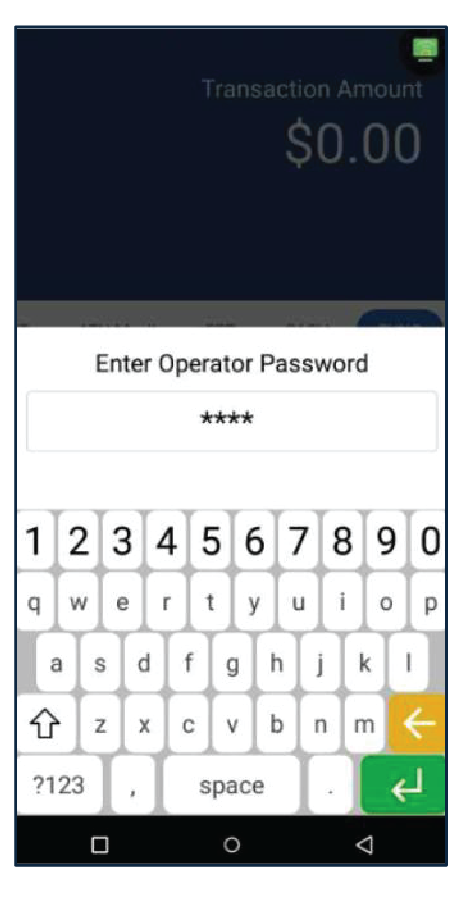
Reports
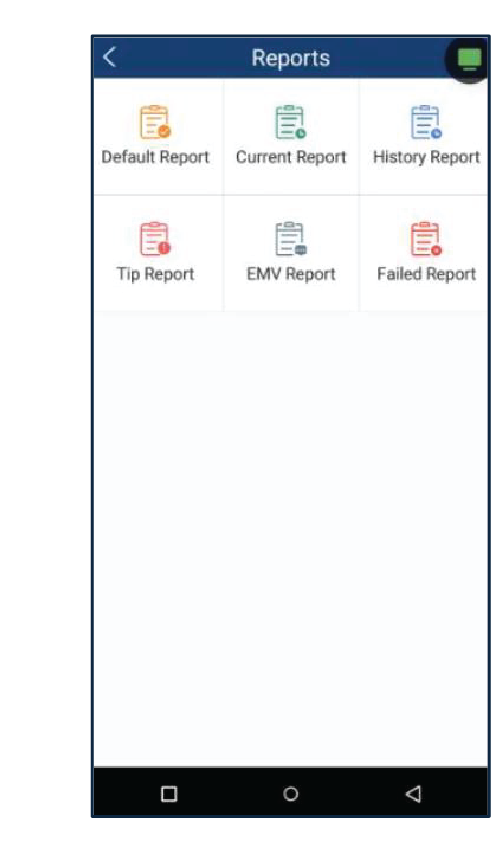
View and generate different types of reports, Default Report, Current Report, History Report, Tip Report, EMV Report and Failed Report.
1
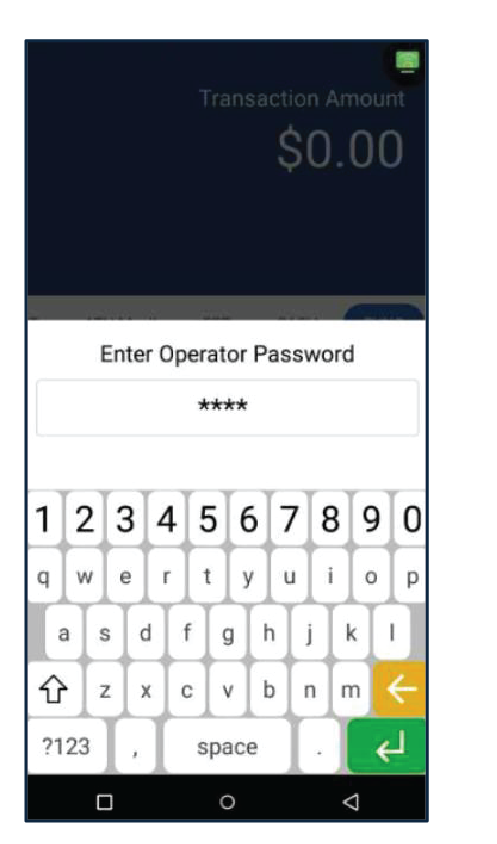
Press Functions then, press Reports.
2
Enter the Operator Password.
3
Select the type of report you would like to print.
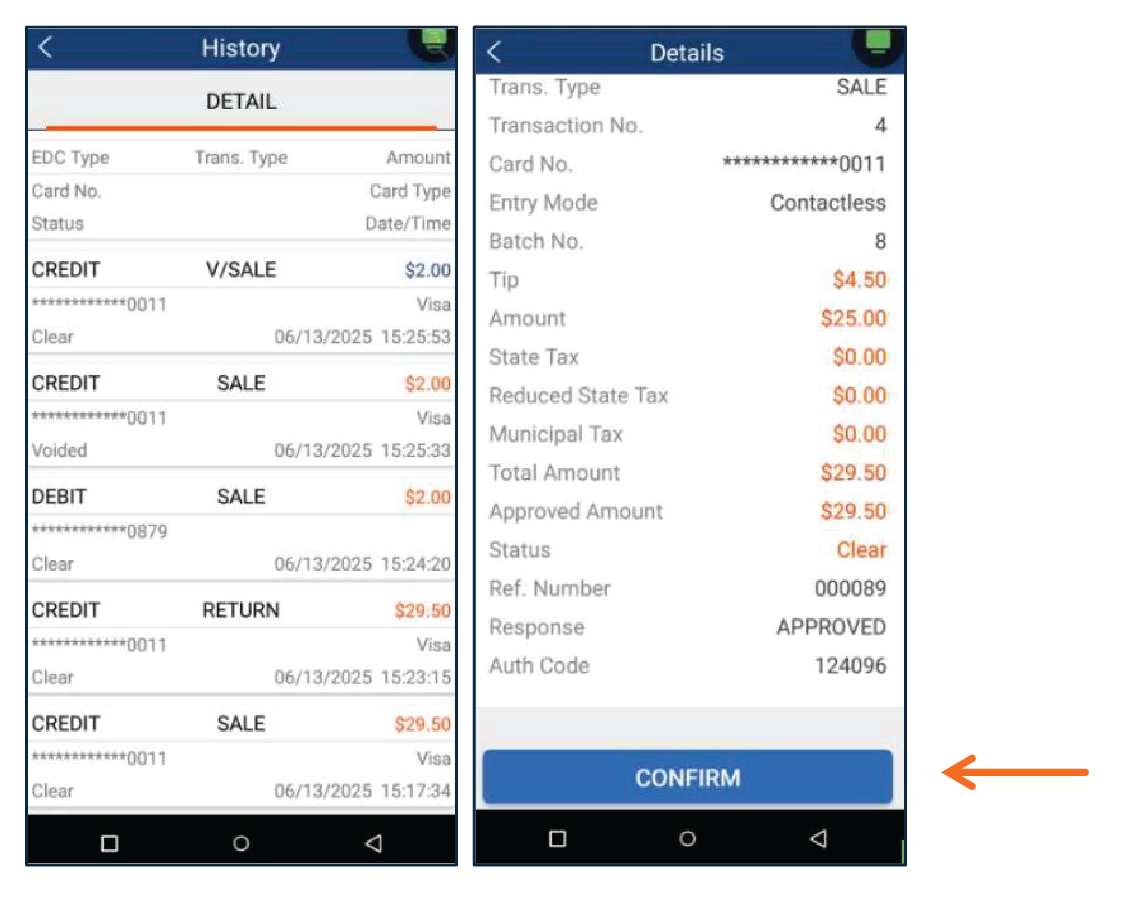
History
In this section, you can view a detail transaction history and search by invoice, server/clerk, transaction number, card type, or the last 4 digits.
1
Press Functions then, press History.
2
Enter the Operator Password.
3
The terminal will display a summary of all transactions. Select a transaction to view its detail. Press Confirm to return to the transaction summary.
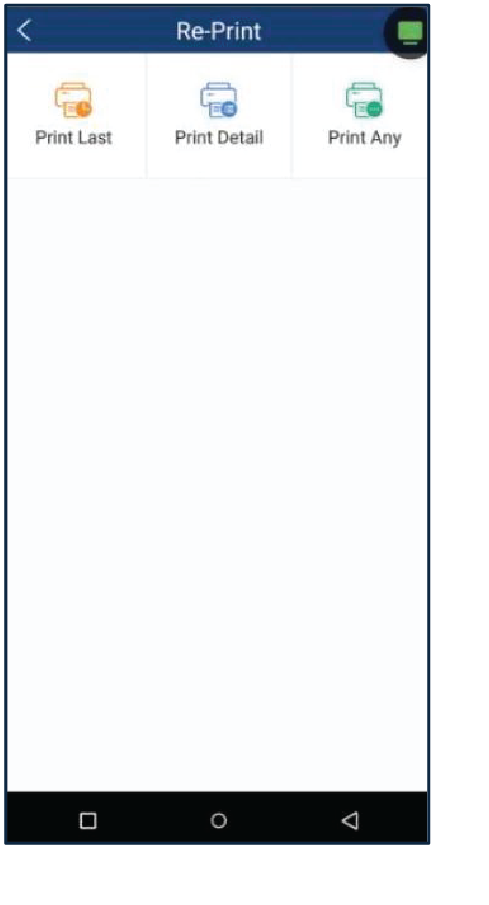
Re-Print
Below the steps to reprint a last transaction, a print detail or print a merchant or customer receipt.
1
Press Functions then, press Re-Print.
2
Select the type of receipt you would like to print: Print Last, Print Detail or Print Any. The terminal will print the receipt selected.
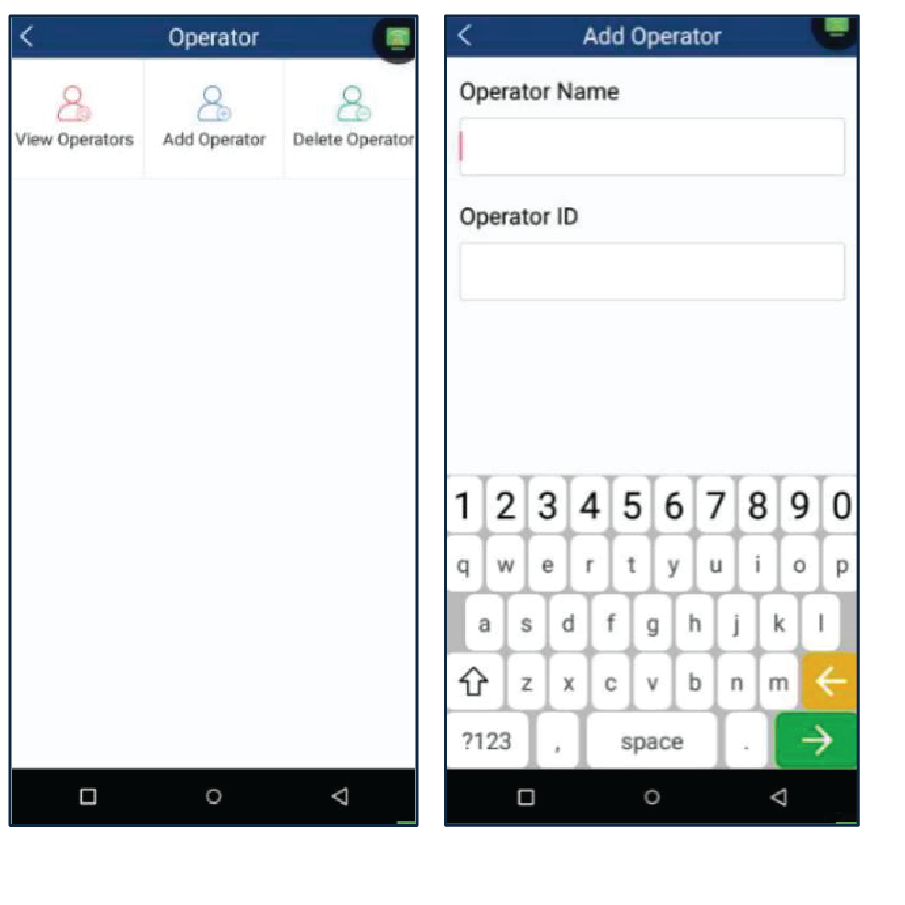
Operator
Below the steps to add, view and delete Operator users.
1
Press Functions then, press Operator. Enter the Operator Password.
2
Select Add Operator. Enter the Operator Name and Operator ID then, press Enter.
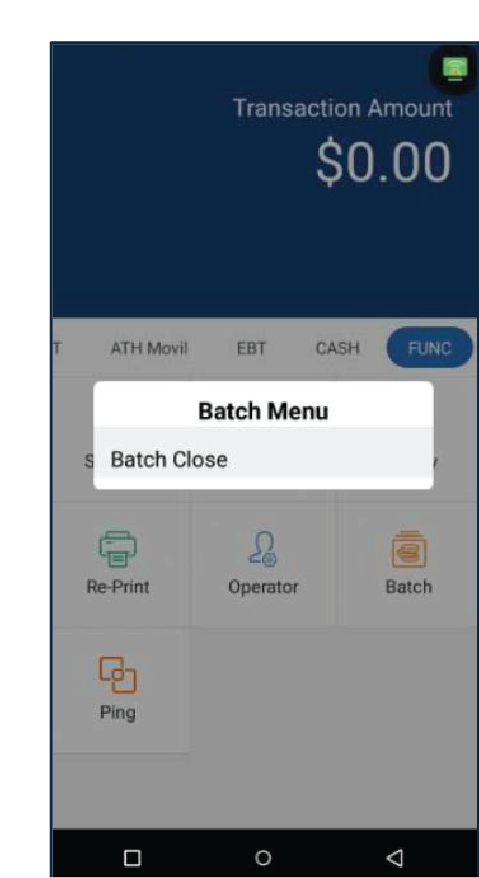
Batch
Below the steps to perform a batch close (Settlement) of the sales transactions.
1
Press Functions, then press Batch.
2
Press Batch Close. The terminal will print automatically a Condensed and Batch Report.
Ping
In this section allows the payment terminal to test its network connection and verify communication with the payment server.
1
Press Functions and press Ping
2
Enter the Operator Password then, press Enter.
3
On the screen it will display an URL address and a Ping timeout. Press Enter to validate the communication.
4
The terminal will display the result of the test (4 packets transmitted, 4 received). If the result is Network is not available or unknow domain, check the network setting.
Common Errors
In this section, some of the most common errors that may occur when using the terminal are described, along with their solutions. If the problem persists, please contact our Technical Support team at 787-751-1401.
1. Message – Transaction timeout
Description
Detail
Problem
This happens when there is a delay in entering the PIN number.
Cause
The PIN number was not entered in time.
Solution
Reprocess the transaction.
2. Message - Network unavailable
Description
Detail
Problem
Communication error, it could be due to a deactivated SIM card or disabled WiFi.
Cause
Communication issues.
Solution
Please refer to the Internet Connection and Ping section.
3. Message - 2-Chip Read Error
Description
Detail
Problem
Error reading chip card.
Cause
This error occurs when the card is not properly presented for contact reading.
Solution
Try placing the card again on the contact area.
4. Message – The EBT and Cash section is not displaying.
Description
Detail
Problem
The EBT and Cash section disappears.
Cause
This error occurs when the terminal is out of paper.
Solution
Load paper into the terminal.
5. Skip the Tip
Description
Detail
Problem
The customer wants to skip the tip and proceed with the payment of the purchase.
Cause
The terminal does not allow the payment to proceed if the customer chooses not to leave a tip.
Solution
Enter the amount $0.00 and press Enter to continue with the transaction payment.
6. Please Settle
Description
Detail
Problem
The terminal no process transaction.
Cause
The terminal does not allow transactions until a deposit is made. After three days without a deposit, the terminal will display the error: Please Settle.
Solution
The customer must make a deposit. In the Functions section, go to Batch. Then, go to Batch Close.
7. Call Help FE
Description
Detail
Problem
The terminal does not process transactions.
Cause
It does not allow any transaction and displays the message Call Help FE on the screen.
Solution
Please contact Technical Services at 787-751-1401.
FAQs
FAQs
1. Does the terminal have an external PIN pad?
Yes. Only the A80 terminal model can have an external PIN pad, which is the Q25 PIN pad. The A920PRO terminal models do not support an external PIN pad.
2. Does the terminal manage users?
Yes, the terminal manages users in the Operator section, where you can add, view, and delete users. To do this, you will need the Operator password.
3. Does the terminal require a password to process a manual transaction?
No, the terminal does not require a password to process a manual transaction.
4. Can the date and time be updated on the terminal?
No. Only the time zone can be updated through Settings > System > Date & Time.
5. How do you set the screen timer?
To set a timer on the terminal, go to Settings > Display > Advanced > Sleep. Then, select the number of minutes after which you want the screen to turn off. The terminal will display the selected number of minutes.
6. How do you process a refund transaction with a tip and tax?
If the sale includes tax and a tip, go to Payment section and then select Return. In the Amount field, add the subtotal of the sale and the amount of the tip that was added. The taxes should be entered in their respective fields.


 2
Enter the amount and add a Tip (If apply). On the insert/tap/swipe screen, the customer can pay with a credit card or a debit card.
2
Enter the amount and add a Tip (If apply). On the insert/tap/swipe screen, the customer can pay with a credit card or a debit card.
 3
Once the transaction is completed, the terminal will display the payment result (Approved, Declined, etc.). Select the method for customer's copy receipt: Print Receipt, Text Receipt or No Receipt.
3
Once the transaction is completed, the terminal will display the payment result (Approved, Declined, etc.). Select the method for customer's copy receipt: Print Receipt, Text Receipt or No Receipt.
 2
Enter the amount and taxes then, press Enter. Select tip if applies.
2
Enter the amount and taxes then, press Enter. Select tip if applies.
 3
On the insert/swipe/tap screen, the customer can pay with a credit or debit card.
3
On the insert/swipe/tap screen, the customer can pay with a credit or debit card.
 4
Once the transaction is completed, the terminal will display the payment result (Approved, Declined, etc.) Select the method for customer’s copy receipt: Print Receipt, Text Receipt or No Receipt.
4
Once the transaction is completed, the terminal will display the payment result (Approved, Declined, etc.) Select the method for customer’s copy receipt: Print Receipt, Text Receipt or No Receipt.
 2
Enter the amount and taxes (If applies) then, press Enter.
2
Enter the amount and taxes (If applies) then, press Enter.
 3
On the insert/swipe/tap screen, the customer can pay with a debit card.
3
On the insert/swipe/tap screen, the customer can pay with a debit card.
 4
Enter CashBack, select between suggested amount, other amount or no thanks. Enter the pin number to continue.
4
Enter CashBack, select between suggested amount, other amount or no thanks. Enter the pin number to continue.
 5
Once the transaction is completed, the terminal will display the payment result (Approved, Declined, etc.). Select the method for customer’s copy receipt: Print Receipt, Text Receipt or No Receipt.
5
Once the transaction is completed, the terminal will display the payment result (Approved, Declined, etc.). Select the method for customer’s copy receipt: Print Receipt, Text Receipt or No Receipt.
 2
On the insert/tap/swipe screen, tap to enter the card number.
2
On the insert/tap/swipe screen, tap to enter the card number.
 3
Enter expiry date and the CVC2.
3
Enter expiry date and the CVC2.
 4
The terminal will present a signature request on the screen, or it will automatically proceed after 30 seconds.
4
The terminal will present a signature request on the screen, or it will automatically proceed after 30 seconds.
 5
Once the transaction is completed, the terminal will display the payment result (Approved, Declined, etc.).
5
Once the transaction is completed, the terminal will display the payment result (Approved, Declined, etc.).
 6
Select the method for customers copy receipt: Print Receipt, Text Receipt or No Receipt.
6
Select the method for customers copy receipt: Print Receipt, Text Receipt or No Receipt.


 2
Enter the total amount, taxes and tip (if applies) then, press Enter. The terminal will then display the QR code to be scanned.
2
Enter the total amount, taxes and tip (if applies) then, press Enter. The terminal will then display the QR code to be scanned.
 3
Once the transaction is completed, the terminal will show the payment result (Approved, Declined, etc.).
3
Once the transaction is completed, the terminal will show the payment result (Approved, Declined, etc.).
 4
Select the method for Customers Copy Receipt: Print Receipt, Text Receipt or No Receipt.
4
Select the method for Customers Copy Receipt: Print Receipt, Text Receipt or No Receipt.

 2
Enter the amount then press Enter. Select Food Stamp.
2
Enter the amount then press Enter. Select Food Stamp.
 3
Swipe the card. Enter the pin number, then press Enter.
3
Swipe the card. Enter the pin number, then press Enter.
 4
Once the transaction is completed, the terminal will display the payment result (Approved, Declined, etc.). Select a method for the Customers Copy Receipt: Print Receipt, Text Receipt or No Receipt.
4
Once the transaction is completed, the terminal will display the payment result (Approved, Declined, etc.). Select a method for the Customers Copy Receipt: Print Receipt, Text Receipt or No Receipt.

 2
Enter the amount then press Enter. Select Cash.
2
Enter the amount then press Enter. Select Cash.
 3
Swipe the card to complete the transaction.
3
Swipe the card to complete the transaction.
 4
Once the transaction is completed, the terminal will display the payment result. Select a method for the Customers Copy Receipt.
4
Once the transaction is completed, the terminal will display the payment result. Select a method for the Customers Copy Receipt.
 2
Enter the amount then press Enter. Select Cash Voucher.
2
Enter the amount then press Enter. Select Cash Voucher.
 3
Enter the card number then press Enter.
3
Enter the card number then press Enter.
 4
Enter the Voucher number, press Enter. Enter the Authorization Code and press Enter.
4
Enter the Voucher number, press Enter. Enter the Authorization Code and press Enter.
 5
Once the transaction is completed, the terminal will display the payment result (Approved, Declined, etc.). Select the method for customer's copy receipt: Print Receipt, Text Receipt or No Receipt.
5
Once the transaction is completed, the terminal will display the payment result (Approved, Declined, etc.). Select the method for customer's copy receipt: Print Receipt, Text Receipt or No Receipt.
 2
Enter the amount then press Enter. Select Food Stamp Voucher.
2
Enter the amount then press Enter. Select Food Stamp Voucher.
 3
Enter the card number then press Enter.
3
Enter the card number then press Enter.
 4
Enter the Voucher number then press Enter. Enter the Authorization Code then press Enter.
4
Enter the Voucher number then press Enter. Enter the Authorization Code then press Enter.
 5
Once the transaction is completed, the terminal will display the payment result (Approved, Declined, etc.). Select the method for customer's copy receipt: Print Receipt, Text Receipt or No Receipt.
5
Once the transaction is completed, the terminal will display the payment result (Approved, Declined, etc.). Select the method for customer's copy receipt: Print Receipt, Text Receipt or No Receipt.
 2
Swipe the card and enter the pin number.
2
Swipe the card and enter the pin number.
 3
Once the transaction is completed, the terminal will display the payment result (Approved, Declined, etc.).
3
Once the transaction is completed, the terminal will display the payment result (Approved, Declined, etc.).
 4
Select the method for customers copy receipt: Print Receipt, Text Receipt or No Receipt.
4
Select the method for customers copy receipt: Print Receipt, Text Receipt or No Receipt.
 2
Swipe the card. Enter the pin number then, press Enter.
2
Swipe the card. Enter the pin number then, press Enter.
 3
Once the transaction is completed, the terminal will display the payment result (Approved, Declined, etc.).
3
Once the transaction is completed, the terminal will display the payment result (Approved, Declined, etc.).
 4
Select the method for customers copy receipt: Print Receipt, Text Receipt or No Receipt.
4
Select the method for customers copy receipt: Print Receipt, Text Receipt or No Receipt.
 2
The balance will be displayed on the screen, then press Confirm.
2
The balance will be displayed on the screen, then press Confirm.
 3
Once the transaction is completed, the terminal will display the result. The EBT card balance will be printed on the Customer Receipt.
3
Once the transaction is completed, the terminal will display the result. The EBT card balance will be printed on the Customer Receipt.
 2
Enter the amount and taxes (if applies) then, press Enter.
2
Enter the amount and taxes (if applies) then, press Enter.
 3
Select a tip, you can select Suggested Percentage, enter Other or No Tip.
3
Select a tip, you can select Suggested Percentage, enter Other or No Tip.
 4
The transaction will be completed. The terminal will print a merchant copy receipt automatically. Select the method for Customers Copy Receipt.
4
The transaction will be completed. The terminal will print a merchant copy receipt automatically. Select the method for Customers Copy Receipt.
 2
Enter the amount and taxes (if applies).
2
Enter the amount and taxes (if applies).
 3
The transaction will be completed. The terminal will print a merchant copy receipt automatically. Select the method for Customers Copy Receipt.
3
The transaction will be completed. The terminal will print a merchant copy receipt automatically. Select the method for Customers Copy Receipt.
 2
Enter the Original Transaction Number, then press Enter.
2
Enter the Original Transaction Number, then press Enter.
 3
The terminal will display a summary of the transaction. Press Confirm to complete the Void transaction.
3
The terminal will display a summary of the transaction. Press Confirm to complete the Void transaction.
 4
Select the method for Customers Copy Receipt: Print Receipt, Text Receipt or No Receipt.
4
Select the method for Customers Copy Receipt: Print Receipt, Text Receipt or No Receipt.